Using Wake on LAN on macOS

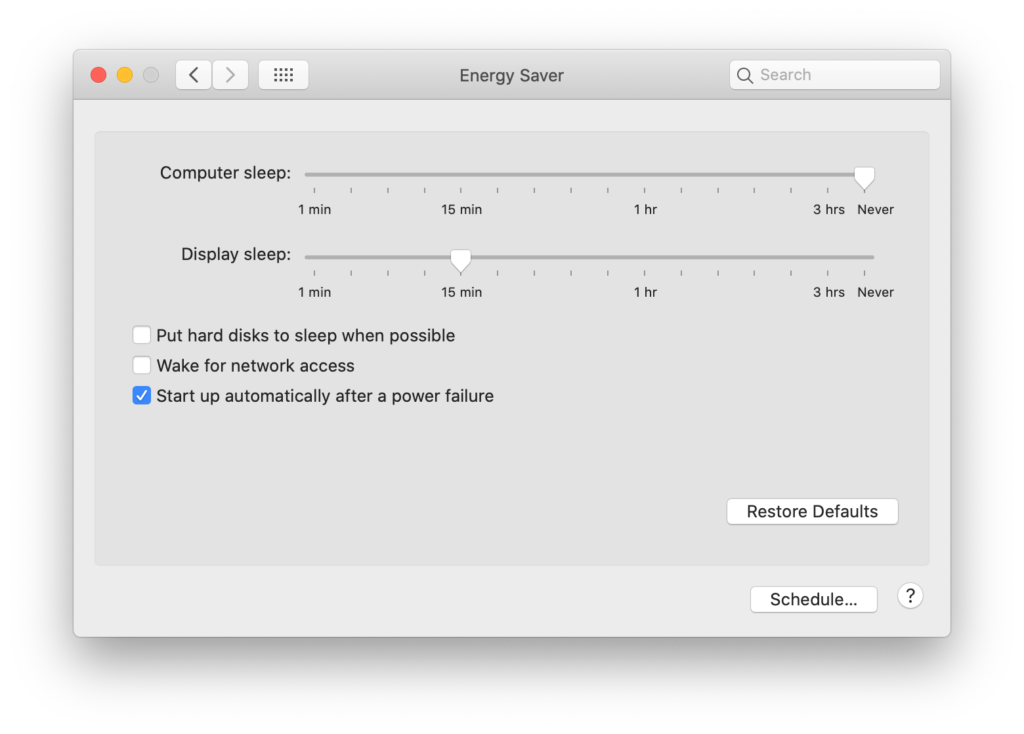
A couple of weeks ago I posted this little ditty about how to cold boot your Mac remotely, and one of the options nestled in the screenshot I included with that post was the intriguing “Wake for network access” checkbox.

It’s an option that I’ve mostly avoided paying any attention to over the years, because the computers I mostly tend to deal with are ones that are seldom (if ever) actually turned off. There are lots of reasons why this is the case, but they tend to fall into the two general buckets of This Computer Needs To Stay On Because People Are Getting Files From It, and the equally capitalized This Computer Needs To Stay On Because People Are Getting Services On It. The idea of needing to wake a computer remotely seemed a fringe issue at best, but oh how the wheel turns and time makes fools of us all etc etc.

We’re living in a world where remotely tinkering with non-servers is starting to be more of a pressing issue and a requirement than a suggestion. And there are ways of dealing with those kinds of requirements that aren’t immediately obvious. If you put the average, intelligent person in front of a screen with a checkbox marked “Wake for network access” then chances are they’d look up at the fact that the preference pane that the option is nestled in, note that it’s the Energy Saver pane, and come to the logical conclusion that if this is a place that controls when your computer goes to sleep and there’s an option there for something to do with waking over a network then it’s not a huge or illogical conceptual jump to decide that that if their computer was asleep and you tried to connect to it over the network then the computer would wake up.

This, it turns out, is absolutely true. And – in a more precise and accurate sense – an utter, utter lie. It’s entirely possible to wake your computer remotely, but there’s a specific way of doing it that isn’t immediately obvious and that isn’t ever really called out, and that way is by the implementation and use of a Magic Packet.

Okay, I should probably explain what a Magic Packet is. I could also call it a magic packet, sans capitalization, but that’s less fun, and if you’re going to reference supernatural capabilities in your IT doublespeak then you might as well lean into it. A Magic Packet is a specially-crafted network packet that contains the MAC address of the computer that it’s intended to reach, sent out over UDP to port 0, 7 or 9. It’s a highly targeted, highly specific finger prod to the sleeping computer that only that computer will respond to, and if you want to make one on your Mac then you have to jump through a hoop or two.

Firstly, you need a way to make a Magic Packet. This is probably unsurprising for anyone who’s read more than half a dozen of my posts, but I’m going to use homebrew to install a package to create and send said Magic Packet, thus:

brew install wakeonlan

Secondly, you’ll need some information about the computer you’re crafting the Magic Packet for – notably its IP address, the port number you’re aiming for, and its MAC address. The port number is 9 on macOS (at least, it is in every case I’ve seen so far, and if that doesn’t work you can try ports 0 and 7), and the command should be formatted something like this:

wakeonlan -i 10.0.0.1 -p 9 12:34:56:78:ab:cd

Plug that into the Terminal on the computer you’re trying to connect from, and all things being equal it’ll find its way to the targeted computer and raise it from it’s slumbers…

What I Have Been Doing On My Vacation.

While IT consulting (where the particular scope and method of execution I tend to pursue is as a sort of Freelance Sysadmin For Hire) is an essential service, I’m finding that things are… quiet on the job front. When your business is largely composed of helping other businesses design, implement and maintain their Apple IT infrastructure and those businesses are either on hiatus or just plain twiddling their thumbs, then you find your workload substantially reduced.

Which, actually, is fine by me; like most people in my particular nook and cranny of the industry I work by appointment and very flexible hours, and have been doing it long enough and well enough that work is always there. That’s great, but the downside is that one rarely has time to go and do new things, or branch out and try something new. Still, now I have more free time while the world descends deeper into lockdown, so I’m using that time to learn something more about Swift via the miracle of Swift Playgrounds.

Swift Playgrounds is squarely pitched at kids, but as a forty-six year old it’s not insulting or too dreadful, and if you have nothing else to do and a passing interest then I urge you to take a look. I’ve spent the last week or so working through a lot of lessons that require you to guide a weird little cartoon guy through mazes and picking up jewels and toggling switches, and once that’s done I’m going to have a crack at the 100 Days of Swift thing. I’m great at knocking out some quick and dirty bash scripts, but I have an Anthropology degree and plunged straight out of college into working in 1994 and have never really stopped since; ergo I have zero formal coding experience and have had to kind of reverse-engineer things and self-teach in odd trajectories as I’ve gone along.

So far it’s been a bit of an eye-opener for exactly how rusty I am in all kinds of areas. I’ve managed to get through the first module with moderate ease, but the second module is a mite more challenging because it falls squarely into the trap of all Coding-For-Idiots type things; that it’s clearly written by people who know what they’re doing.

I’m sure you know what I’m talking about. You want to learn about a thing, so you buy a book that purports to teach you about it in thirty days, or twenty-four hours or something equivalent. The subject matter is immaterial; it could be C++, brain surgery, or washing machine repair. Let’s say it’s washing machine repair because that’s more fun. At any rate, the first couple of lessons are helpful and practical; they explain the broad strokes of what a washing machine is and a high-level view of its operation and fundamental purpose (ergo, dirty pants and hot water and soap go in one end and clean pants come out of the other), and then they detail the major bits of the washing machine – the drum, hoses, knobs and switches and whatnot.

And then they blindfold you and throw you into the deep end of a swimming pool with chains and weights around your feet by launching into, I don’t know, spindle torque ratio and foot-pounds per inch of water filtration, because it doesn’t occur to the jerk who wrote the thing that you have at best a passing level of experience at the operation of the WashMatic 9000™, didn’t do much physics or math in school, and that the little you remember about those things is buried beneath the better part of thirty years’ worth of other stuff that turns out to be considerably more pressing on a day-to-day basis. You’re a moron, is what I’m trying to get across here. You’re a moron and the book is probably written for what an expert thinks constitutes a moron, which is in actuality a person who is a less-qualified expert.

Anyway, a lot of the bits of the second module so far are in the mold of “This is an open-ended challenge that you can address any way you like using the things you’ve learned,” and you look at that little cartoon chap and his gems and switches and profound lack of spatial awareness and elementary common sense and shake your head wearily.

Further, it’s clear that whoever wrote this thing subsists on a diet of lies, and does in fact have a very particular way that they want you to solve the puzzle, despite their protestations to the contrary. You can feel the silent judgment.

Still. I have a very good friend from back in the UK who has taken to calling this current moment an “Unexpected Holiday,” which I think is a wonderfully optimistic way of looking at things. This is time out from our regularly scheduled lives, and it’s best to look at it as an opportunity and not a curse. We can’t go to the gym (because gyms are plague houses) and we can’t see our friends except as tiny, blocky images on Zoom, and staring at the walls – while fun – has a definite shelf life, so we might as well try and do something useful with the time. If anyone needs me then you’ll know where to find me, but until then I’ll be trying to work out why none of my code works while a little cartoon man on my screen glares at me, radiating mild disappointment.

Remote cold booting your Mac

In this period of ongoing peril and, well, frankly terrifyingly uncertain business environment, I’ve talked to a lot of folks who are having to radically adjust the equipment they use and the way that they use that equipment; i.e., not being in the same room as some of the computers that they’re used to being in the same room with.

This is, let’s face it, mostly servers. Entirely servers, actually, and as seems to be the spirit of the age right now it’s clear that things were easier back in the Good Old Days. Of course, I’m not talking about the Good Old Days pre-pandemic; I’m talking about the days when you could pick up the telephone, break out your credit card, and talk to a nice person at Apple and give them a lot of money in exchange for an Xserve.

Xserves were fabulous. Yes, they weren’t price or feature comparable to some of the offerings you’d get from a good PC server vendor, and they lacked a lot of things like expandability and were sorely limited by their 2U standard height and the number of drives you could throw in one, but if you wanted a macOS (Sorry, “Mac OS X”) server then they were the only game in town and they did an excellent job. I’ve talked in the past about how loud they were, but they included such niceties as redundant power supplies and Lights Out Management (LOM) unit, which allowed you to do all kinds of hardware management that included remote-booting the thing.

You can’t do that with a Mac today. If the box on your desk or in your server room down the hall or (as seems to be the case of late) forty miles down the road in a locked, sealed building is off then there’s ostensibly no way of turning it on unless you’re willing to lean over and push a button, walk down the hall and push a button, or get in your car, drive through the proto-apocalyptic wasteland that we apparently now all live in, break into a building, and push a button. If your Mac suffers a power outage then you can absolutely check this box:

…and the thing will obligingly fire up once power is restored, and that’s great, but it’s not the same thing as being able to shut a computer down and then fire it up again.

However, as is often the case with this kind of thing, there’s a way of doing it through the command-line if you don’t mind getting a little dirty, and by dirty I mean performing a dirty shutdown. What’s a dirty shutdown, you ask? Well, I’m glad you brought it up, because it’s a neat little trick that’s built into the OS that allows you to combine all the convenience of a nice, orderly shutdown with the exciting thrill of suddenly yanking the power cable out of the back of the thing like some kind of foaming maniac.

If you look at the man page for shutdown, you’ll see the following options:

The one to pay attention to there is the -u flag, which normally comes into play when you have your computer attached to a UPS. When the power goes out and your UPS kicks in then the computer will struggle on for as long as possible, but providing your UPS has a management port and a USB cable that you have plugged into your Mac then when it in turn realizes that it’s about to run out of juice it’ll send a command to your Mac to shutdown, but instead of just sitting there once power is restored the UPS simulates a power cut so that your Mac automatically boots.

It’s ingenious, and also allows you to shutdown your Mac in a nice, orderly fashion and then once you’re ready to reapply power it’ll automatically fire up instead of sitting there like a big metal lump.

So, if you just shut your Mac down from the command line by typing in sudo shutdown -h now then it’d halt the system, quit everything that needed quitting, and turn itself off in a neat, orderly fashion. Whether you manually disconnect power or not, the computer will require you to physically power it on by hitting the power button.

But if you invoke the -u flag and type in sudo shutdown -h -u now then the computer will do all the sensible, practical, good-housekeeping things you’d expect from a proper shutdown, and then tell itself that the power was unexpectedly disconnected so that when power is restored the computer will just fire right up.

“That’s great,” I hear you say. “But what good is it if, as you mentioned earlier, I’m stuck at home in glorious self-isolation with a year’s worth of bathroom tissue while the End of the World rages around me?”

Well, firstly that’s a little hysterical of you, but I’ll skate over that bit because you make a decent point. Where this option is useful is if you have a UPS with a network connection and remote on/off capabilities. There are options out there; just because there’s no LOM still extant on the Mac doesn’t mean that you can’t effectively outsource that component – just remote into the Mac, issue the dirty shutdown, then hop onto the UPS and turn it off or (if it’s possible with your model) turn off the power to the Mac. When you want to cold boot your Mac you just remote into the UPS, power it on, and that in turn supplies power to the Mac which – because it thinks it was unexpectedly shut down – automatically boots from cold, leaving you at the login screen.

Roll your own Fusion Drive

This was a fun little project I poked around in recently while helping another ACN member with a data recovery project.

Back when Apple started shipping computers with Fusion drives, said Fusion drives were wonderful things. Essentially what they did was pair a 128GB SSD with a 1TB+ rotational hard drive and use CoreStorage to create a LUN that packed the two together and gave you the best of both worlds; a fast drive that held data for immediate use and a slower drive that was substantially larger and fed data to the fast drive. What you ended up with was what appeared to be a 1TB+ hard drive that was somewhat slower than a (greatly more expensive) SSD, but a lot faster than a regular 7200 rpm hard drive.

The trade off was that – at least in the Mac mini – that reduced the number of available drive slots to one, which was frustrating because the prior generation of Mac mini had two drive slots, thus allowing you to make a mirrored RAID of the boot drive. Which was very handy if you were using said Mac mini as a server, which a lot of people were doing. To get around the issue I’d break the Fusion drive into it’s constituent elements – a 128GB SSD and a larger hard drive – and then create a RAID mirror of the two. It wasn’t ideal (because the mirrored RAID would take the size of the lowest element – i.e., you’d only be able to use 128GB out of that 1TB+ hard drive), but if you were really just looking to use the internal drives for boot data and some caching then it was just fine. After all, actual user data would usually sit on a fast external RAID anyway.

Breaking the Fusion drive was pretty straightforward, and worked thus:

• First, boot from an external drive or put the Mac mini in Target Disk Mode, connected to another Mac.

• Second, open the Terminal and plug in diskutil coreStorage list to get a list of all the connected coreStorage volumes.

• Third, make a note of the logical volume group universal unique identifier (or lvgUUID if you don’t want to have to say that all the time). It’s a 32-digit number expressed in five groups, and it looks something like 1234a678-1a23-1b23-1c23-1234567890ab

• Finally, append that lvgUUID to the end of a diskutil command to delete the LUN, thus: diskutil coreStorage delete 1234a678-1a23-1b23-1c23-1234567890ab

Lo and behold, you’d now have a plain, regular, basic SSD and hard drive available for your RAIDing pleasure.

But what if you want to go the other way? If you have a small SSD and a large hard drive and you don’t really want two drives clogging the joint up and would prefer one faster drive? Well, it turns out that rolling your own Fusion drive requires a couple more steps than breaking one, but isn’t that difficult.

• First, get a list of disks connected to your Mac by typing diskutil list

• Choose the disks you want to use for your new Fusion drive. Let’s say they’re /dev/disk1 and /dev/disk2

Note: Exercise caution and take a moment over that last step. Where things go from this point on involve erasing and breaking things in your computer. Make absolutely sure that you’ve chosen the correct disks because otherwise Very Bad Things can happen.

• Type diskutil coresStorage create MyNewFusionDrive /dev/disk1 /dev/disk2

• You’ll be shown another lvgUUID. Make a note of that, as you’ll need it in the next step.

• Use that lvgUUID to create a new volume, stipulating the name, type, and amount of the drive you want to use. For example: diskutil coreStorage createVolume 1234a678-1a23-1b23-1c23-1234567890ab "NewFusionDrive" jhfs+ 100%

…and that’s about it. You should now have a new Fusion drive on your desktop.