I’ve not been shy about wearing my love of Synology Diskstations on my sleeve. As an IT Consultant it’s fairly common to establish a set of tools or recommendations that are go-to options you regularly put in front of clients, but the true test of whether or not those tools and recommendations are worth considering is to turn to your IT person and ask them if they use those in their own businesses. Some things don’t make that cut because they don’t necessarily apply (for example, I have no need of an Okta setup) and others are either cost-prohibitive or simply recommended due to a paucity of options. The NAS space falls into all of those prohibitions, but it says something that a lot of consultants I regularly work with eat their own dog food when it comes to Synology. I know I do. I’ve bought two of the things, after all, and they were both purchases that not only fail to fill me with regret, but that make me quietly relieved. They’re the kind of thing that you put in place, configure, and then leave alone knowing with absolute certainty that they’re doing their job, and that you don’t have to worry about them.
It’s the configuring part that’s kind of interesting, though. There are options in that area that you can go with out of the box that hit the essentials of whatever you’d like to do, security-wise; either keep the thing off the internet entirely, use Synology QuickConnect, or use a VPN.
QuickConnect is fine, but it’s not exactly bullet-proof. Any time you’re opening up a device to the internet at large you’re painting a target on its back, and yes, QuickConnect offers some reasonable protections but it’s fundamentally a way for remote users to connect to specific services, and as such requires exposure of those services. There are times when it’s the only option (when, say, your NAS is hosted at your office behind a captive portal), and there are a lot of things you can do to beef up security to compensate (locking down ports and services, setting up a reverse proxy, using your own domain name, extensive 2FA usage and so on).
Fortunately, setting up a VPN on your Synology box is easy to the point of trivial (provided your DiskStation has a routable connection to the internet that you have some kind of control over. You’ll need to be able to open the appropriate ports for VPN.)
Synology VPN Server is freely accessible from the Package Center of your DSM – once downloaded, open the VPN Server package and click on OpenVPN to configure it. Doing that is terribly simple; just check the “Enable OpenVPN Server” box, choose the maximum number of connections you want to enable.
Note the port that’s opened (1194), and if you want to allow users to connect to other devices and services on the target network then you’ll need to check the box marked “Allow clients to access server’s LAN”.
Synology can do a lot of the heavy lifting for you if you’re lucky enough to have a router that its router configuration (Control Panel -> Router Configuration) can talk to. If you’re in that group then the wizard can walk you through configuring port forwarding; if you’re not then you’ll have to go get access to your router and manually set up port forwarding for port 1194. Going into that is somewhat out of the scope of this article. I mean I can’t see your router model, or write directions for every single one. I’d be here all day.
“But,” I hear you ask, “doesn’t this only apply if you have a static IP address? How will the internet know where my Synology is? My internet provider is terrible and only gives me static addresses if I sign up for their exorbitant business account that’s vastly slower than a residential account despite the fact that it’s on the same exact line and using the same exact modem!”
This is a good point (although oddly specific). Happily, Synology DSM makes it extremely simple to set up DDNS. In the Control Panel, choose “External Access” and then click the DDNS tab. If you have an existing DDNS setup (mine is hosted with dyndns) then you can enter your credentials here, or else opt to use Synology’s included DDNS solution (synology.me). The DDNS client on the Synology DSM runs out and talks to Synology’s DDNS server and updates its current address.
After that, it’s simply a matter of configuring your VPN Client to connect to your newly-created VPN. Handily, you can do a lot of the work by clicking on the “Export Configuration” button at the bottom of the OpenVPN configuration window. This will download a text file and a certificate that you’ll need to install onto your computer to work with your OpenVPN client – Synology includes a helpful read me file that details exactly how this process works and recommends an OpenVPN client for each major platform.
So, there you have it; a simple way to connect to your own network when traveling or working remotely, safe in the knowledge that you’re protected from man-in-the-middle attacks and able to access your critical data in a secure and safe manner.
This, ladies and gentlemen, is what Apple thinks is an iMac Pro:
Behold. (Please ignore the horrible rug.)
Now, for those of you who don’t pay a lot of attention to Apple’s product line (and who probably have better things to do) it should be made clear at this point that this is not, in fact, an iMac Pro. Or any kind of iMac for that matter. iMacs have the computer and screen built into one slim, stylish, power unit, whereas this is a massive, forty-pound hunk of scratched and scarred Aluminum hewn into something resembling a giant cheese grater, and then covered in faux-wood because its owner had a bunch of faux-wood wrap kicking around and was sick of looking at a lot of scratches. More precisely, this is a 2009 Mac Pro, and even more precisely, it is my 2009 Mac Pro.
I love this machine because it is, not to put too fine a point on it, completely bonkers. While there’s every reason for it to exist, there is no reason whatsoever to be using an eleven year-old computer in a world where the massive leaps in processor and design technology make this akin to an abacus. A computer from 2009 is slow, has terrible graphical abilities, and lacks the modern conveniences that we take for granted in terms of interfaces and technologies. Using one is to obey the same impulse for anachronism that makes young men grow ironic beards, smoke pipes, and ride penny-farthings.
Except, actually, this is none of these things. Because while old computers are slow, a lot of them are also expandable, and a lot of those expandable bits are not slow and terrible, but are fast and decent. I bought this thing for about two hundred dollars and augmented it with bits of dead computers and assorted projects I’ve accumulated over the years, and now it’s chock full of fast storage, has oodles of memory, and two six-core Xeons. That’s twelve Xeon cores. Twenty-four threads! I feel that I’m not sufficiently making this accessible to people who don’t know or care about Xeons or cores, but think of it this way; imagine if you woke up one morning, had got dressed, had breakfast, bid farewell to your nearest and dearest, got in your car to go to work, turned the key in the ignition and instead of hearing the modest, pedestrian burble of an inline six you were presented with the sound of a Furious Titan Roaring A Battle Cry Unto The Gods And Breaking His Fists Against The Firmament?
Yeah, so, it’s basically that.
So, this thing isn’t slow and awful and ugly and stupid. Okay, yes, it’s ugly, but none of the rest is true. The video card in it is equivalent to the one that comes in the new Mac Pro. It has a lot of slots to put cards and upgrades in, has the wireless bits from a newer, dead MacBook Pro so that it can do all the wireless things that modern computers can do, and you can even plug your fancy USB-C peripherals into an expansion card in the back.
What you can’t do is use it with macOS Catalina or macOS Big Sur.
Now, I kind of get that; if you’re Apple then there are some very solid reasons not to support a machine of this vintage. While those Xeons are mighty they’re prone to some security flaws that make this machine a bad fit for some very specific niches and industries, and Apple’s not in the habit of issuing software updates that are going to open up customer data to any kind of intrusion. Still, a lot of people (like me) aren’t going to be using their computers in any kind of situation that might make that threat remotely likely, and would really like to continue using their big, ugly computers.
Happily, this is technically possible with only a modicum of headache because those Xeons I keep rattling on about are also the types of processors that run in Apple’s current iMac Pro and Mac Pro computers. Admittedly the processors in my stylish, mock-oak Mac Pro are somewhat slower and older in vintage, but they’re basically the same creature, so technically they should work, Right?
Right. And, it turns out, the process is fiddly but not as horrible as you might expect.
(Note: If you have a Mac Pro 5,1 (or a 4,1 upgraded to 5,1) then the following will probably work for you as written. If you have neither of these machines but your computer is of an older vintage and you want to try and run a newer operating system than you technically should, then you can read along and take in the general points and input, but I’m in no way guaranteeing that any of this will work. Also, back up before trying any of this, and if you’re even remotely concerned about this just back away now. This is the kind of thing that would violate your warranty if there was the remotest possibility that anyone of sound mind would warranty an eleven year old computer, but still, beware. Your Mileage May Vary. Caveat Emptor. Cave Canem. Don’t Walk On The Grass.)
First, some provisional considerations. You’ll need a metal-capable graphics card and to upgrade your Mac Pro to macOS Mojave in order to upgrade the BootROM to 144.0.0.0.0 (which will also allow you to use NVME drives) and once that’s done boot into Internet Recovery and disable SIP by typing csrutil disable in the Terminal.
Secondly, you should look at this thread on macrumors.com. It’s enormous and where I got a lot of this information from, but be warned; there’s a lot to trawl through there – which is why I’ve put this more concise walkthrough together.
Next, you’ll need to download the latest version of OpenCore from this GitHub repository. Once downloaded, open the OpenCore folder, where you’ll see something like this:
Next, copy this and paste it into a new non-rich text document. Warning: this is very long:
Take this new document and save it as “config.plist” (check again that it’s plain text and not rich text) and then drop it into the /EFI/OC directory, thus:
This file is a copy of the config file I’ve been playing with and using, and is set up to allow OpenCore to identify itself as an iMac Pro and allow it to get actual Apple updates. Again, this works fine for me, but I make no warranty that it’ll work for you.
Next, it’s time to engage in some command-line trickery pertaining to EFI – the Extensible Firmware Interface. EFI is a partition on a disk that the computer looks at when powering up to get an idea of what hardware is running on the computer, and once it has that information the computer uses that information to boot the operating system. In editing that config.plist file we’re telling the Mac Pro at the very lowest and most fundamental level that it is something that it isn’t, and also supplying some additional bits of code to allow it to function accordingly.
In order to do any of that we have to get at the existing EFI partition so we can tinker around with it, so fire up Terminal and enter the command diskutil list – you’ll end up looking at something like this:
Yes, my Terminal is set up to look like MS-DOS. I’m easily amused.
What you see here is a list of every disk and volume on the computer, but we’re only interested in the EFI volume at disk0s1. In order to get your hands on that, enter this command to mount the volume in the Finder:
sudo diskutil mount /dev/disk0s1
Once that’s mounted, take your new and improved EFI folder that you got from OpenCore and put it into the top level of your disk’s EFI volume, thus:
Finally, cross your fingers and reboot your Mac Pro.
All things being equal you’ll be able to use your computer as per normal (with the exception that if you’re using a non-Apple video card you’ll now have a boot picker that you didn’t have before). I’ve actually tried this file on two Mac Pros – one of them worked perfectly the first time and the other failed to see the startup disk, but I was able to boot into Internet Recovery and choose the existing startup disk, and then reboot into that disk without further incident.
You should also be able to install macOS Catalina or (as of this writing) the latest beta release of macOS Big Sur. As an amusing side benefit, you might also be given a notification thanking you for the purchase of your iMac Pro and offering you a guided tour of the computer that you don’t actually have…
I don’t think I wrote anything last week, which is something I feel low-grade anxiety about. One of the things I’ve been trying to do as some sort of Psychic-Goat-Sacrifice-To-The-Apocalypse-Gods is to knock out a few words of wisdom now and again so that I can tell anyone who cares that I’m trying to put some positive energy out in the world or somesuch. It’s a lie, of course; I’m just writing things down because I have more free time to bang my head against problems these days, and if I don’t record that stuff then I’ll just forget.
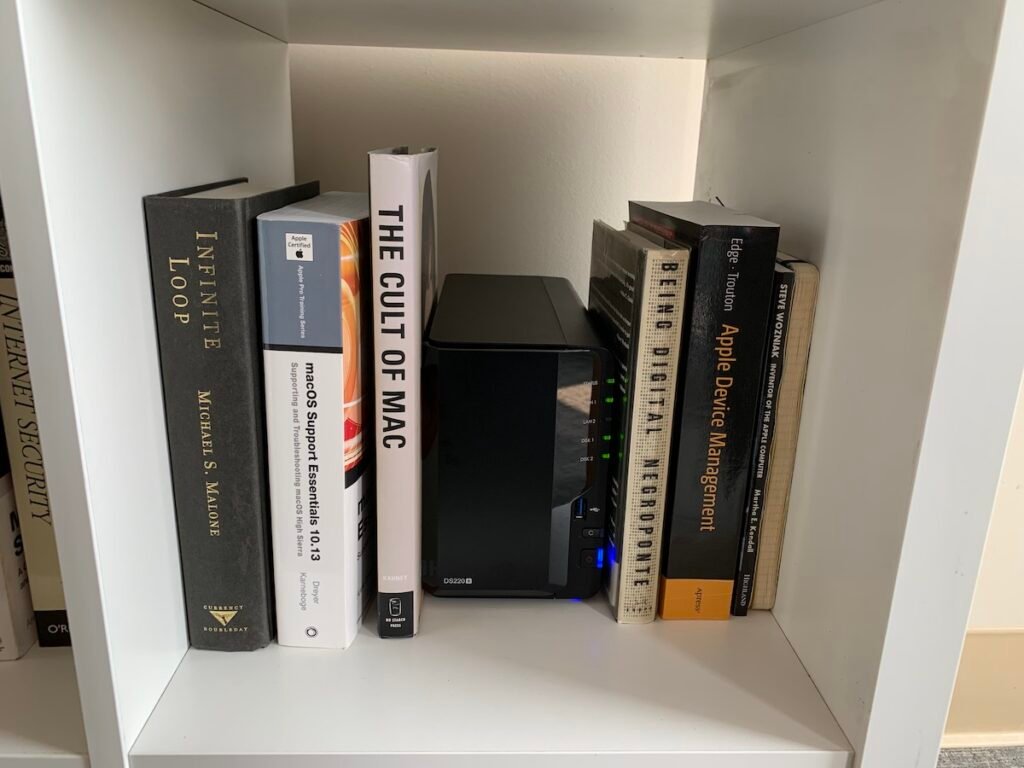
I’m good at forgetting things. Not maybe-I-should-seek-professional-help good, but definitely in pro-am territory. Happily, technology has solutions for people like me, and those solutions tend to be the common-sense, regular solutions that I’ll cheerfully recommend to anybody who’ll pay me to have an opinion; keep your data safe and accessible, and back it up. A lot. Equally handily, there’s a relatively simple thing for doing that – a NAS. Specifically (in this case) a Synology DiskStation 220+, nestled discreetly in a bookshelf:
Brad – I still have your Negroponte book. Sorry.
I love Synology DiskStations. They’re an excellent piece of kit, striking the line between full-featured and accessible, allowing you to do pretty much anything you want with data without making the process utterly incomprehensible. They’re the perfect $300-if-you-have-your-own-drives solution for the enterprising young IT consultant on the go, and while the latter part of that sentence seems unduly optimistic, the three hundred bucks part rather does the heavy lifting, value-wise.
The problem with having one of these in my office is that they don’t support WiFi, and the only internet I have in the office is WiFi, and there’s literally nothing that I can plug anything into to get internet via the customary physical route, i.e., a cable.
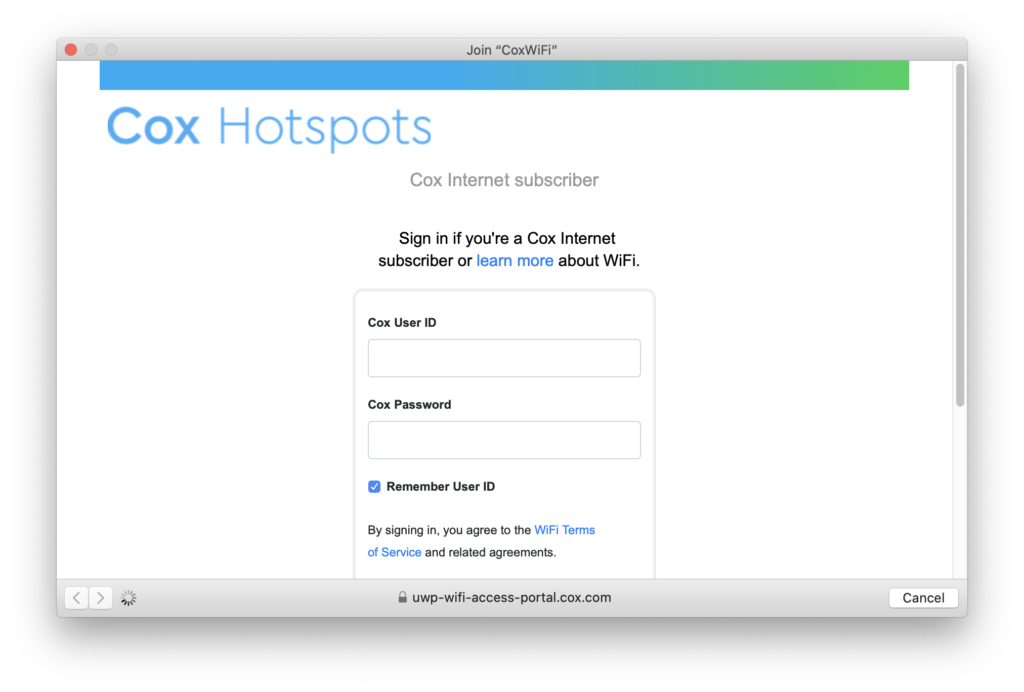
So, a problem. What I really needed was to find a way to bridge the wireless connection in the office (via Cox Wifi and their Captive Portal) to the Synology box, and at first blush this seemed pretty simple.
When you first sign a new device onto the Cox Hotsports Captive Portal (which I’m going to call “WiFi portal” from now on to save a lot of typing) it prompts you for your credentials, and once you’ve entered those you’re able to stay logged in to the network for as long as you might possibly want, because what the WiFi portal does is capture your MAC address, checks to see if it’s authorized to use the network, and then if not gives you a prompt for your username and password. If you have a web browser installed on your computer (which you do because otherwise I’d be intrigued to know how the hell you’re reading this) then most of this is done for you. But the Synology DiskStation has no web browser, and even if it had one it has no WiFi hardware that would allow it to connect to the WiFi network in the first place.
Oh dear.
So, I have no ability to use the Synology with WiFi, but I do have a number of large boxes filled with cables and assorted bits of networking gear of assorted vintages. Trawling through those boxes yielded one part of the answer in the form of an Apple Airport Express.
These are little puck-sized wireless boxes that were mostly designed to extend existing Apple Airport networks, but also did decent duty as simple routers that you could use to create wireless networks. One of the great things about them is that the built-in Airport Utility software in macOS gives you the option to Join A Wireless Network, which effectively turns the Airport Express into a little wireless bridge. In English: you select this option, choose a WiFi network to connect to, WiFi goes into the box, and internet comes out via a cable. Perfect. Except that there’s no web browser installed on the Airport Express so you can’t sign it into the WiFi portal, which was the same problem we had when we started.
Except no, it really isn’t. What’s happening when you use your web browser to sign into the WiFi portal is that – as I mentioned before – the first thing that happens in the process is that the portal looks at your MAC address and decides whether or not you’ve connected before. If you can tell the portal that the MAC address its looking at is one that it’s seen before then the portal will simply allow the device that bears that MAC address to connect to the network, no questions asked.
So, let’s start lying to the WiFi portal about who we really are. To do this we’re going to temporarily change the MAC address of your computer so that you can use it to connect to the WiFi portal, and then once that’s done whatever device that actually owns that MAC address will be able to connect. This is done via the command line with the following command: sudo ifconfig en0 ether 00:11:22:33:44:55 (where 00:11:22:33:44:55 equals an actual MAC address and not a lazy placeholder). You’re going to do this more than once, so if you’re like me and enjoy tinkering with your whole Terminal environment then you can add it as an alias to your .zprofile, thus:
alias mac='sudo ifconfig en0 ether'
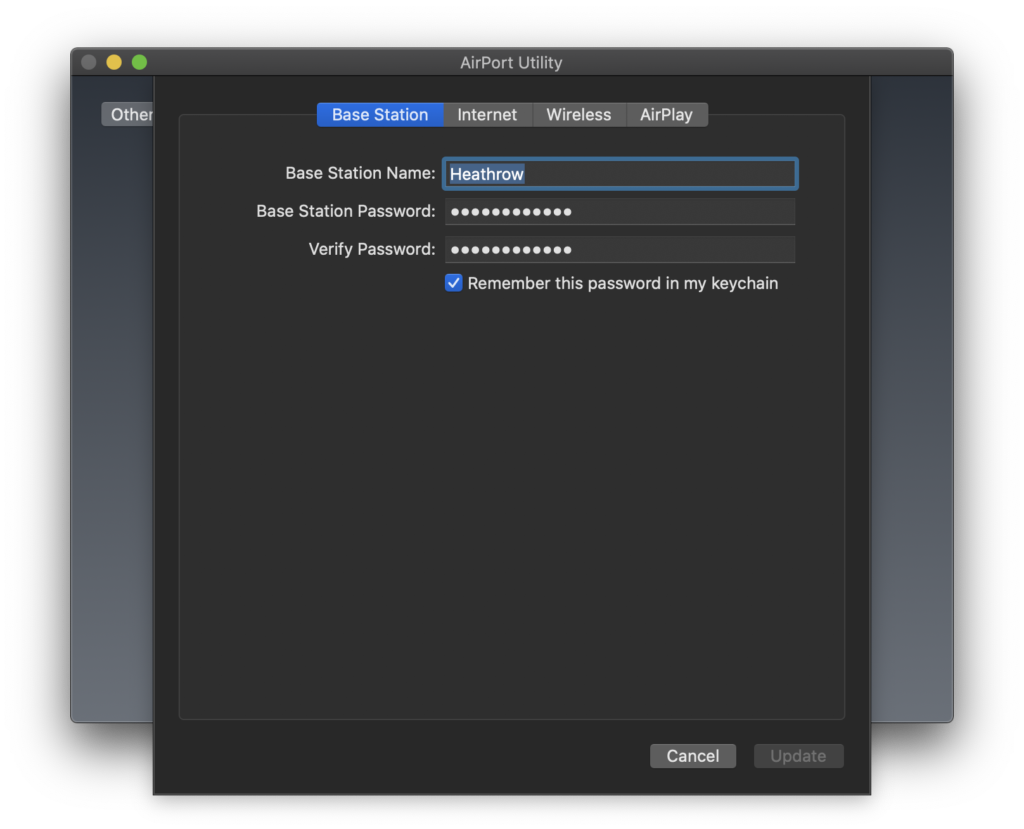
The first step is to make sure that the Airport Express is able to join the WiFi network. To do that we’ll have to find the MAC address of the Airport Express, which is easy if you have the original box that the thing came with but not so easy if you dug the infernal gadget out of a large, dusty cardboard box of junk and knotted cables that resides in your haunted garage. Happily, there’s an undocumented way of finding the MAC address of an Airport router; simply hold down the Option key on the keyboard while clicking on the icon for the router in the Airport Utility, and instead of the default view (this):
Note the clever Airport-themed name. I’m quite proud.
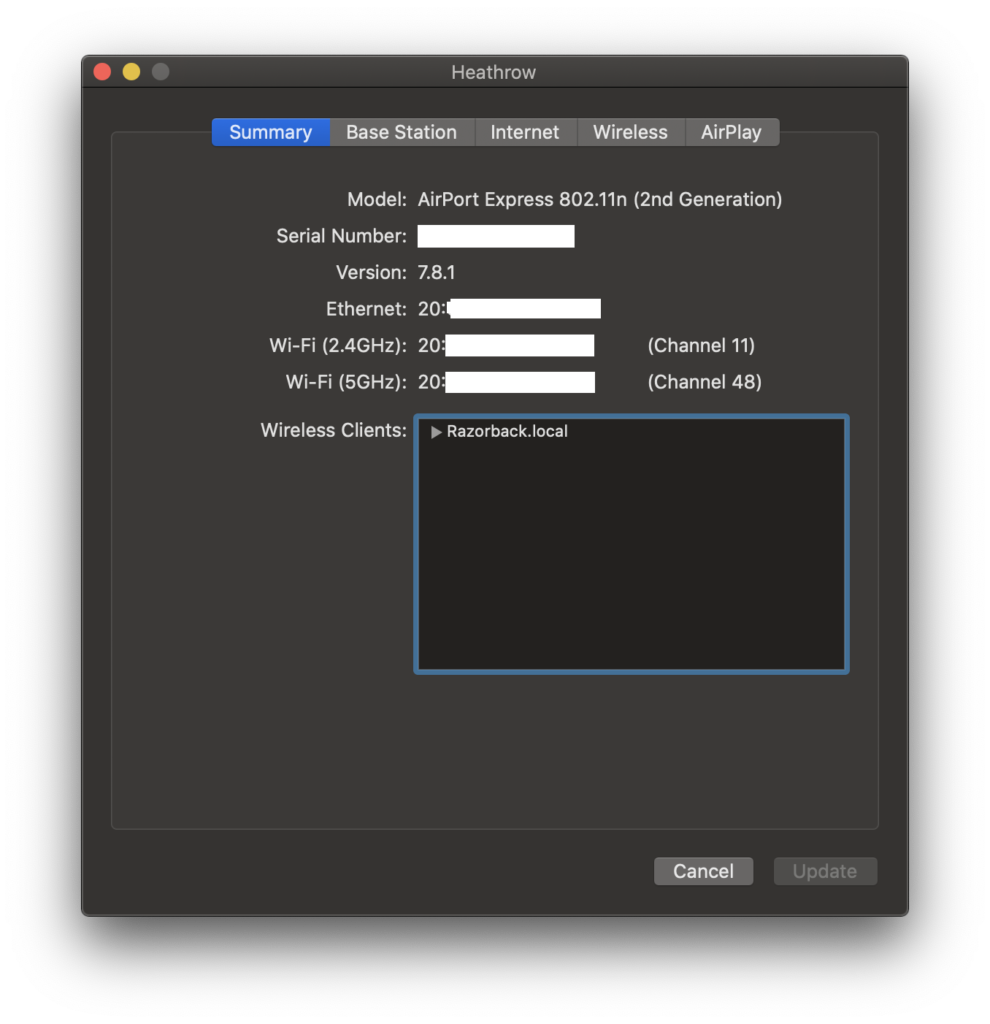
…you get this:
Mmmm. MAC addresses. Delicious, delicious MAC addresses.
The next step is to take the MAC address of the Wi-Fi interface on the Airport Express and then clone that onto your computer. I chose the 5GHz MAC address, but you may have to do either the 2.4GHz or the 5GHz or both depending on the WiFi portal you’re connecting to. The first thing to do is to connect to the WiFi portal normally, then open up the Terminal and either use the handy alias from earlier on or go ahead and type in sudo ifconfig en0 ether followed by the MAC address of the appropriate wireless interface that you got from the Airport Utility. After a moment you’ll be prompted to sign into the WiFi portal again, and once you’ve done so then that MAC address will then be accepted and useable. Reboot your computer to reset the MAC address to it’s original state. No, I don’t like rebooting either. Yes, you should probably do it.
Once you’re back up and running, turn off WiFi and connect an ethernet cable to the network port on the back of the Airport Express. All things being equal you’ll now be able to connect to the internet. If not then go back a step or two and try the MAC address for the other interface on the Airport Express (2.4GHz or 5Ghz).
Next, you’ll need to go snag the MAC address of your Synology NAS. This is a lot easier; simply open the Control Panel on your DiskStation, click on Info Center, and then the Network tab, thus:
Again, do the same trick: connect your computer to the WiFi portal, fire up Terminal and enter sudo ifconfig en0 ether followed by the MAC address of the DiskStation. Reboot your computer, then shut down the DiskStation, connect it to the network port of your Airport Express, then fire it up again.
This has, I must say, worked flawlessly, but there are caveats. For one thing, there’s no guarantee that you’ll retain the same IP address if there’s, say, a power outage, so if you’re planning on connecting to the Synology remotely then you’d better enable the QuickConnect feature and/or sign the thing into some kind of DDNS (I like dyndns.org, but the Synology supports a lot of options in that space). Finally, I’d encourage the use of Synology Drive to keep data synced between your Synology and your computer, as having the thing safely store and serve important things to your computer is rather the whole point of the exercise, and this makes that considerably easier…