Way back in the good old days it was pretty straightforward to go and do some amateur spelunking in the depths of your Mac. Breaking important and vital things in the operating system was a – well, not trivial undertaking, but certainly a relatively simple one. Fortunately it was also very easy to go poking around in the Console.app to see what your Mac was up to so that you had at least a reasonable chance at deciding what you’d done wrong so that you could fix it.
And then, of course, Apple had to go and make it all better. Okay, the “better” there is a hair subjective, so I’ll clarify: Apple introduced a new, unified logging system whereby error logs were dynamically and intelligently supported as a matter of course, allowing you greater flexibility in being very granular in digging through logs as well as making the log files a lot smaller. Which was nice.
What wasn’t so nice is that it’s now terribly awkward to search through system logs. Sure, you can fire up the Console and watch error messages scroll by – and scroll back to look at them for the current session – but looking back through logs is a trifle more problematic, and requires a little command-fu.
Enter the log command, which allow you to (amongst other things) search through your log files to pull out user-defined strings, thus:
log show --predicate 'eventMessage contains "Previous shutdown cause"' --last 24h
Way back at the beginning of the end of the world I walked into a store and dropped the astounding sum of five bucks on an iMac.
Behold. And while you’re beholding note the $4.99 scrawled in permanent marker on the top left corner. Grr.
(Note: the store in question is Alpha Thrift, which I unhesitatingly endorse because yes, it’s virtue-signally of my demographic to do that kind of thing but I actually think that they do an incredible job of supporting challenged and disadvantaged individuals and families, which is something we should all be getting behind right now.)
The Alpha Thrift I swing by now and again is next door to the health food store that has the weird special tea that my wife likes, so it’s an easy diversion to go and nip in there to look at stuff. Now and again they have computer bits that are worth picking up – the odd G4 iMac, a lot of keyboards and screens, but on that particular occasion I found a white Intel iMac, sans cords and keyboard/mouse, and figured “what the hell” and bought the thing.
It’s a late 2006 with a 2.16Ghz Core 2 Duo, a 250GB hard drive that I switched out for a spare SSD, and I also replaced the 2GB of memory with a couple of 2GB sticks I had left from my stack-of-dead-Mac-Mini project. I’m guessing from the neat lines of tape that were stuck to the screen that it was somebody’s home office machine and it was in remarkably good cosmetic condition for a computer that’s been around for fourteen years, with none of the fading/burning in that you get in screens of that vintage. I upgraded it to Mac OS X Lion 10.7.5, fooled around with it, then put it on a shelf in my garage because it turns out there’s very little you can practicably do with a computer of this vintage in this day and age. Getting Homebrew on there was an unruly and problematic hack, the only browser I could reliably get to run was Chrome (and even that protested), and it turns out I had no use for a five-dollar iMac and no time to find one.
Still, I couldn’t let go of the idea that – just maybe – there was something I could still do with the thing if I managed to workaround the limitation of 10.7.5 being the maximum supported version of the OS. The Mac Pro that was under my desk until very recently ran Catalina via the dosdude1 hack, but while there are ways of shoehorning macOS Sierra and up onto older machines my venerable iMac missed the cutoff for those by a generation or two. A few years back there existed some ingenious methods for getting OS X Yosemite 10.10 onto computers of this vintage, but the exact means and bits of software required to make that happen have sort of drifted away in the tidal sands of the internet and are no more.
Finally, I found RMC OS X Patcher, which seemed like the perfect solution except that I just couldn’t get it to work until I did some poking around and reinterpretation of the instructions, which I shall now present for your delectation and delight. So…
In order to make this work you’ll need the following:
• An existing Mac computer – ideally something current that works.
• An old, unsupported Mac that you want to install a modern operating system onto.
• A USB Thumbdrive large enough to hold a Mac OS X Installer (I used a 64GB one because I have a bunch of them in a drawer but you’d be okay with 32GB as well)
• A full installer for the operating system that you want to put onto the old computer. Current downloadable operating systems only give you a download of the installer application, not the full installer package. I used mas to download an installer for El Capitan for my ancient iMac.
• A few hours.
Note: Most of the below is liberally cribbed from the instructions page on RMC’s site, but I’ve made some changes to clarify some things that were not abundantly clear and caused a certain amount of confusion. I am not pretending to be any kind of authority on how this dark magic works; I’m just a pronunciation guide for the trickier bits.
You’ll need to download the latest version of the OS X Patcher software from here after you’ve looked at the Supported Macs list found here. If your old Mac isn’t on this list then don’t go any further. Yes, this is all about installing modern operating systems on old computers, but there’s still such a thing as too old. Sorry.
Plug your USB Thumbdrive into your current, modern Mac and erase it in Disk Utility as Mac OS Extended Journaled. Give it a simple name like “Installer”.
Find the OS X Patcher software you downloaded and double-click it to unzip it. Open the Terminal up, type in chmod +x and then drag the OS X Patcher.sh script into the Terminal window and hit return.
Still in the Terminal, type sudo and then drag the script into the Terminal window again and hit return.
The script will run and give you a choice to hit “1” for Patch Installer and “2” for Patch Update. Type “1” and hit return. It will then ask you for the installer for the modern operating system you want to use to make into a hacked installer to use on your old Mac, so you should locate the full installer for that operating system and drag it into the Terminal window and hit return again.
Next, it’ll ask you what volume you’d like to use and you should type in the name of the USB thumb drive that you’re going to be turning into an installer for your modern operating system (e.g., “Installer”). Hit return again and then wait as it copies/builds the installer onto the thumb drive. And wait.
Once the script has finished running you can quit out of Terminal, eject the thumb drive, plug it into your old Mac, then power it on while holding down the Option key on the keyboard until you see the boot picker menu. Choose the Installer disk you created on your thumb drive, then hit return to boot from that drive.
It should open up into the installer for the OS, but before you start installing things there are some things to do first. For one, while you can technically install onto an existing drive it’s going to be a lot simpler and less problematic if you’re installing onto a clean, erased drive, so if you haven’t done so already and want to make sure that any data on the drive in your old computer is backed up then this would be an excellent time to reboot from the internal drive in your old computer and back that data up.
Still, if you’re happy erasing the drive then this is the time to do it. From the Utilities menu at the top of the screen choose Disk Utility, then erase the internal drive and reformat it as Mac OS Extended Journaled, and once that’s done quit out of Disk Utility.
We’re not ready to install yet, though. The next thing you’ll probably need to do (particularly if you’re using an older Mac OS X Installer like I was) is fool the computer into thinking that it’s still valid and signed, and that means lying to your computer about the date. I wrote something about that here, but in case you don’t want to wade through that then you’ll need to find out the date that the operating system was released on (El Capitan was September 30th, 2015), then turn off wifi from the wifi menu at the top right corner of the screen on the old computer/unplug any network connections. With that done, you’ll need to open the Terminal from the Utilities menu at the top of the screen and use the date command to fool the computer into thinking that it’s just a few days after the OS was released. The command I used for El Capitan was date 1001000015 (for midnight on October 1st, 2015).
Finally, you can then go ahead and run the installer. Once it’s finished, reboot but hold the option key down again to boot from your thumb drive.
Open the Terminal from the Utilities menu and type in patch and choose the default Machine ID that the script decides your old Mac conforms to (mine was iMac 5,1) Hit return, then type in the name of your internal drive (e.g., “Macintosh HD”) and hit return again. The script will run machine-specific patches, and once that’s done you can just reboot and use your updated Mac.
Some notes: this iMac is old. Very old. Old enough to the point that it comes with an astonishing 128mb of video memory, and because this old hardware isn’t supported by the drivers that come with the OS some things like, well, any kind of graphics acceleration are not supported at all. So, forget gaming or video or anything graphic-intensive (or graphic-involving, for that matter). Still, that aside, it’s clear that if you’re willing to invest a little time (and five bucks) then you can actually get something that’s… well, decently usable and surprisingly responsive, or maybe just be able to keep an old computer that you have in the back of the closet ticking for a little while longer…
So, I really like my 16″ MacBook Pro. I spent years using smaller laptops on the grounds that they’re light and easy to lug around all day, but having this enormous screen and astounding performance has proven invaluable in a world in which I’m not often in my office because, well, The Apocalypse™.
Still – and I don’t want to be all 2017 about this – the Touch Bar and Touch ID bother me. I think it’s because I’m a dinosaur and have legitimate old-school-Mac-user-get-off-my-lawn cred that I’m eager to use. My first laptop was a PowerBook 160, for goodness sakes. The idea that there isn’t a physical button for everything is still strange and alien and makes me feel oddly, incalculably lonely. The world has changed so much, and now they’ve taken buttons away from us? Is there no end to the madness?
Not mine. My Powerbook 160 is in a box, slowly crumbling from age.
You get the idea. Happily, there are some things I do enjoy about the new way of doing things, and while you’ll never convince me that I’ll relish using a button that might not be where I expect it to be because button placement is now contextual I am quite digging Touch ID. It’s great, and it has really solid integration in Apple’s ecosystem, and with a little tweaking you can use it for more than what it says on the side of the box.
For example; using it in the Terminal. I’ve reached the point now that I have to stop and think for a moment to recall what my login password is because I type it so seldom, which is annoying when I’m trying to sudo a command and then have to ham-fistedly bang said password into the Terminal, except now there’s a way of telling Touch ID to do that for you.
We do it using the miracle of PAM (Pluggable Authentication Modules). It’s not a new idea or technology, and it’s been widely used in UNIX/Linux/*nix flavors of many kinds going back for a long time; in it’s simplest terms it’s a little mechanism that sits between you (the user) and the service on your system that you want to use. The service we’re really interested in is sudo, but if you want to see the other default services then you can go take a look in /etc/pam.d
macOS doesn’t keep its PAM modules in etc/pam.d but instead stashes them in /usr/lib/pam. I mention this not because there’s a lot to be gained from poking around in there but because I had a devil of a time finding them, and this way I have some record of where to look so future-me doesn’t have to go reinvent the wheel and spend half an hour spelunking in the Terminal issuing salty oaths. You’re welcome, future me. Jerk.
There are modules for all kinds of functionality; smart card support, Kerberos authentication, Open Directory as well as simple deny/approve functions. For now we’re only interested in the pam_tid.so module (where tid = Touch ID) and making that work with the sudo service, but it’s clear that this is a tool that a discerning admin could use to do some pretty impressive tweaking of the fundamentals of how the OS handles users and services.
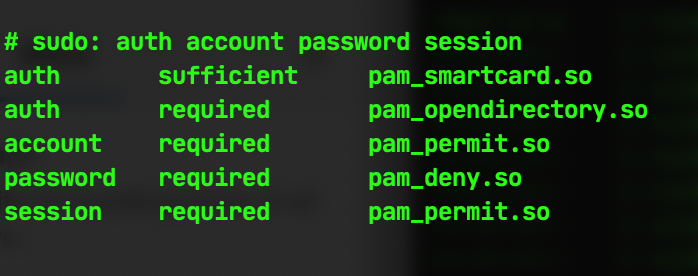
The first move is to go into /etc/pam.d and edit the sudo config file, like so:
sudo pico /etc/pam.d/sudo
Which will give you this:
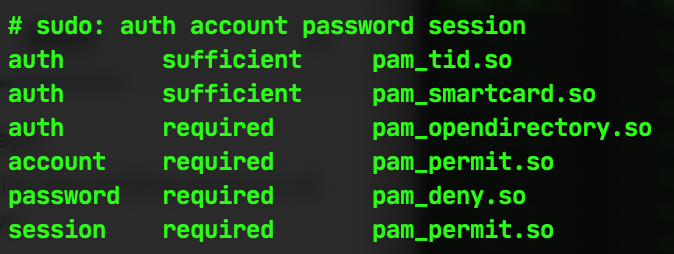
We’re going to tie in the pam_tid.so module for authentication and make it useable for executing the sudo service by adding
auth sufficient pam_tid.so
…to the first line of the configuration file, leaving it looking like this:
Once you’ve saved that file then you should be able to use Touch ID to authenticate any command that requires sudo. You can test it out with something innocuous, such as sudo cd ~/ which will then put up a prompt like this on your screen to tell you to put your finger on the Touch ID button:
And that’s about it! All first-world-problem jokes about the exhausting chore of having to type a password into a Terminal screen aside, this is a really nifty way of leveraging something that’s been built into macOS to use the powerful biometric security in your computer in place of a normal password, which can be attacked or stolen or, let’s face it, forgotten.
So, WWDC 2020 is coming up in three days, and a lot of people in my neck of the tech industry are interested to see what exotic treats, unusual surprises/rare unguents it will bring. Rather than throw my two cents into the ring on the thrilling stuff that will bring (i.e., ARM transition etc) I thought I’d instead jot down the things that I think should make an appearance (but that absolutely will not do so).
• Face ID for Macs would be nice, and I think it’s absolutely doable, but probably not with current Mac hardware. I mean, it seems like a logical move – we already have Touch ID and the T2 chip to handle the grunt work of authorization, but when the current, brand spankin’ new portables line is rocking pretty lousy front-facing cameras and no sensors for doing the kind of mapping required to make Face ID work then it’s hard to make an argument for this coming any time soon.
• Xcode for iOS is also something that I’d love to see but that I’d be fabulously surprised would make the cut. Yes, we have Playgrounds (which is very decent and really nice for people like me who enjoy a healthy refresher on the very basic blocks of programming), but that’s not the same as the full IDE. And that’s a shame, because the iPad Pro is a very capable machine power-wise and also has a huge market footprint – being able to write iOS applications on an iOS device would be great for a lot of people but I don’t see it coming soon. Plus, there’s a pleasing symmetry in the idea that where you currently need a Mac to write iOS applications, you might be able to use an iOS device to write Mac applications.
• While we’re on the subject, I’d like an actual, Apple-approved or Apple-branded Terminal application for iOS. It’d be a niche product, sure, but for the folks who’d use that functionality it would be extraordinary to suddenly have a raft of tools available that they wouldn’t otherwise keep to hand. Still, that raises the idea of being able to execute code on the iPad that isn’t Apple-approved, and it’d have to be rigidly sandboxed as an environment for them to even consider the idea. I’m sure that there’s some internal math where the balance between the cost benefit of dealing with licensing open source tools for iOS would be weighed against the actual number of losers, and my gut says that even with nobody putting their thumb on the scale it won’t be worth pursuing. And this makes me sad because that would be pretty incredible.
• USB 4/Thunderbolt 4 introduction on the Mac/iOS. It seems clear that those two technologies are destined to converge, but it’s too early in the game for Apple to widely start supporting and implementing them. This time next year, maybe.
• Wildly experimental new hardware products/technologies. Apple tends not to intro new hardware at WWDC, preferring to go with special events for those because they like to keep their focus and message tight on product introductions. And that’s very smart. I don’t think there’ll be any introductions of significant hardware products for any of their platforms. There’s a lot of talk about Apple AR glasses being a thing, and that’s an interesting idea, but my hunch is that Apple probably has a bunch of things going at any one time and a lot of them never see the light of day. Remember the kerfuffle about how Apple Is Doing A Car? And yet no cars have appeared, and I suspect none are likely to do so.
Now, it’s worth noting that my batting average on predictions is… well, it’s pretty dreadful. I guess we’ll find out How Wrong I Am on Monday the 22nd…
Font management in macOS has radically improved over time; there are people who’ll throw a lot of shade at macOS Catalina, but for every niggle and complaint there are a bunch of neat, clever little fixes and features that don’t necessarily get the exposure and appreciation they deserve.
Licensing additional fonts that can be delivered through Font Book is both smart and creative. It’s also something that could be extensible – while font licensing isn’t what the vast bulk of people would automatically think of as a killer feature in an OS there are plenty of folks in the creative/design world who would richly appreciate, say, some kind of macOS Font Store. As someone who works primarily with those kinds of users, I’d be more than happy to see specific cuts of fonts that could be automatically purchased or licensed and that would just plain work with the OS. I mean, if you’ve ever spent an hour or two digging through the font folders on macOS doing forensic font-management then you’d appreciate, well, never having to do that again.
If you run a system with hidden users (which may sound bizarre and creepy on the face of it, but it’s something occasionally required on MDM-managed installs) and you want to log in as that user on your computer then this is a useful tip that used to be available in macOS documentation back when macOS was good old-fashioned OS X. It seems to have disappeared now, which is a shame, but it’s also pretty cool that it’s quietly persisted over the last dozen OS versions.
The default display at the login window is the icon view for each user; click on the user, enter the password (or authenticate via TouchID) and you’re in. Great. But if you want to be able to set that login window to display Username/Password fields then you have to log in, go to the System Preferences and make changes there so that the next time you log in you get that option. It’s a drag, because it’s a bunch of extra steps. If only there were a quick and easy way of toggling between those login window options. You can see where this is going.
Here’s how to do it:
• At the login window – when presented with the icons for each user – don’t click on anything. Instead, tap the left or right arrow on the keyboard to highlight a user. If it’s not your main user then that doesn’t matter; the trick is to highlight something.
• Hit Option-Return on the keyboard, and the window will switch to Username/Password fields, thus allowing you to type in the short name and password of the user you want to log in as.
You can hit Option-Return again to toggle back, but as the change is only for that login window session you’ll get your normal icon view back the next time you log in…
A few weeks back I wrote about the FrankenMini – the Mac mini I assembled a la Tony Stark out of a box of scraps. Okay, Iron Man did his thing in a cave in the desert with a bunch of weaponry and I did mine in my garage with a couple of screwdrivers and a certain amount of swearing, but we both looked a little sickly and had uncool scruffy facial hair, so I’m calling it pretty much a dead heat.
I used to run a much nicer Mac mini as a file/web/whatever server in my home office, but switched that to a nice Synology Diskstation that’s synced to an identical unit in my downtown office, and with that in place I no longer had need of the nice Mac mini which went on down the road to a friend of mine. This, it turns out, was no great loss, as Apple has been steadily and methodically stripping functionality out of macOS Server for years, and as such there wasn’t a lot of tinkering possibility locked away in the thing.
But now I have this old, terrible, not nice-but-perfectly-serviceable Mac mini doing little except feeding the occasional print job to my 3D printer and sitting reproachfully on a workbench, so I thought I’d do something useful with it and implement DNS over HTTPS (or DoH if you don’t like a lot of typing. Which I don’t.)
Hmm? What’s DNS over HTTPS, I hear you say? Let me explain.
If you’re interested in a slightly higher level view of the basic mechanics of DNS – and I highly recommend you dip a toe into that water because it’s perfectly warm and not as full of monsters as you may expect – I’d encourage you to go look here at this excellent write up on cloudflare.com:
“How does DNS work?”
DNS is (to cut a tremendously, tremendously long story short) the way that your computer turns human-readable internet names (e.g., www.apple.com) into the actual IP addresses that your computer needs to get to a webpage (e.g., 23.15.137.53). It does this by reading what you type into, say your browser (although many, many things on your computer use DNS, a lot of which you wouldn’t think of and many that you’d never know about) and then sending that inquiry off to a DNS server (or more correctly a DNS resolver) – usually on the internet – that does the footwork and goes and queries other DNS servers to work out where it is you want to go.
But how does your computer know where the DNS server/resolver is? Well, the address of the DNS server/resolver is something that’s provided to your computer by whatever network your computer or device is connected to – your home router, or your mobile hotspot, or the coffee shop wifi network (back when we could go and sit in coffee shops, that is). Those networks assign your computer or device an address on their local network and a DNS server so that when you send a query out to the world at large to look at www.apple.com that network will know where you are to send that information back to you.
The internet as we know it only functions because of DNS, and the architecture of DNS is one of the great unsung marvels of the modern age. It’s not sexy or cool or attention-grabbing, but were it not for DNS there’d be no Google, or Amazon or Netflix or… well, you get the idea. Still, DNS dates back to 1983 and because it’s such a crucial part of the way that the modern world works, progress on things like security have been slow albeit steady. It’s not the kind of thing you can make major, paradigm-shifting changes to without breaking modern civilization very badly, which, I think we can mostly all agree, would be A Bad Thing.
The chief problem with DNS is that the resolver sits there, happily gathering information on what you’re sending it whether you like it or not. As a general point of principle it’s a little creepy that your ISP or whoever is providing you with the resolver knows what’s going in and out of your computer, but principle aside there are a lot of use cases where that’s data that you really don’t want getting out there. I’ve worked with clients who are doing contract work for the DoD, for example, and who aren’t thrilled that someone with a will and a relatively small amount of resources could theoretically sniff the traffic they’re sending to their DNS resolver. Happily there’s a way of stepping around that, which is where the FrankenMini™ steps in.
Cloudflare offers a fast, secure DNS resolver that encrypts traffic with TLS via HTTPS. In more normal English, HTTPS is the securely encrypted version of HTTP, which is in turn the protocol used to deliver web content over the internet. When you connect to a secure webpage – a bank or online store for example – you’re probably connecting via HTTPS. However, when your computer goes to initially send an inquiry to most DNS resolvers that inquiry is sent as an unencrypted HTTP request – in effect, your ISP can’t see what you’re doing on a secure website, but it can snoop on where you’re going.
Many modern browsers (Chrome, Edge, Brave, Firefox et al) already have DoH built in as options, but Safari does not. And that’s vexing. Additionally, there are other types of software than web browsers that also use DNS, and it’d be nice to be able to roll those protections over for those other pieces of software or services. Happily, Cloudflare has an option for that – the cloudflared client. If you install this onto your Mac then anything on that Mac will be able to use DoH. And if you make that Mac your DNS server then anything on your network will likewise automatically be able to use it, too.
So, on one hand I have a FrankenMini™ and in the other hand I have cloudflared. I think you can probably work out where this is going.
To business, then – setting up the FrankenMini™ to be a DNS server so that every DNS search is encrypted and nice and secure!
First, we’ll need a DNS server that we can run on the Mini, because otherwise there’ll be nothing for the devices on the network to use. I’m going to use dnsmasq because it’s open source, easy to configure, pretty well-documented and generally awesome. Once that’s in place I’m going to install cloudflared so that DNS requests that the Mini sends out are covered by DoH, and finally I’m going to tie those two things together so that DNS requests from computers/devices/whatever on my network come into the Mini via dnsmasq and the Mini then pushes those DNS requests out via cloudflared.
Installing dnsmasq and cloudflared is done via homebrew, thus:
brew install dnsmasq
…and then
brew install cloudflare/cloudflare/cloudflared
Once dnsmasq is installed the next step is to configure it to look at itself so that it can pass requests to the cloudflared client. This is done by digging into the dnsmasq configuration file at /usr/local/etc/dnsmasq.conf and then changing the default of #server=/localnet/192.168.0.1 to server=127.0.0.1#54
The next step is to configure cloudflared. Happily, Cloudflare has this covered on their site and it’s a simple matter of making a cloudflared directory in /usr/local/etc/ and then creating a file called config.ymlin that directory. You populate that file via a copy/paste job with a couple of minor tweaks – while normal, common-or-garden DNS runs on port 53 we’re telling dnsmasq to send inquiries out on port 54 and cloudflared to listen for requests on port 54 so that they can talk to each other privately and don’t start playing havoc with every other device on the network, and additionally we’re going to set a no-autoupdate flag:
All that’s left is to make cloudflared and dnsmasq start when the computer boots up – the FrankenMini™ sips power like a little tiny baby bird, so it stays up and running 24/7, but on the off-chance that it needs rebooting it would be a hassle to have to remember to go into the garage (which, as mentioned in the main FrankenMini article is cold and chiefly filled with ghosts and rats) to manually go and kick-start the DNS server. Happily, cloudflared and dnsmasq include tools for this very purpose which you can install by typing the following into the terminal…
sudo cloudflared service install
…which will install a launchctl item at /Library/LaunchDaemons/com.cloudflared.plist, and…
sudo brew services start dnsmasq
…which will similarly enable dnsmasq
After that it’s simply a case of setting each device on your network to look at the IP address of the machine that’s running dnsmasq/cloudflared (or, in my case, setting my router up with that address so that every device connected to my network automatically gets that address).
One unanticipated but welcome discovery has been that Cloudflare’s DNS resolver (1.1.1.1) is astoundingly fast, and I don’t know about you but I’ll take fast and secure over slow and dreadful any day of the week…
Last time I finished up with a tremendously simplistic run through of how digital encryption uses certificates to create chains of proof that computers can use to establish trust in the identities of services and other computers they’re talking to. Still, certificates are only part of the deal, and you can’t have Public Key Infrastructure without, well, keys.
Remember Public Key Infrastructure? The thing that I made a fuss about and then said I wasn’t going to explain what it was until next time? Well, this is next time, so here goes.
To understand how PKI works it’s important to revisit symmetric encryption and talk about asymmetric encryption.
If symmetric encryption is using one key to encode and decode a piece of information then asymmetric encryption is the use of two keys to do the same.The two keys are a public key and a private key, and while in the real world you’d have one key that both locks and unlocks a door, you can think of these two keys as special keys that can only lock or unlock a door.
Let’s say that I run Big Dave’s Taco Shack™. In this example I’ve taken leave of my senses, thrown all my computer stuff into a hole in the ground and immediately embraced all my desires to become a terrible restauranteur. I go and sign a lease on a restaurant in a strip mall that nobody ever goes to, make a probably very politically and morally problematic sign to hang over the front door, then go and buy… I don’t know. Commercial taco-making apparatus, probably. This is a terrible example. Anyway, I also hire three people to work there – Jeff, Andy and Bob.
Jeff, Andy and Bob all close up the restaurant at the end of the night, and I give them a public key because locking the doors of my burgeoning taco enterprise so that it can’t be burglarized seems like a function that I’d want to make public – inasmuch as “public” means Jeff, Andy and Rob. The key that I give them can only be used to lock the door – if the door is locked and they put that special key into it and try and unlock it then it won’t work.
I’m the owner of this doomed culinary enterprise, and I don’t want anyone else to be able to get in there in the morning except me, so I have a special private key that only exists to unlock the door.
If Jeff, Andy and Bob leave their keys lying around then that’s actually okay, because nobody can use those keys to do anything except secure my fine dining establishment. Heck, I could just start handing out those keys to everyone I know or meet just in case they ever needed to lock my probably-failing-by-now eatery up safe and sound.
That’s how public and private keys work – one key (the public key, freely handed out to the world at large) cryptographically secures a piece of information or data, and the other (the private key, kept securely away from the public) cryptographically unlocks that piece of information or data.
Where to go from here.
There’s a lot more to dig into, here, and what I’ve laid out so far is an extremely simplified and high altitude view, tailored for people who’ve heard some of these terms and needed a broad explanation of what they mean. I’ve deliberately not touched on session keys, the mechanics of how digitally signing happens, signatures and hashes or even going through the anatomy of an SSL/TLS transaction works in the real world. When I had the idea for these articles I wanted to focus on the basic, basic mechanics of encryption and not obfuscate matters with a lot of more esoteric information, but there’s one final thing that I wanted to touch on…
You (or: Where It All Goes Horribly Wrong).
All right, maybe not you per se, but people. Historically, people have been the Achilles’ heel of security, because human beings are not reliable. They don’t work in absolute, finite and predictable ways, and they’re so far from infallible that it’s frankly laughable.
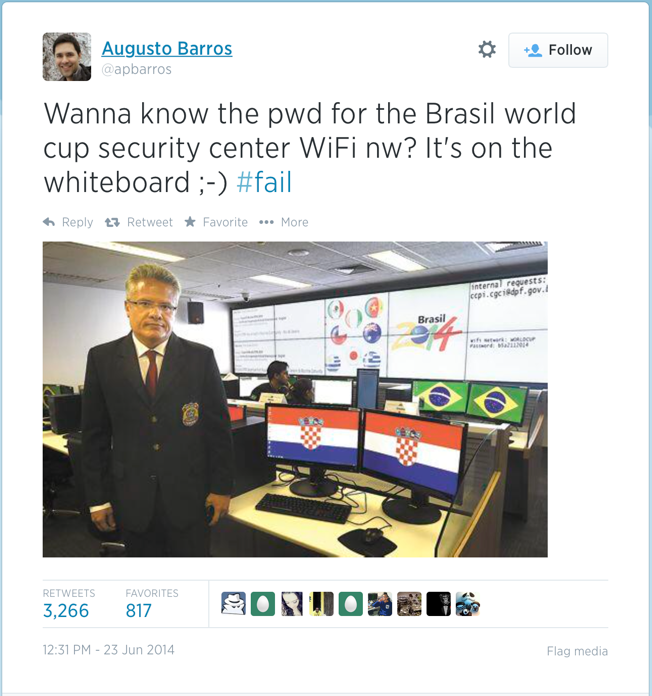
We’re careless. We leave passwords scrawled on post-it notes on our screens, or stuck underneath the keyboard and mouse mat. We use the same passwords for every service. We put together cryptographically secure wifi networks and write the password on a whiteboard and then have our photo taken of ourselves next to that whiteboard just like this chap during the Brazil World Cup:
Ouch.
Way back in the first article I wrote that Helen Keller quote about security, and I’ll throw it out there again:
“Security is mostly a superstition. It does not exist in nature.”
It’s an ugly truth, but nonetheless one that has to be carefully acknowledged. No matter how well-designed and cryptographically robust a security system you design or use, you can’t simply set it in place and rely on it to self-maintain. As a person who makes a living advising people on this kind of stuff it might seem self-serving to use this opportunity to do a hard sell on engaging professional help, but it’s nonetheless a good idea; still, there are some logical and fairly easy steps that you can take yourself.
• Be aware of PCI/HIPAA regulations, and talk with your credit card merchant (if you have one) and insurance company (again, if you have one) about their recommendations. These are entities that really, really don’t want you to have an expensive lapse in security and can probably direct you to resources that you’d find useful.
• Educate yourself. This little burst of articles about security and encryption were fun to write, but they in no way go into the kind of depth of information that’s out there (probably in better-written and more cogent form).
• Have good documentation about the products and services you’re using. I’m not suggesting writing down a list of passwords; rather it’s important to know what certificates and keys you’re using, who they’re authorized through and their expiration dates.
In the last article I covered about 3800 years’ worth of the history of encryption in, to be fair, a very abbreviated form. I highlighted three distinct encryption methods because they informed the basic point of the piece – which was that prior to the invention of the modern computer and the prevalence of wide-scale networks like the internet the only practicable kind of encryption was symmetric encryption – meaning that if you want to secure a piece of information then you do that with a key that you use to encrypt it, and that the other party who wants to read that piece of information has to use that same key to decrypt it. There are countless dozens of other encryption techniques that might be fun to take a deep dive on (e.g,. Null Cipher, Playfair, Rasterschlussel 44, Pigpen, Rail Fence, Four Square, Straddling Checkerboard and on and on and on…), and I’d warmly recommend doing so if you have even a passing interest in the history of how we’ve collectively tried to keep secrets from each other since we collectively crawled out of the primordial ooze.
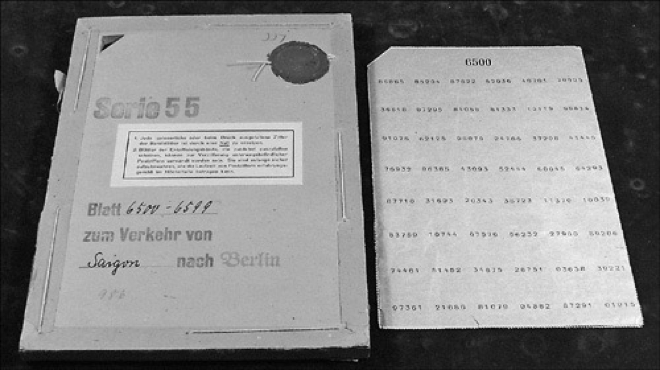
Still, once we moved into the Age Of The Computer new and intriguing options opened up because we’re no longer chained to models of handling and processing information that have to be understood and accurately processed by the average human being, who – while excelling about things like putting on pants, deciding what to have for lunch and doing laundry – is probably not designed for doing lightning-fast advanced algorithmic calculations with unerring reliability. The advent and widespread use of new technologies meant that in the span of less than a century we went from this:
The venerable and noble One-Time Pad.
to this:
Rawr. Set phasers to fun, amirite?
(Incidentally, I would have loved to be a fly on the wall of that photoshoot. “Okay, Bill, I think we have everything we need, but let’s have you climb up on the desk. Right. Just like that, yes. Okay, now, give me those bedroom eyes…”)
Unsurprisingly, many of the initial notable digital encryption technologies followed the old symmetric model – the one where one single key was used to both lock and unlock the information. I won’t go into massive depth on them, but the big three were DES, 3DES and AES.
DES (“Digital Encryption Standard”) was invented by IBM in the 1970’s; it was a 56-bit algorithm that was considered the gold standard of encryption in its day, but – as I mentioned in the last article – Security is mostly a superstition, and rather than calling something unbreakable it’s wiser to adopt a mindset of it-hasn’t-been-broken-yet; to that point, DES was successfully compromised in 1998. It had a good run, though.
3DES (or “Triple-DES”) was 1998’s successor to DES, and was essentially just comprised of three incidences of DES running on the same piece of information, rather like three six year-olds standing on each others’ shoulders and wearing a long overcoat to sneak into an R-rated movie. Although, frankly, if I ran a movie theater and three six year-olds tried that I’d probably just let them in on the grounds that you have to reward that kind of ingenuity and moxie, and that they’re not my kids and their parents can deal with the therapy bills. 3DES was (and is) slow, but while it’s currently regarded as being secure it’s also being deprecated and retired, which is something a lot of us can identify with right now.
AES (“Advanced Encryption Standard”) is the technology that most people are more familiar with, as it’s used by default in most commercial and residential WiFi routers and networks. It comes in a variety of flavors (128/192/256-bits) and Intel and AMD build AES acceleration directly into their chips to make it faster and easier to implement. That’s good, because AES is everywhere; it’s used in iOS to do device encryption, it’s used in Filevault on macOS, it’s used to encrypt IPSec VPN, WPA WiFi, and SMB 3 for encrypted macOS and Windows networking. There are no guarantees that some bright spark won’t come out with a hack for it tomorrow, but right now cracking it would be a significantly difficult task on the level of major world powers throwing vast resources at a problem and generally burning trillions of dollars in the process. AES is about as good a symmetric encryption product as you could possibly want.
So, there are excellent products available for securing data using symmetric encryption, but there’s a whole other raft of tools and techniques available that use the power and miracle of the Internet™ to handle more complex and flexible encryption tasks. Behold, ladies and gentlemen, the awesome majesty of…
Public Key Infrastructure (PKI)
You see, we’re already starting with the weird acronyms and non-intuitive naming conventions and models.
Now, this whole section is a bit of bait-and-switch because I’m probably going to go into detail on what PKI is and how it works in the next article, but before we get there I think it’s worth laying some groundwork on the basic mechanic of how computers trust each other and how that works. To do that we’ll go back and revisit our friend Faceless Bob from the last article. Remember Bob? Classic. That scamp.
So, Bob wants to go on vacation, because in his world of weird faceless people you can leave the house without fear of pandemics and the airlines are actually running. I know, it’s crazy! Work with me here.
Anyway, Bob gets off the plane in a distant, non-specific foreign land and walks up to the immigration officer at the airport.
The immigration officer has no idea who Bob is or where he comes from. Bob could be a Nobel Peace Prize winner on his way to do humanitarian outreach among the fjords or a homicidal maniac with a suitcase full of axes and rubber chickens. He might not even be Bob. He could be Faceless Jeff, or (god forbid) Faceless Ted, that noted creep. Fortunately, Bob remembered to pack his passport, so he holds it up and shows it to the immigration officer:
…which is all well and good, and is admittedly a good start. “Of course,” the immigration officer thinks to himself, “this doesn’t tell me much about this Bob character. Who is he? What does he want in life? Is he going to come to my homeland and cavort around committing acts of literal mayhem? Can I trust this character and let him through immigration?”
These are all sensible questions, because while Bob has some identification, the immigration officer can’t just rely on any old piece of paper with Bob’s name on it, so he asks for Bob’s passport and Bob hands it over:
The immigration officer looks at the passport and is satisfied that it is, in fact a legitimate document. But still, just because the passport is real that offers no intrinsic guarantees about Bob’s worthiness to come into the country and walk its rural byways and enjoy the pleasures of the Glorious Democratic Peoples National Clockwork Doll Museum.
Still, the immigration officer doesn’t have to trust Bob and Bob’s intentions, because the passport was issued by the US State Department, who the immigration officer does trust:
And if the US State Department says that Bob is okay, then it’s essentially vouching for Bob and saying that he is who he says he is and that they trust him with a passport. Satisfied, the immigration officer agrees that he trusts Bob because he trusts the State Department, and because the State Department trusts Bob:
“Right,” I can hear you saying. “This is all very diverting, but what do faceless men and passports and green check marks have to do with… what did you call it? PKI?”
Well, I’d tell you, that’s a smart question that deserves a simple answer that I hope I can make as clear as possible because this is conceptually a little goofy, and I’ve yet to see a metaphor or clever little parable that does a neat job of explaining this. So:
In the above example, Bob is a computer program running on, say, your bank’s website. The faceless State Department guy is an entity called a Certificate Authority, which uses complex mathematical algorithms to create and authenticate digital certificates that computers use to prove their identity to each other. That’d be the passport part of the equation – and once it’s created that digital certificate it gives it to Bob’s program. This certificate will only work with Bob’s program.
Your computer is the immigration officer, and when it encounters Bob’s program it doesn’t have any way of knowing for sure that Bob’s program is actually working for, say, your bank and isn’t just pretending to be from your bank. However, Bob’s program has the certificate (that is made of terrifyingly complex and realistically unbreakable math) which your computer can look at, and then your computer can check against a Certificate Authority that it absolutely trusts.
Your computer contacts the Certificate Authority and shows it the certificate that Bob’s program gave you so that the Certificate Authority can verify whether it’s legitimate or not. If it checks out then your computer knows it can trust Bob’s program – because the certificate is uniquely and specifically written to prove that Bob’s program is what it purports to be, and as your computer trusts the Certificate Authority that gave Bob’s program its certificate then therefore it decides in turn that it is safe to trust Bob’s program.
And this, in a nutshell, is how modern encryption works; not just with faceless men and passports and green check marks, but also because we have fast and widespread secure networking in the form of the internet it is possible to set up chains of trust so that you don’t have to directly worry about trusting the information that you’re dealing as long as someone higher in the chain than you does trust it.
This is, of course, a very, very simple way of looking at a pretty complicated subject, and there are loopholes and caveats and details aplenty to dig into next time…
I pride myself on being a man with his finger on the pulse of the wants and needs of the general public; a sort of psychic thermometer of the zeitgeist. It’s a responsibility I take tremendously seriously, so when I sat down to figure out what to post about I immediately considered the unsettled nature of society and the precarious economic brinksmanship we’re all engaged in and knew – without the merest consideration of the possibility of the fractional perception of any feasible doubt – that it was my duty to write a couple of posts about encryption.
It’s a subject that – in the normal world where we’re not all filled with low-grade dread about curves and spikes and rates – often throws people for a loop. I’ve been lucky to work with (and for) some remarkable people in a breadth of roles and industries, and it’s always a little humbling to come across someone who knows a lot more than you about something eclectic or esoteric. I, for example, may know a lot about mobile device management, but I know nothing about being a chocolatier. If you put me in front of a barrel of raw chocolate and told me to make a ganache then there’d be little that I could bring to the table that couldn’t be slotted into the categories of “Inedible” or “Vile.” Likewise, I can design and build robust and secure wifi networks, but I can’t practice dentistry or surgery (and really shouldn’t ever be in a position where anyone would want me to try.)
You can’t be a specialist and a generalist at the same time, but we pick up broad strokes about fields of knowledge as we go along through life and use those to build models of about how the world works. I know that chocolate is made with dairy and sugar and that dentistry involves scrapy tools, soothing music and an ability to understand your patient’s incomprehensible gurgling and translate it to lies about how often they floss.
Encryption seems like it falls into this category; most clients are aware of the general idea of what it is, and that it’s important and that it’s a good thing, but there’s an inherent reticence to trust it. People are fine with the idea of end-to-end encryption because that’s something that conversationally makes sense; that something can be encrypted all the way through to its destination. It’s a functional linguistic model, but when you start talking about public and private keys and certificates then that model breaks down; not because laymen aren’t capable of understanding it, but because those aren’t concepts that can easily be understood in simple, layman’s terms by people who aren’t IT people and are, say, chocolatiers and dentists.
So, I’m going to try and fix that in a handful of simple, easy lessons that involve minimal bloodshed.
(Attention: Other IT people, please make note: this is supposed to be a high altitude view of the subject. I don’t want a lot of messages along the lines of “what about session keys” or “actually, you can use private keys to encrypt data for public keys when you’re working with digital signatures” and so on. This one’s for the chocolatiers and dentists, not you, okay? Cool.)
The Golden Rule
“Security is mostly a superstition. It does not exist in nature.” – Helen Keller
I like to trot this quote out a lot when I talk about encryption and security, because while Helen Keller was famously not a security expert (and the rest of the quote was talking about how you should embrace risk and change,) this absolutely cuts to the core of the problems we face in keeping people and data safe.
Notably: you can’t. Security is a lie. It doesn’t exist. Zebra are not safe from Lions. You can skip driving and never fly in a plane and obsessively try and control every aspect of your health and still die from being hit by lightning or choke on a brussel sprout. There are no guarantees; in the real world there’s no 100% infallible path to safety. When we talk about security, what we’re really talking about is the mitigation of risk.
And really, that’s fine. Think of information security as a boat with a hole in the bottom. Provided you’re paying attention and bailing water out as fast as it comes in, it won’t sink; and in fact if you keep paying attention and are practical and smart about your bailing strategy then the boat can keep floating indefinitely. The other passengers may not even notice that there’s a hole in the boat at all.
Okay, that’s not the greatest metaphor, but what I’m trying to get across is this: there’s always going to be some unseen, unanticipated vector of attack, but with good practices and responsible vigilance you can greatly cut down or almost eliminate how that could effect you.
The History of Encryption (1900BC to 1970AD)
Well, now that’s out of the way we can dial in on what modern encryption is and how it works, and a good introduction to that is to go into what modern encryption isn’t.
When we think about encryption in the simplest of terms we tend to think about codes and ciphers, which are forms of symmetric encryption. The idea of substituting one thing for another in order to obfuscate a message is the simplest and oldest form of encryption, and given a good enough schema it can be decently effective.
Symmetric encryption really refers to a form of encryption where one key is used to encode and decode a message. While what’s below mostly refers to antiquated forms of symmetric encryption (because they’re historically interesting and conceptually easy to get your head around) it’s still a method that’s used in modern security. Blowfish, DES, and the assorted flavors of AES (AES-128, AES-192 and AES-256) are all examples of symmetric encryption.
Egyptian Substitution Cipher, circa 1900 A.D
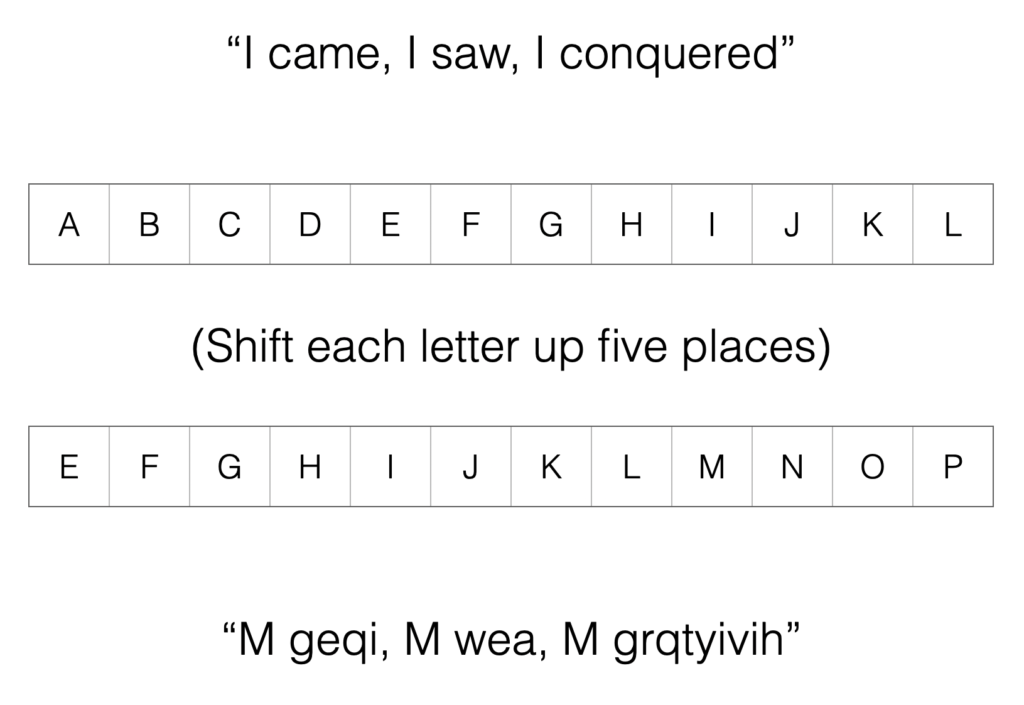
The Egyptians were doing it with hieroglyphs, but as seems to be the case with a lot of technologies it was the Romans who kicked things up another conceptual notch by inventing Shift Substitution ciphers – while Julius Caesar is widely credited with the invention there’s no absolute way to be sure who had that bright idea, but the fact remains that by the 1st Century A.D the Romans had it all solidly nailed down. The problem with the old Substitution cipher was that if messages were complex enough then it was possible to look at the frequency of certain words or glyphs and speculate/infer what they might refer to, but Shift Substitution was a degree more complex because it shifted each character in a message up by a fixed interval, thus:
In the above example you can see that each letter of the alphabet is shifted up a pre-ordained number of places, so that A becomes E, B becomes F and so on. Without knowing the number of places that each character is shifted through it’s difficult (although ultimately possible) to work out what the message might be.
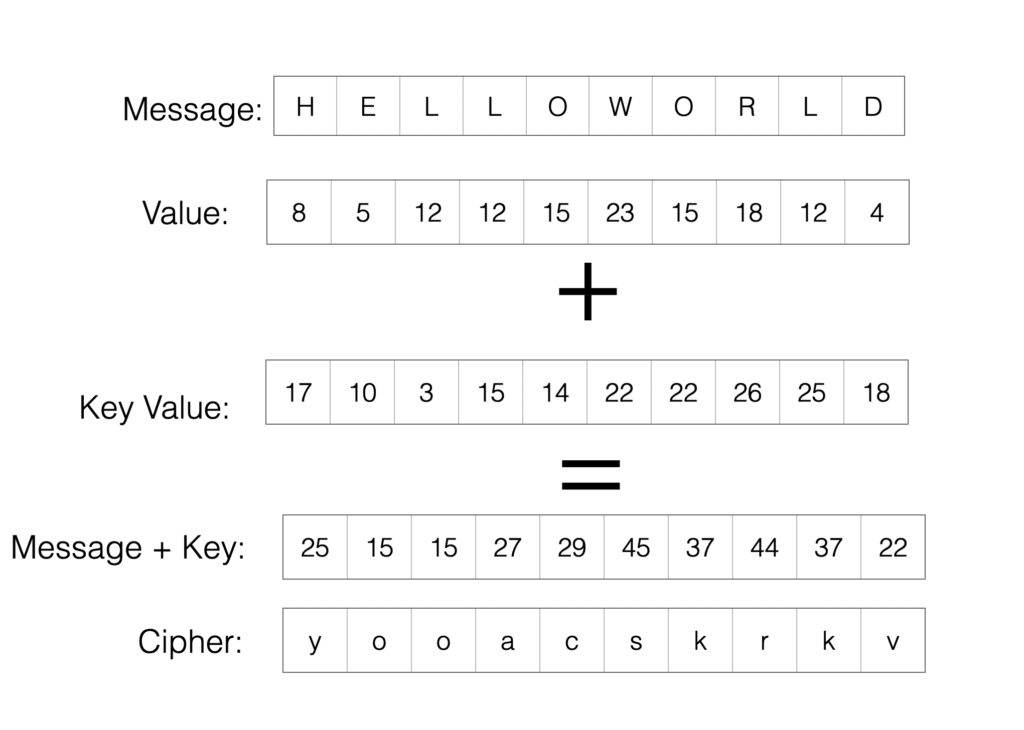
Finally, we jump forward about 1700 years to the late 1800s and the invention of the One-Time Pad:
One-Time pads were cyphers initially created for Telegraphic transmission, and they were used extensively during World War II, and sort of built off of the shift-substitution model. Each message sent with a one-time pad used a unique set of numbers as ciphers – one per letter – with the sending and receiving party encoding and de-encoding using the same sets. After each transmission the set of numbers was destroyed (thus only used “One-Time”), so if the transmission was intercepted there was no way that the message could be cryptographically compromised. So, if we wanted to send a message (“Hello World”) then we’d assign each letter a number in the alphabet with, say, A=1, B=2, C=3 and so on, then add a pre-defined set of numbers to that numerical value as a key, wrapping values above 26 back around so that 27=A, 28=B etcetera. The end result would look something like this:
Given a long enough set of numbers (or “key”) then One-Time pads were functionally unbreakable.
All the above are examples of symmetric encryption, and follow the same rules. First, they apply a shared key to a message – by “shared” key I mean simply that both the person sending and the person receiving the message have a piece of knowledge that they share that let them know how to encode/decode that message. Secondly, that shared key can be a string, a character, or an integer. Thirdly, that key can be an operation.
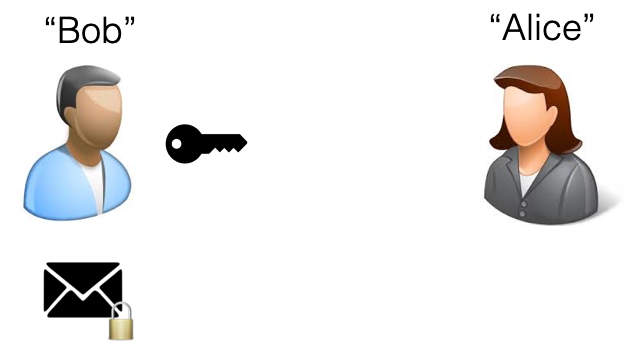
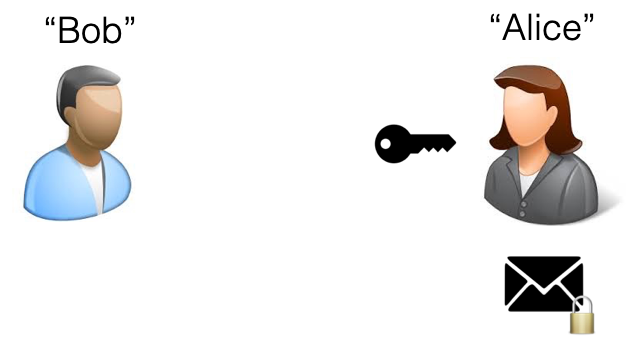
Let’s say that I’m Bob and my friend Alice and I want to share a piece of encoded information. The process would look something like this.
First, I’d encrypt my message with a key (a substitution or shift-substitution cypher like the Egyptian hieroglyphs or the Roman shift substitution or a one-time pad, or possibly an operation or algorithim-based approach like AES-128).
Bob: “Hey, Alice. I want to send you this message.” Alice: “Okay. Send it on over you faceless freak.”
Next, I’d send that key to Alice so that when I sent her the message she’d have the key to open it. If the key is intercepted en route or doesn’t get through then it’s just the key – it doesn’t reveal anything about the message because the message hasn’t been sent yet.
Bob: “Here’s the key you’ll need to unlock my message.” Alice: “Great. A giant key. You’re too kind.”
Then I’d send Alice the encoded message.
Bob: “Okay, you have the key, let me send the message over.” Alice: “Fine. Sure. I guess.”
Finally, Alice could open the message sing the key I’d sent her:
Bob: “There. Unlock the message.” Alice: (Unlocks and reads message) “Ugh. Bob. You’re gross. I’m calling HR.”
While these traditional, straightforward substitution cyphers aren’t exactly sophisticated in the modern world, they were sort of the bleeding edge of encryption back in the day, but even if you were using something as well-designed as a One-Time pad you were still stuck with the essential flaw at the root of this approach: key distribution. How you got the key from one party to another was problematic; you could go and meet the person face-to-face and give them the key, you could use an existing secure channel of communication to get the key to them, or you could give the key to someone you trusted and have them hand the key over for you. None of those are iron-clad secure options, and all of them are rife with breakpoints and weaknesses.
Next time: The History of Encryption (1970AD to today)…