Using rsync to synchronize folders on two Macs (or: I am too lazy to walk to my garage.)

One of the enjoyable things about this whole Global Pandemic Jamboree has been that – like the great bulk of my peers – I’ve had a chance to contemplate the greater truths of life and ponder the big questions about the fleeting nature of time and the fragility of man. I’ve also had a lot of time to sort through a lot of things, and not in the incorporeal emotional self-actualization sort of way, but in the “I-have-a-pile-of-dead-gear” kind of way. Which, if you’re weighing those two options, is a lot more fun and involves slightly less weeping.

Specifically, I had five dead Mac minis in various states of decay and destruction; all of them having been torn down and worked on and declared unfixable in a reasonable economic sense by clients, and all in the big box of broken stuff that I run to eWaste recycling every few months. Now, when someone hands me a dead computer and tells me that they don’t want to ever see it again I do the sensible, grown-up and professional thing of immediately destroying the hard drive with a hammer and drill so that any data on the thing is irretrievable, which generally leaves me with about 90% of a computer that most likely has some terminal issue (either diagnosed or undiagnosed.) Bad RAM. Bad logic board. Torn cabling, damaged fans, iffy-or burned out power supplies. Given enough time, one could go through all those machines and work out what was wrong with each and possibly – given even more time – cobble them together into some FrankenMac.

Well, of late I seem for some incalculable reason to have time to burn, so I did exactly that. Behold my creation! Look upon it and weep:

The FrankenMini™. Look What Man Hath Wrought!

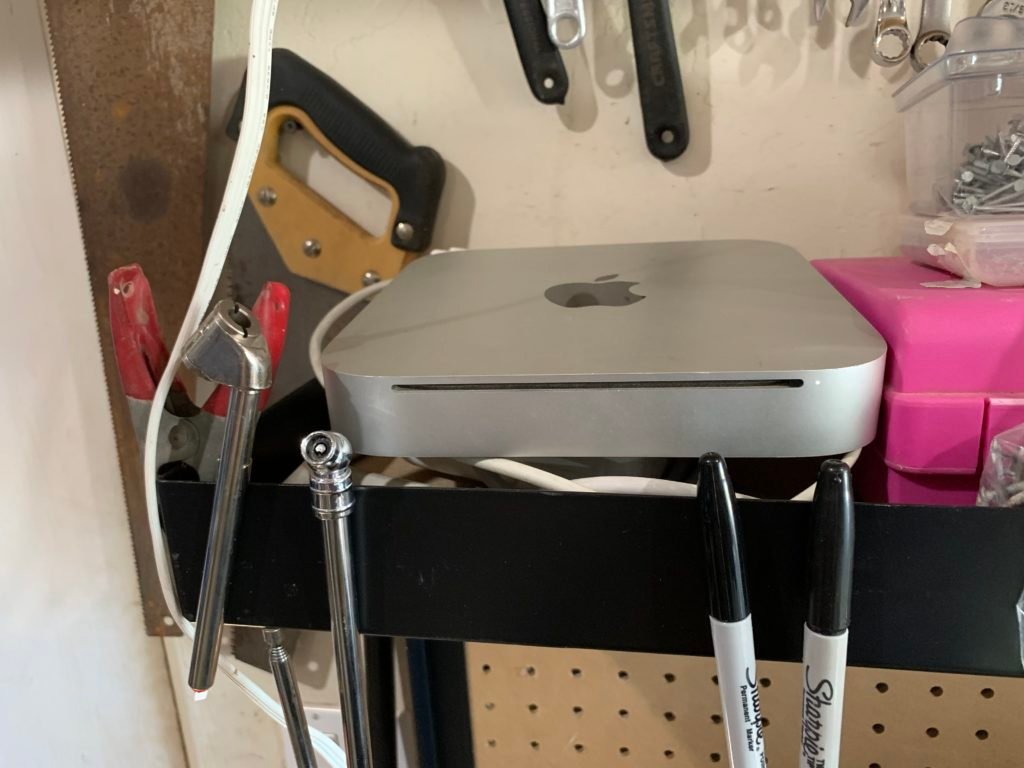
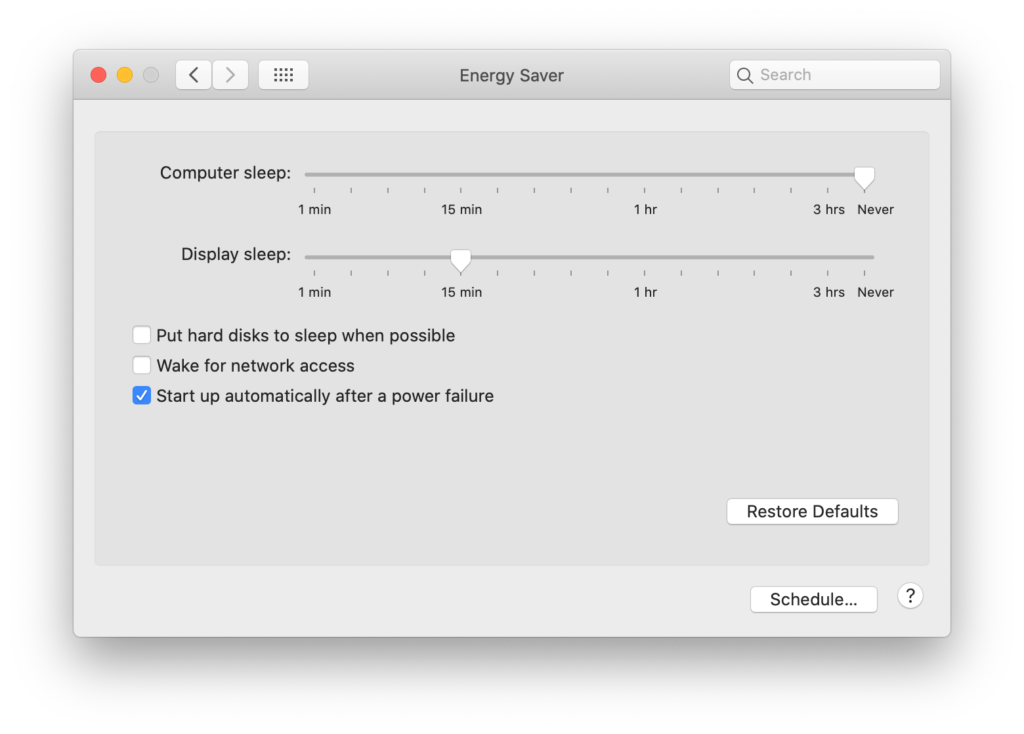
Okay, well it’s not that impressive. I feel I rather hyped it up, and that’s on me. But it thinks that it’s a 2010 Mac mini with a 2.4Ghz Core 2 Duo, 8GB RAM and an SSD, and all-in-all it’s a decent-if-unremarkable box that I leave hooked up to the stereo in my garage and also use to feed print jobs to my 3D printer.

I like to 3D print at night because I have no patience and if something’s going to take 9 hours to reach fruition then I’d rather as much of that as possible take place while I am dead to the world. The thing is, however, that at night time the garage is really, really cold and drafty, and also I saw a rat in there one time and there might also be spooky ghosts, so I don’t generally feel excited about sitting around in there at night and setting up print jobs. I’d far rather just push the files to the thing and screen share in so I can make the thing run overnight and go check on my prints the following morning when it’s warm and the rats are sleeping and the chances of seeing sets of macabre, incorporeal twins holding hands and telling me I’m going to play with them forever are substantially lower. Also, the Mac mini is precariously perched on a shelf and prone to falling down if I fuss with the USB ports. I mean, look at that picture – it’s basically held in place by two sharpies and a certain amount of luck.

I have the thing set up with key-based SSH and a static IP, and because I do a fair amount of fussing around and tweaking of 3D print files I wanted to be able to just have the print folder on my Mac Pro (in my home office, warm, no rats, only occasionally haunted by a cat who sits in my good chair and won’t move) synchronize with the print folder on the FrankenMini, which meant setting up rsync.

rsync and I are old friends and go back a ways; right back to the earlier days of OS X, pre-Time Machine. Backing up a Mac back then was usually accomplished with backup software like Retrospect, but while Retrospect was fine at what it did I ran into a few situations where one didn’t so much need a specialized software backup as much as one needed to shove a bunch of files from point A to point B and have that operation not copy over anything that hadn’t changed.

rsync was simple, elegant and fast. Simply, you feed rsync a folder/directory/file and then it synchronizes that input with another folder/directory/file – either locally on the same computer or with another computer. When you fire up rsync to have it sync to another computer it opens up an SSH session and fires up another rsync instance on that remote machine. The two instances of rsync compare notes, calculating hashes for each file, and if the hashes don’t match then the appropriate file is copied to the appropriate machine.

There are a couple of gotchas that you have to bear in mind, though. The big one is that when you copy a file from one Mac to another then the file creation date on arrival on the remote Mac changes to the modification date of the file; in plain English, if it’s April 28th and you copy over a file last modified on April 25th, then when you look at the file that’s been copied to the remote Mac it shows the file creation data as April 28th. This isn’t ideal, but can be fixed by invoking archive mode using the -a flag.

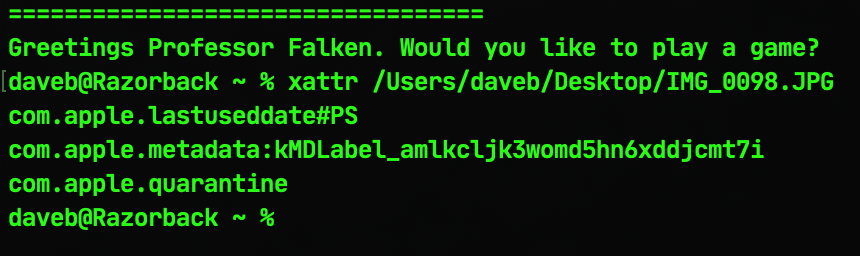
The second problem is that rsync neglects to copy over extended attributes and resource forks. Extended attributes are bits of metadata in the file that can contain things like quarantine info, label information and so on. You can take a look at the extended attributes of a file by invoking the xattr command thus:

Resource forks are a different issue – and one that’s increasingly become less pressing as time goes by now that they’ve been effectively deprecated in macOS, but both extended attributes and resource fork problems can be resolved by invoking the -E flag.

So, to business. The FrankenMini sits at IP address 10.0.0.64 and already has SSH enabled via the Sharing prefpane. If I have a folder called “3D_Print_Files” in my ~/Documents folder then the command would look like this:

rsync -HaE "/Users/daveb/Documents/3D_Print_Files/" dave@10.0.0.64:"/Users/dave/Documents/3D_Print_Files"

So, what’s happening there? Well we’re invoking rsync with the -H (preserve hard links), -a (archive mode to preserve date and time and other flags) and -E (extended attributes and resource forks) options, then pointing to the source folder that the initial sync is running from (in this case, "/Users/daveb/Documents/3D_Print_Files/" on my Mac Pro in my non-haunted and non-rat-infested office). The destination folder is called through an SSH session by feeding it the username of an account and the IP address of the remote machine (dave@10.0.0.64), and then the location of the destination that you’ll be copying the data to ("/Users/Dave/Documents/3D_Print_Files")

The net result will be that you’ll end up copying the contents of the source folder to the destination folder, ignoring files that have not been updated. And this is all well and good, but what do you do if you want to actually make the two folders sync with each other rather than just copying source to destination? All that’s required is to switch the command around and append it to the first command, like so:

rsync -HaE "/Users/daveb/Documents/3D_Print_Files/" dave@10.0.0.64:"/Users/dave/Documents/3D_Print_Files" && rsync -HaE dave@10.0.0.64:"/Users/dave/Documents/3D_Print_Files/" "/Users/daveb/Documents/3D_Print_Files"

This is, admittedly, rather a mouthful, but you can easily make a command alias out of it by throwing it into your .profile/.zprofile, which should simplify matters considerably.

This is, in essence, a pretty simple trick, but all talk of rats and ghosts aside it’s a remarkably simple and easy way of replicating and synchronizing potentially vast amounts of data over both a local and wide network. I wouldn’t suggest using it over the internet without some kind of encryption (either certificate-based or an honest-to-goodness VPN), though, but if either of those is an option then rsync can be a pretty versatile tool in the arsenal of anyone who isn’t going out much these days…

Using Wake on LAN on macOS

A couple of weeks ago I posted this little ditty about how to cold boot your Mac remotely, and one of the options nestled in the screenshot I included with that post was the intriguing “Wake for network access” checkbox.

It’s an option that I’ve mostly avoided paying any attention to over the years, because the computers I mostly tend to deal with are ones that are seldom (if ever) actually turned off. There are lots of reasons why this is the case, but they tend to fall into the two general buckets of This Computer Needs To Stay On Because People Are Getting Files From It, and the equally capitalized This Computer Needs To Stay On Because People Are Getting Services On It. The idea of needing to wake a computer remotely seemed a fringe issue at best, but oh how the wheel turns and time makes fools of us all etc etc.

We’re living in a world where remotely tinkering with non-servers is starting to be more of a pressing issue and a requirement than a suggestion. And there are ways of dealing with those kinds of requirements that aren’t immediately obvious. If you put the average, intelligent person in front of a screen with a checkbox marked “Wake for network access” then chances are they’d look up at the fact that the preference pane that the option is nestled in, note that it’s the Energy Saver pane, and come to the logical conclusion that if this is a place that controls when your computer goes to sleep and there’s an option there for something to do with waking over a network then it’s not a huge or illogical conceptual jump to decide that that if their computer was asleep and you tried to connect to it over the network then the computer would wake up.

This, it turns out, is absolutely true. And – in a more precise and accurate sense – an utter, utter lie. It’s entirely possible to wake your computer remotely, but there’s a specific way of doing it that isn’t immediately obvious and that isn’t ever really called out, and that way is by the implementation and use of a Magic Packet.

Okay, I should probably explain what a Magic Packet is. I could also call it a magic packet, sans capitalization, but that’s less fun, and if you’re going to reference supernatural capabilities in your IT doublespeak then you might as well lean into it. A Magic Packet is a specially-crafted network packet that contains the MAC address of the computer that it’s intended to reach, sent out over UDP to port 0, 7 or 9. It’s a highly targeted, highly specific finger prod to the sleeping computer that only that computer will respond to, and if you want to make one on your Mac then you have to jump through a hoop or two.

Firstly, you need a way to make a Magic Packet. This is probably unsurprising for anyone who’s read more than half a dozen of my posts, but I’m going to use homebrew to install a package to create and send said Magic Packet, thus:

brew install wakeonlan

Secondly, you’ll need some information about the computer you’re crafting the Magic Packet for – notably its IP address, the port number you’re aiming for, and its MAC address. The port number is 9 on macOS (at least, it is in every case I’ve seen so far, and if that doesn’t work you can try ports 0 and 7), and the command should be formatted something like this:

wakeonlan -i 10.0.0.1 -p 9 12:34:56:78:ab:cd

Plug that into the Terminal on the computer you’re trying to connect from, and all things being equal it’ll find its way to the targeted computer and raise it from it’s slumbers…

What I Have Been Doing On My Vacation.

While IT consulting (where the particular scope and method of execution I tend to pursue is as a sort of Freelance Sysadmin For Hire) is an essential service, I’m finding that things are… quiet on the job front. When your business is largely composed of helping other businesses design, implement and maintain their Apple IT infrastructure and those businesses are either on hiatus or just plain twiddling their thumbs, then you find your workload substantially reduced.

Which, actually, is fine by me; like most people in my particular nook and cranny of the industry I work by appointment and very flexible hours, and have been doing it long enough and well enough that work is always there. That’s great, but the downside is that one rarely has time to go and do new things, or branch out and try something new. Still, now I have more free time while the world descends deeper into lockdown, so I’m using that time to learn something more about Swift via the miracle of Swift Playgrounds.

Swift Playgrounds is squarely pitched at kids, but as a forty-six year old it’s not insulting or too dreadful, and if you have nothing else to do and a passing interest then I urge you to take a look. I’ve spent the last week or so working through a lot of lessons that require you to guide a weird little cartoon guy through mazes and picking up jewels and toggling switches, and once that’s done I’m going to have a crack at the 100 Days of Swift thing. I’m great at knocking out some quick and dirty bash scripts, but I have an Anthropology degree and plunged straight out of college into working in 1994 and have never really stopped since; ergo I have zero formal coding experience and have had to kind of reverse-engineer things and self-teach in odd trajectories as I’ve gone along.

So far it’s been a bit of an eye-opener for exactly how rusty I am in all kinds of areas. I’ve managed to get through the first module with moderate ease, but the second module is a mite more challenging because it falls squarely into the trap of all Coding-For-Idiots type things; that it’s clearly written by people who know what they’re doing.

I’m sure you know what I’m talking about. You want to learn about a thing, so you buy a book that purports to teach you about it in thirty days, or twenty-four hours or something equivalent. The subject matter is immaterial; it could be C++, brain surgery, or washing machine repair. Let’s say it’s washing machine repair because that’s more fun. At any rate, the first couple of lessons are helpful and practical; they explain the broad strokes of what a washing machine is and a high-level view of its operation and fundamental purpose (ergo, dirty pants and hot water and soap go in one end and clean pants come out of the other), and then they detail the major bits of the washing machine – the drum, hoses, knobs and switches and whatnot.

And then they blindfold you and throw you into the deep end of a swimming pool with chains and weights around your feet by launching into, I don’t know, spindle torque ratio and foot-pounds per inch of water filtration, because it doesn’t occur to the jerk who wrote the thing that you have at best a passing level of experience at the operation of the WashMatic 9000™, didn’t do much physics or math in school, and that the little you remember about those things is buried beneath the better part of thirty years’ worth of other stuff that turns out to be considerably more pressing on a day-to-day basis. You’re a moron, is what I’m trying to get across here. You’re a moron and the book is probably written for what an expert thinks constitutes a moron, which is in actuality a person who is a less-qualified expert.

Anyway, a lot of the bits of the second module so far are in the mold of “This is an open-ended challenge that you can address any way you like using the things you’ve learned,” and you look at that little cartoon chap and his gems and switches and profound lack of spatial awareness and elementary common sense and shake your head wearily.

Further, it’s clear that whoever wrote this thing subsists on a diet of lies, and does in fact have a very particular way that they want you to solve the puzzle, despite their protestations to the contrary. You can feel the silent judgment.

Still. I have a very good friend from back in the UK who has taken to calling this current moment an “Unexpected Holiday,” which I think is a wonderfully optimistic way of looking at things. This is time out from our regularly scheduled lives, and it’s best to look at it as an opportunity and not a curse. We can’t go to the gym (because gyms are plague houses) and we can’t see our friends except as tiny, blocky images on Zoom, and staring at the walls – while fun – has a definite shelf life, so we might as well try and do something useful with the time. If anyone needs me then you’ll know where to find me, but until then I’ll be trying to work out why none of my code works while a little cartoon man on my screen glares at me, radiating mild disappointment.

Remote cold booting your Mac

In this period of ongoing peril and, well, frankly terrifyingly uncertain business environment, I’ve talked to a lot of folks who are having to radically adjust the equipment they use and the way that they use that equipment; i.e., not being in the same room as some of the computers that they’re used to being in the same room with.

This is, let’s face it, mostly servers. Entirely servers, actually, and as seems to be the spirit of the age right now it’s clear that things were easier back in the Good Old Days. Of course, I’m not talking about the Good Old Days pre-pandemic; I’m talking about the days when you could pick up the telephone, break out your credit card, and talk to a nice person at Apple and give them a lot of money in exchange for an Xserve.

Xserves were fabulous. Yes, they weren’t price or feature comparable to some of the offerings you’d get from a good PC server vendor, and they lacked a lot of things like expandability and were sorely limited by their 2U standard height and the number of drives you could throw in one, but if you wanted a macOS (Sorry, “Mac OS X”) server then they were the only game in town and they did an excellent job. I’ve talked in the past about how loud they were, but they included such niceties as redundant power supplies and Lights Out Management (LOM) unit, which allowed you to do all kinds of hardware management that included remote-booting the thing.

You can’t do that with a Mac today. If the box on your desk or in your server room down the hall or (as seems to be the case of late) forty miles down the road in a locked, sealed building is off then there’s ostensibly no way of turning it on unless you’re willing to lean over and push a button, walk down the hall and push a button, or get in your car, drive through the proto-apocalyptic wasteland that we apparently now all live in, break into a building, and push a button. If your Mac suffers a power outage then you can absolutely check this box:

…and the thing will obligingly fire up once power is restored, and that’s great, but it’s not the same thing as being able to shut a computer down and then fire it up again.

However, as is often the case with this kind of thing, there’s a way of doing it through the command-line if you don’t mind getting a little dirty, and by dirty I mean performing a dirty shutdown. What’s a dirty shutdown, you ask? Well, I’m glad you brought it up, because it’s a neat little trick that’s built into the OS that allows you to combine all the convenience of a nice, orderly shutdown with the exciting thrill of suddenly yanking the power cable out of the back of the thing like some kind of foaming maniac.

If you look at the man page for shutdown, you’ll see the following options:

The one to pay attention to there is the -u flag, which normally comes into play when you have your computer attached to a UPS. When the power goes out and your UPS kicks in then the computer will struggle on for as long as possible, but providing your UPS has a management port and a USB cable that you have plugged into your Mac then when it in turn realizes that it’s about to run out of juice it’ll send a command to your Mac to shutdown, but instead of just sitting there once power is restored the UPS simulates a power cut so that your Mac automatically boots.

It’s ingenious, and also allows you to shutdown your Mac in a nice, orderly fashion and then once you’re ready to reapply power it’ll automatically fire up instead of sitting there like a big metal lump.

So, if you just shut your Mac down from the command line by typing in sudo shutdown -h now then it’d halt the system, quit everything that needed quitting, and turn itself off in a neat, orderly fashion. Whether you manually disconnect power or not, the computer will require you to physically power it on by hitting the power button.

But if you invoke the -u flag and type in sudo shutdown -h -u now then the computer will do all the sensible, practical, good-housekeeping things you’d expect from a proper shutdown, and then tell itself that the power was unexpectedly disconnected so that when power is restored the computer will just fire right up.

“That’s great,” I hear you say. “But what good is it if, as you mentioned earlier, I’m stuck at home in glorious self-isolation with a year’s worth of bathroom tissue while the End of the World rages around me?”

Well, firstly that’s a little hysterical of you, but I’ll skate over that bit because you make a decent point. Where this option is useful is if you have a UPS with a network connection and remote on/off capabilities. There are options out there; just because there’s no LOM still extant on the Mac doesn’t mean that you can’t effectively outsource that component – just remote into the Mac, issue the dirty shutdown, then hop onto the UPS and turn it off or (if it’s possible with your model) turn off the power to the Mac. When you want to cold boot your Mac you just remote into the UPS, power it on, and that in turn supplies power to the Mac which – because it thinks it was unexpectedly shut down – automatically boots from cold, leaving you at the login screen.

Roll your own Fusion Drive

This was a fun little project I poked around in recently while helping another ACN member with a data recovery project.

Back when Apple started shipping computers with Fusion drives, said Fusion drives were wonderful things. Essentially what they did was pair a 128GB SSD with a 1TB+ rotational hard drive and use CoreStorage to create a LUN that packed the two together and gave you the best of both worlds; a fast drive that held data for immediate use and a slower drive that was substantially larger and fed data to the fast drive. What you ended up with was what appeared to be a 1TB+ hard drive that was somewhat slower than a (greatly more expensive) SSD, but a lot faster than a regular 7200 rpm hard drive.

The trade off was that – at least in the Mac mini – that reduced the number of available drive slots to one, which was frustrating because the prior generation of Mac mini had two drive slots, thus allowing you to make a mirrored RAID of the boot drive. Which was very handy if you were using said Mac mini as a server, which a lot of people were doing. To get around the issue I’d break the Fusion drive into it’s constituent elements – a 128GB SSD and a larger hard drive – and then create a RAID mirror of the two. It wasn’t ideal (because the mirrored RAID would take the size of the lowest element – i.e., you’d only be able to use 128GB out of that 1TB+ hard drive), but if you were really just looking to use the internal drives for boot data and some caching then it was just fine. After all, actual user data would usually sit on a fast external RAID anyway.

Breaking the Fusion drive was pretty straightforward, and worked thus:

• First, boot from an external drive or put the Mac mini in Target Disk Mode, connected to another Mac.

• Second, open the Terminal and plug in diskutil coreStorage list to get a list of all the connected coreStorage volumes.

• Third, make a note of the logical volume group universal unique identifier (or lvgUUID if you don’t want to have to say that all the time). It’s a 32-digit number expressed in five groups, and it looks something like 1234a678-1a23-1b23-1c23-1234567890ab

• Finally, append that lvgUUID to the end of a diskutil command to delete the LUN, thus: diskutil coreStorage delete 1234a678-1a23-1b23-1c23-1234567890ab

Lo and behold, you’d now have a plain, regular, basic SSD and hard drive available for your RAIDing pleasure.

But what if you want to go the other way? If you have a small SSD and a large hard drive and you don’t really want two drives clogging the joint up and would prefer one faster drive? Well, it turns out that rolling your own Fusion drive requires a couple more steps than breaking one, but isn’t that difficult.

• First, get a list of disks connected to your Mac by typing diskutil list

• Choose the disks you want to use for your new Fusion drive. Let’s say they’re /dev/disk1 and /dev/disk2

Note: Exercise caution and take a moment over that last step. Where things go from this point on involve erasing and breaking things in your computer. Make absolutely sure that you’ve chosen the correct disks because otherwise Very Bad Things can happen.

• Type diskutil coresStorage create MyNewFusionDrive /dev/disk1 /dev/disk2

• You’ll be shown another lvgUUID. Make a note of that, as you’ll need it in the next step.

• Use that lvgUUID to create a new volume, stipulating the name, type, and amount of the drive you want to use. For example: diskutil coreStorage createVolume 1234a678-1a23-1b23-1c23-1234567890ab "NewFusionDrive" jhfs+ 100%

…and that’s about it. You should now have a new Fusion drive on your desktop.

COVID-19 scams (or: People Are The Worst).

Proving once again that in every crisis there’s someone who sees an opportunity:

#LASD Warning of spike in online scams & hacking attempts related to the COVID-19 emergency.

Scams like this are nothing new. They’re pure, unadulterated opportunism, and they’re uniformly shoddy (in both purpose and execution) attempts to exploit people who are too stressed, ill-informed, or just plain busy to be able to filter information to the fullest extent.

Fortunately there are a few simple rules that you can adhere to that will protect you against the vast bulk of email/text/phone scams.

Consider the source of the information. Where is it purportedly coming from? What government agency is communicating with you, and does it sound legitimate?

A few years ago a common scam was to scare people into handing over bitcoin under threat of exposure of their browsing habits. Based on the idea that either guilt or the perception of guilt was a powerful motivator, scammers peeled email addresses and paired passwords from info dumps taken from large commercial hacks (e.g., the Target and Zappos customer database hacks) and would send threatening emails to folks with their passwords in plain text as proof that the scammer had legitimate access to the victim’s computer. It was moderately ingenious, but rather hampered by the fact that the fiction that surrounded a lot of the examples that we received panicky communications about revolved around the sender being a CIA or FBI agent.

The CIA or FBI don’t care a hoot about domestic malfeasance, and certainly not about what you look at on the internet provided that something isn’t state secrets that you’re sending to a foreign power. Likewise, the IRS isn’t telling you that there’s been a COVID-19 outbreak in your area and that you should immediately send them a $29 evacuation fee. And Government agencies will always send email from a .gov email address; never a .com/.net/.whatever-else.

Anything that sounds too good to be true is always too good to be true. There are no miracle drugs available to treat Coronavirus/COVID-19. Essential Oils and Lemon Soap do not help. Solicitations to buy equipment or treatments or sanitizing products that are an easy sell, but they’re a scam.

The Government knows who you are already. There’s been a spate of fake “verification request” emails going around – telling folks that they’re eligible for emergency assistance and funds, but that before the federal government can cut a check they just need a little information first. Trivial things, like name, age, address, social security number. Maybe even banking details. Things that the Federal Government has already (or has no reason to ask for). If the only vector that the Federal Government has to communicate with you is your email address then that should send up some red flags.

Don’t give anyone your personal details – not your address, date of birth, banking information, usernames or passwords. Not ever, not under any circumstance. The people or organizations who need to contact you will have that already.

Scammers can’t spell. This applies to almost all scams on the internet, and again, it’s moderately ingenious. People who are too rushed or impaired to notice typos, serious grammatical errors, incorrect punctuation or flat out spelling mistakes are the target audience for scammers. It’s sort of reverse filtering; the people who’d notice those errors aren’t the target audience and are less likely to fall for a scam, whereas people who skate over those errors are more likely to be vulnerable and go along with what they’re being sold.

When in doubt, ask someone else. It doesn’t have to be your IT guy, or your boss – if something comes across your desk and you have concerns about legitimacy then talk to a co-worker or family member and have a second pair of eyes look at it before acting on it. This is something that I wish more folks would do; there’s an ego hit that you might take if you ask someone if the thing you’re looking at is fake and it is, and you might feel like an idiot. But we’ve seen powerful, intelligent, organized people get pulled in by scams and phishing attacks because nobody can be 100% attentive and execute perfect judgment 100% of the time. Running something past someone else is a remarkably efficient way of mitigating the issue.

Stay safe, stay healthy, and stay indoors for a while. These are trying times, and this current unpleasantness is tough on all of us; individuals, families and businesses both large and small. And – speaking as a small business – I’d very much like as many of you as possible to be here once this all blows over…

Brewfile maintenance

Not a terribly catchy title, but then again it’s not a terribly catchy subject. Still, a useful thing to have up your sleeve and incorporate into your regularly-scheduled maintenance. You are doing regularly-scheduled maintenance on your computer, right? Not just letting it be and then being surprised when it transpires that your sole copy of The Great American Novel™ disappears one day and you discover that the last backup took place sometime last June? Thought so. We’re all terribly responsible.

I’m a big fan of homebrew because I’m a sucker for package managers and small, superb little tools that make your life easier in a million ways (provided that you’re passably comfortable with using the Terminal.app). However, now and again I have to switch machines or upgrade/reinstall, and it’s a drag to have to remember all the stuff I’ve installed onto one machine and then go and find it all and reinstall it again on another machine. Yes, it’s not what you might call an everyday occurrence, but it happens from time to time and is – for lack of a better catchy epithet – a total bummer

Fortunately, you can mitigate some (if not all) of that by using a brewfile to go and build a list of everything you have on your computer and then format that in a file that homebrew can read and use to reinstall everything. And it’s ludicrously simple to do, thus:

• Install the Homebrew bundle tap: brew tap Homebrew/bundle

• Run the bundle command to dump a formatted list of all your homebrew packages into a brewfile: brew bundle dump

This will go and create a file called “brewfile” at the root of your home directory, and opening that file will reveal something like this:

There are many like it, but this brewfile is mine.

Now, having that brewfile on your computer is great, but in the case where you’d want to restore that onto a new computer then there’s no guarantee that your older computer will be accessible (or even functional), so having the file somewhere else seems like a good idea. If you run the brew bundle dump command a second time it’ll error out because the file already exists, so I like to combine it with a mv command to create the file where it expects it to be (in my home folder) and then move it to my Dropbox, thus:

brew bundle dump; mv ~/Brewfile ~/Dropbox/

Because the mv command is moderately intelligent it will overwrite any existing file with a new copy, thus saving a lot of tiresome hunting and deleting every time you want to save a new copy.

Finally, I automate the process by creating an alias in my .zprofile to do a lot of the tedious typing for me:

alias brewfile='brew bundle dump; mv ~/Brewfile ~/Dropbox/'

Great! But what if I want to also put a copy of my .zprofile to Dropbox as well? I can’t use the mv command for that because, well, I need my .zprofile where it is and not solely living in Dropbox where it can’t do me any good. All things are fixable through the mercy of hideously clunky shell commands, so I cobbled together this monstrosity that seems to do the job nicely:

rm ~/Brewfile; brew bundle dump; cp ~/Brewfile ~/Dropbox/; cp ~/.zprofile ~/Dropbox/zprofile

You can also make an alias of this roiling horror in your .zprofile if you can stand it, like so:

alias roilinghorror='rm ~/Brewfile; brew bundle dump; cp ~/Brewfile ~/Dropbox/; cp ~/.zprofile ~/Dropbox/zprofile'

Using the brewfile to restore your packages onto a new machine is trivially simple; just install homebrew, then brew tap Homebrew/bundle again to get the bundle package onto your machine, then finally put your saved brewfile into the root of your home folder (where bundle expects it to be) and run brew bundle install – depending on all the stuff you have on there it can take a while (and if it’s trying to pull down Xcode and a bunch of Apple productivity apps then I mean a while).

This approach isn’t what you’d call pretty, but it’ll get the job done. And if that’s not the definition of using UNIX packages then I don’t know what is.

Variables, operators, scripts and Jamf Pro.

Yes, this is going to be a tiresome shell script post, but the thing about tiresome shell script posts tend to be actually useful things if you’re looking for a quick way of reminding yourself about the quickest, easiest and most efficient way of performing some simple but crucial task without a lot of pointing and clicking (and, better yet, without having to actually do any of that at all). After all, this blog is squarely pitched at people like me who enjoy shell scripting but got their degrees in Anthropology and had to pick this stuff as they went along so there’s probably some value in it.

I greatly enjoy Jamf Pro, and if you’re looking for a solution to implement or administer a whole raft of computer and devices then you could a) do far worse than use what is essentially the premier product for doing that, and b) give me a call. Rates are reasonable, operators standing by etc etc.

One of the fun things about Jamf Pro is that there are a couple of different ways of sending a script to a client machine without much (if any) input from the user, who probably has better things to do with his/her/their time. The best way is by setting an Extension Attribute – you write a script (or use/customize one of the hundreds of scripts or templates built into Jamf Pro or posted on Jamf Nation) to run a script against a macOS computer on check-in. In plain English, the Jamf Binary that gets installed on your client computer when you setup Jamf sits quietly in the background and occasionally phones home to the Jamf Server to let the server know that all is well, and to ask if there are any messages for it to look at. When it checks in then the Jamf Server can send down policies and profiles to restrict or allow the client computer to do all kinds of things, and in addition can run a shell script on the computer as root.

Which is very, very handy, because when you’re trying to administer computers and you need to do something substantive to those computers via the command line then you need to be able to do so as root, and chances are that a good number of your end users are either going to look askance at plugging in their passwords into odd screens or are running non-admin accounts and just plain don’t have useful passwords to plug in there. And also very handy because you can take the output of those scripts and put them into Jamf Pro by setting an Extension Attribute and throwing the result into a Smart Computer Group and in turn putting that onto your Dashboard.

In plain English – this is a thing that Jamf Pro puts on your computer that can report back all kinds of custom, non-standard but highly useful information, such as whether your laptop battery health has dipped below acceptable levels, whether your hard drive has been throwing up errors, or if your computer hasn’t backed up in a week; all useful things that someone should know about, and all indicative of a need for urgent attention and service. Further, all things that you – as the end user – might just plain not notice until it’s far, far too late.

Extension Attributes can handle full-size, complex, heavy duty scripts. You can see some examples here. The other place you can use shell scripts in Jamf Pro is in the Files and Processes field in Policies, and that’s where the operators come into play.

See, the idea is that you throw simple, single-command one-shot scripts into that field so that you can accomplish quick, basic tasks – with root permissions – on the destination Mac. Which is great if you want to, say, set the NTP time server or point the computer at an alternate Software Update Server.

But what if you want to put something a little more complex in there and string a couple of commands together? Well, it’s not widely and loudly talked about but you are able to do that by stringing your commands together using an operator like &&, || or ;.

A very quick word or two about && and || follows:

&& works as a logical AND statement – requiring all conditions to be true. An example of this would be something like:

echo 'Hello World' && echo 'Goodbye Cruel World'

Which would give you an output of

Hello World

Goodbye Cruel World

|| works as a logical OR statement – requiring only one condition to be true, thus:

echo 'Hello World' || echo 'Goodbye Cruel World'

Which would give you an output of

Hello World

Back to the good stuff! Let’s say that I wanted to be able to construct a policy that would change the hostname of a client computer to match it’s hardware serial number. There are reasons not to do that (chiefly that it looks messy and that end users might find it confusing and impersonal), but equally if you’re working in a lab with a lot of identical workstations then using that as a demarcator might be practical. There are two steps to making this happen.

First, you have to find the serial number of the computer. This part is relatively straightforward because all you really need to do is to go talk to the I/O Kit Registry (ioreg) command and tell it to go search through the million billion things it can look at and pull out the entry for the computer’s serial number, thus:

ioreg -c "IOPlatformExpertDevice" | awk -F '"' '/IOPlatformSerialNumber/ {print $4}'

Go ahead and drop that into your Terminal and hit return, and it’ll throw your serial number back at you. Great. Next you’ll need a command to go and set the hostname of the computer. We’ll hit up the System Configuration Utility command (scutil), thus:

sudo scutil --set HostName insertSnappyNewHostnameHere

Finally, we’ll need to stick these two crazy kids together by getting ioreg to return the serial number, setting that as a variable, and then passing that variable over to scutil, like so:

myVar=$(ioreg -c "IOPlatformExpertDevice" | awk -F '"' '/IOPlatformSerialNumber/ {print $4}'); sudo scutil --set HostName $myVar

What we’ve done here is glue those two commands together with a ; – but if the first command errored out or failed or some new update renamed or borked something in ioreg then the latter command would simply fail without giving you much indication that anything had gone wrong. The good news is that with this particular command the worst that could happen would be inaction; without relevant input from the first command to the second then the computer would just sit there with it’s original hostname until told otherwise, and thanks to the magical healing powers of Jamf Pro you’d be able to make a nice, neat, very visible smart computer group on its dashboard so that you’d know which computers had the command failed and required additional work or laying on of hands…

Unlocking your laptop with your watch is a terrible idea.

Don’t get me wrong; I love my MacBook Pro and I love my Apple Watch. I was a first-adopter of the original Series 0 watch and wore it religiously until the battery life dropped to an hour or two and then the battery itself decided that after four years of service it was going to swell to the point that it popped the screen off of the thing, forcing me to go out and buy a new one. And by “forcing” I mean enabling, and by “enabling” I mean giving me the slight excuse I needed to go buy another thing.

My current Apple Watch is a Series 3 Space Grey Aluminum. I also have a stainless steel Series 3 that’s sitting in a drawer and that I’ll be trading in when I get round to it; it looks great and feels very solid, but that sucker is heavy to the point that when I put the aluminum one on I wonder if I’ve suddenly become a lot stronger than I thought I was because everything weighs half as much. I love my Apple Watch and it’s basically become indispensable in a world where I shove my phone in my bag most of the time and rely on the thing on my wrist to tell me what time it is, who’s calling me, and how little I’m working out. It’s an amazing gadget, and one of the things it does best is be a proxy for an iPhone. Which is a curse and a blessing when it comes to things like, say, authentication.

The idea goes something like this: if your iPhone can be unlocked by biometric data that positively identifies you as the owner of the device (TouchID or FaceID), then your watch talks to your iPhone and decides that it’s okay for it to unlock itself based off of that lower tier of authentication. And then, if your watch knows that you’re you because your iPhone tells it that’s the case, then can’t the watch itself then act as a proxy form of authentication for your computer?

I mean, it makes sense in a very practical way. Apple puts reasonable protections in place – the iCloud account you’re using has to have two-factor authentication set up – and it all seems pretty clever – once you get past the idea that your computer identifies you from your watch which identifies you from your iPhone which identifies you from your face or fingerprint, that is. It smacks of a bunch of kids standing on each others’ shoulders wearing an enormous overcoat to get into an R-rated movie, but nonetheless you can’t really fault the basic core of the idea. And really, it works well in reality too; Bluetooth Low Energy (BLE) does its job the way you expect it will.

This might be a good time and place to dip – in a very cursory fashion – into what Bluetooth actually is. Which is, confusingly, two entirely different things that don’t talk to each other. What we’ve traditionally considered as Bluetooth is Bluetooth “Classic”. It enjoys a robust data rate that allows you to transmit and receive data at a high rate, which makes it perfect for applications like media streaming to speakers – it ensures a constant flow of data between source and destination at distances up to 100 meters on the 2.4GHz spectrum. The other technology is Bluetooth Low Energy (or BLE for those of us who don’t want to type that out every time), which while it uses the same frequency and enjoys the same (if not greater range) isn’t designed for the kind of throughput you get from Bluetooth Classic. BLE is used in industries and applications where connectivity and small data transfers are preferred, which at the moment mostly means wearables and thus mostly means Apple Watches. While BLE technically enjoys the same range as Bluetooth Classic the proximity-sensing function of it is active within a much shorter range (about 1-2 meters).

In the case of my 16″ MacBook Pro and my Series 3 watch, it’s exactly 60″. I know this because I spent an enjoyable afternoon with a tape measure, a watch, a laptop, and a cat who tried to sit on all three at some point. With the “Unlock with Apple Watch” option checked in the Security Preference Pane I was able to unlock the laptop with the watch reliably at that distance before hitting the proverbial wall. That’s five feet from the laptop, and common sense would dictate that if you’re five feet’s worth of lunging distance from your computer then you’re probably going to be able to stop some miscreant from getting on there and causing much havoc.

In fact, it’s almost a certainty that you’ll be able to do that. Especially if your Mac is a desktop, as desktops are notoriously difficult to pick up with one hand and walk away with. You can probably see where I’m going with this; while you can bring your Apple Watch into close proximity with your laptop and unlock your way in you can also bring your laptop into close proximity with your watch and achieve the same result. And I know this because I’ve done it.

Just so we’re clear: I didn’t steal anyone’s laptop. In fact, I asked a friend of mine who works in a coffee shop to wait for me to go to the restroom, pick up my MacBook Pro, walk up to the restroom door and then see if it would unlock. He did, and it did, and if I’d been sans pants in a locked room then he could have escaped out of the back door with my unlocked laptop containing a ton of privileged data. As it is he charged me five dollars for two shots of espresso, so it’s not like the man is a saint.

Which brings me to the crux of the matter; you have to exhibit a little common sense when it comes to matters of authentication and access. The use case of a laptop wielding maniac loitering outside a restroom is a statistical long shot, but in an office with a ton of people wandering around it’s not improbable that this kind of attack could be carried off pretty efficiently…

Speedtest from the Command Line.

As a person who fires up the Speedtest site and/or app somewhere between three and about eight hundred times a week, it is incalculably negligent of me not to have know that there’s a way of doing this from the Terminal.

“Fine,” I hear you ask. “That’s great, but why should anyone have to go tinkering around with the Terminal when there’s a browser right there that they probably have open already?

That’s an excellent question, and the answer is that using Speedtest from the browser is pretty awful. I mean it looks like this for goodness sakes:

Actual IP address obscured via VPN. Nice try, h@XXors!

I don’t need to see a lot of adverts, and I also don’t want to be mucking around with ad blocking software and tweaking hosts files and whatnot. Yes, there are ways to deal with this kind of annoyance, but you often end up with a different set of annoyances that are really no better in terms of your general mental health and not-grinding-your-molars-into-powder. This is much better, though:

100% improved by green text and fewer mortgage refinancing adverts.

It’s fabulously easy to do, and huge kudos to the good people at Ookla for not only building a tool to do this but also making it downloadable as a binary and also installable via homebrew using these three, simple commands:

$ brew tap teamookla/speedtest

$ brew update

$ brew install speedtest --force

When you first run it you’ll have to agree to their licensing terms, but on the assumption that those are acceptable to you then I encourage you to go ahead and install the thing. Your blood pressure levels will probably thank you.

Update: It gets better! Hitting speedtest -help gets you all manner of goodies that you don’t get with the regular, boring web version. Being able to specify the interface you want to test on is pretty huge, and probably extremely useful for network troubleshooting…

Options abound!