Since macOS Server has been progressively waning as an affordable and effective counter-offering to the equivalent Windows and Linux alternatives I’ve been moving more and more clients to dedicated NAS hardware, which mostly means Synology DiskStations. I could write a whole other article about my experiences with Synology over the years, but nobody would want to read it because the vast bulk of it would be the equivalent of me doodling my first name and Synology’s last name in my binder during English Lit class, and probably drawing a lot of little hearts all over the place. tl;dr: Synology NAS hardware is excellent and only narrowly eclipsed by the software ecosystem they have in place.
It’s great. Not perfect (because perfection is entirely subjective), but really pretty great. The great thing about administering a macOS Server install was always that it had a solid toolset that was easy to navigate and configure for a wide range of tasks, and that if you had to go and do something peculiar with it then you could root around in the depths of that toolset and pretty much always come up with something workable. Working with Synology hits the same kind of reflexive impulse – you need to do a thing and you automatically go and reach for a way to do it, and there’s an answer. Synchronizing with another NAS at a remote location? Boom. Done. Set the thing up to auto-encode media? No problem. Backing up vast tracts of data? Easy.
Okay, not easy, but reasonable. Back when I first started working with Synology I found connecting to some cloud backups moderately torturous, but with a little patience and practice it’s possible to work it out without actually pulling your own hair out in frustration. I like to use BackBlaze B2 as a backup destination for Synology installs because it’s fast, secure, and crushingly, mind-bogglingly inexpensive. It’s like one of those here-are-three-things-you-can-choose-two situations where (against all expectation) you actually get to keep all three.
So, to work. Let’s set up a BackBlaze B2 bucket to work with a Synology NAS.
First, you’ll need a BackBlaze B2 account, available here. Go sign up. I can wait. You signed up? Great. Welcome back.
Next order of business is to log in to your Synology NAS and download the Cloud Sync Client from the Package Manager.
Now, the nitty gritty.
- Log in to BackBlaze B2 and create a new bucket by choosing “Buckets” from the side bar and then clicking on “Create a Bucket.” It’s pretty straightforward.
- Give your Bucket a pertinent name. If, for example, you were backing up your New Business Client folder then you’d call the bucket “New-Client-Files” (note the name can only contain alphanumeric characters or a “-“. No spaces.)
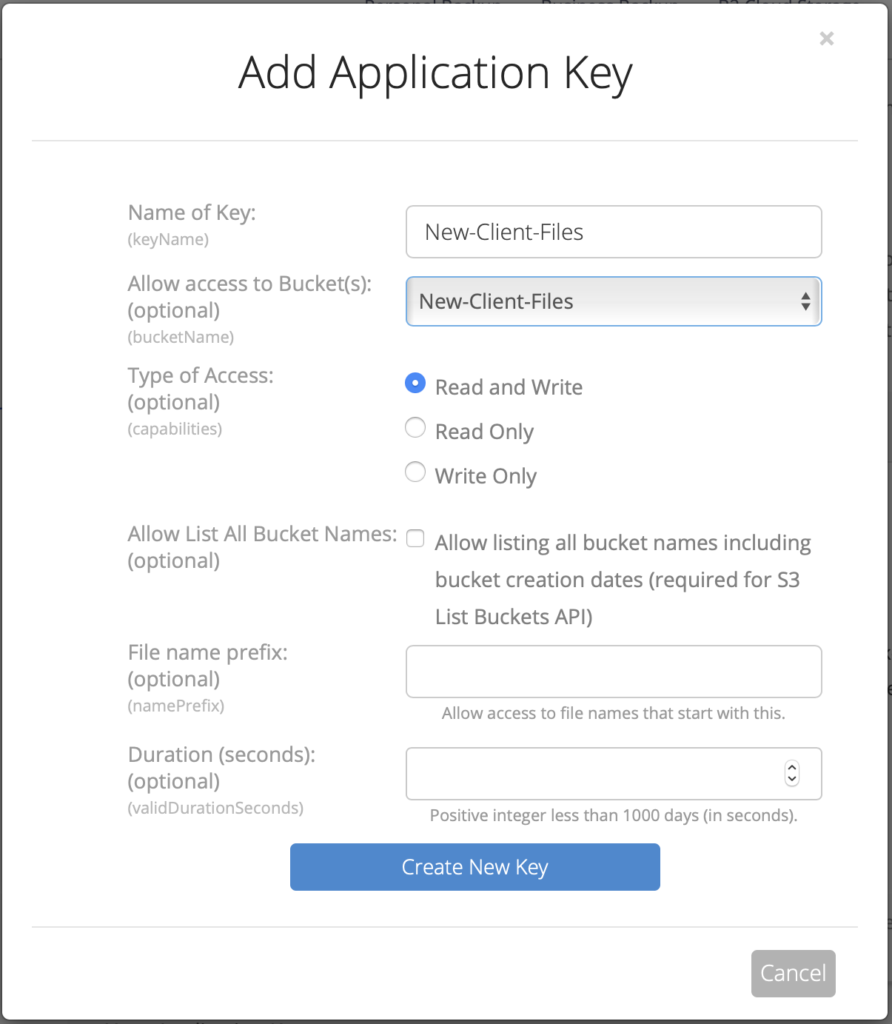
- If this is your first time creating any kind of keys then you’ll want to choose App Keys from the sidebar and create a new Master Application Key. You’ll see that displayed once and once only, so make a note of that or take a screenshot. If you’ve made a Master Application Key before then you should skip this step.
- Still in App Keys you’ll want to make a new Application Key by choosing “Add a New Application Key”. (When this sort of thing is this self-explanatory then I feel a little silly writing it down, but better to err on the side of obsessive compulsion.)
- You can name the Application Key whatever you like, but on a practical level it’s probably wise to make it something in line with the Bucket you created earlier, so “New-Client-Files” would be a decent choice.
- Choose the Bucket you want that Application Key to be associated by from the drop-down menu, then the type of access you want. Note: You’ll almost certainly want to leave that as Read and Write and not mess with the other options before hitting “Create New Key”.
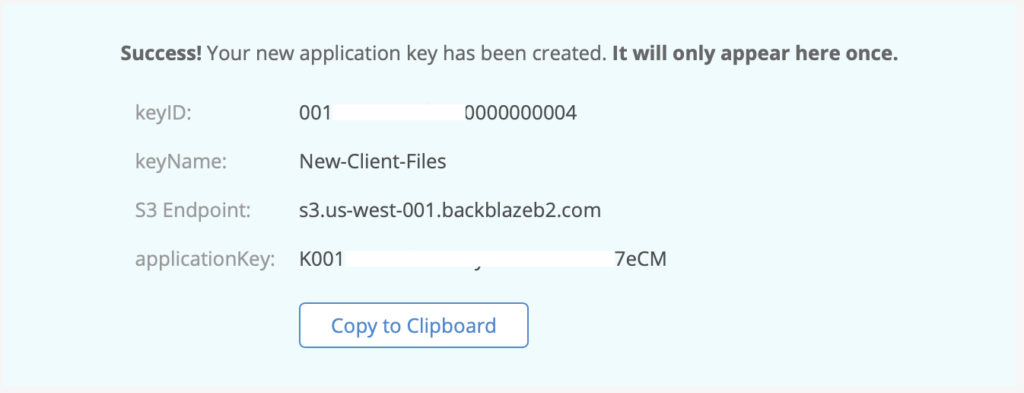
- You’ll get a success message with keyID, keyName, S3 Endpoint and applicationKey info. Make a note of all those and – ideally – leave that window open in your browser. It should look something like this:
- Navigate over to your Synology DiskStation and open up the Cloud Sync application, then hit the “+” icon to add a new Sync destination.

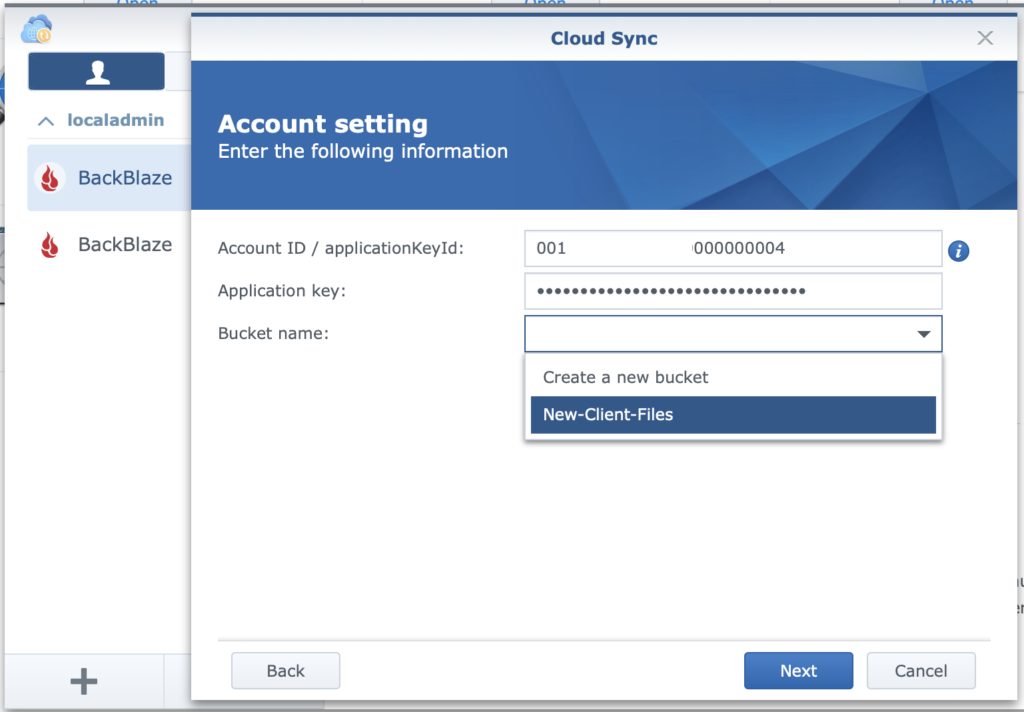
- Add the “keyID” data you got from the Application Key in BackBlaze to the “Account ID/applicationKeyId” field, and the “applicationKey” data from BackBlaze to the “Application Key” field. Watch out for extra spaces if you’re copy/pasting, as they’ll throw up authentication errors.
- From the “Bucket Name” drop-down menu you should be able to see the Bucket that you set up on BackBlaze. Most of the time this happens instantaneously, but if you have to wait a minute or two for it to show up then don’t be alarmed.
- Next, select the local shared folder you want to backup from the “Local Path” drop-down, and choose the Sync Direction you need.
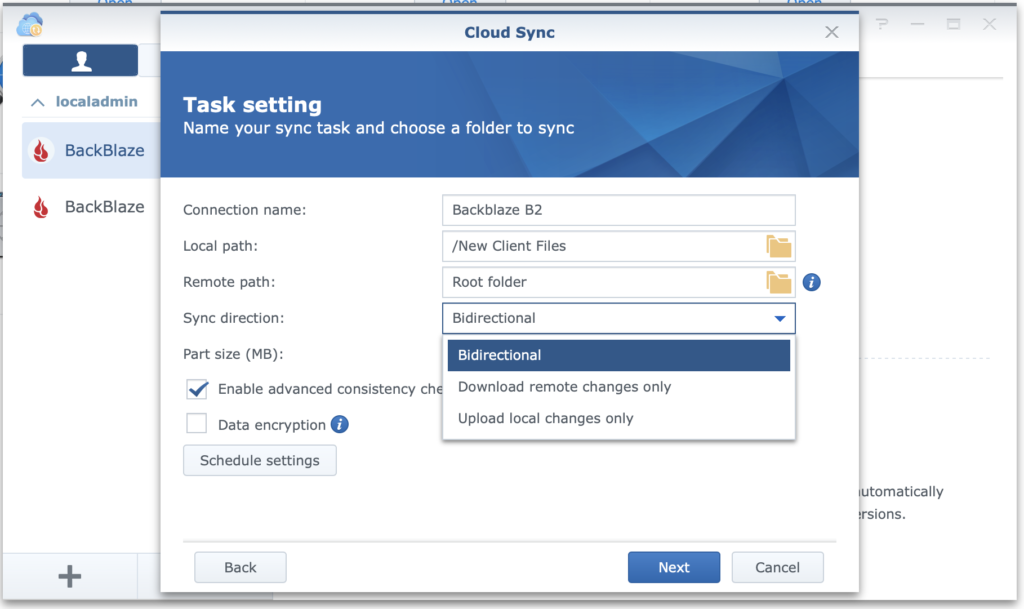
Note: If you’re interested in a straightforward backup then choose “Upload local changes only” and check the box next to “Don’t remove files in the destination folder when they are removed in the source folder.” If you neglect this step then any time you delete a directory on the NAS it will magically reappear, which might sound good on first blush but is actually really annoying. Case in point: renaming a large number of directories on a share only to find out that duplicate copies (with the old names) are pushed back down and you end up with multiple copies of everything and a lot of gnashing of teeth.
- Click “Next”, “Confirm Settings” and “Apply”. And you’re done!