I – as I’ve probably noted elsewhere on this blog – am rapidly becoming terribly old. Well, not terribly old; it seems to be a convention of the human condition that we shift the goalposts on a rolling basis, and while I felt like the weight of adulthood had settled firmly on my shoulders in my late-twenties I’m now willing to accommodate a world view where forty-seven doesn’t seem so bad.
Still, age is all in the mind. And the knees. Well, actually it’s more tangibly a knee-based phenomenon; you can feel as vigorous and sharp as you ever did but then you stand up and your joints make alarming gronking sounds and you start to wonder how long before the reaper starts pencilling you in on his rounds.
All this homespun wisdom is a preamble to the meat of this piece, which is about the state of malware on macOS. Oh, you didn’t get that from all the blathering about knees? That’s fair, I suppose; the occasion of my impending decrepitude is more about being old enough to remember when Macs got viruses, which was a very, very long time ago.
It’s worth spending a moment digging into what viruses actually are and the difference between viruses and malware. These seem to be used interchangeably, but they’re distinct and very different animals and the methods in which they’re employed and protected against are also distinct.
Viruses are computer programs that self-replicate when executed, modifying other pieces of code (executables and files/data) to incorporate themselves so that they can spread and infect other computers. If you make an exception for Microsoft Word macro viruses (which I do because they don’t do code-injection into anything and your Mac can only be a carrier) then there are no macOS viruses. That’s right, I’m planting my flag squarely in “none” and I’m holding that ground. If you disagree then, well, you and I are going to have to go outside and fight. And I’m going to take off my shirt and fight and nobody wants to see that.
(Sidebar: I wear glasses and have bad knees and a doctors note that stipulates no brawling in the street.)
The Mac used to have viruses, back pre-OS X. Some nasty ones, too, but virus software is just that – software – and if your modus operandi was to write code to infect the maximum number of machines in the 1990’s and 2000’s then your best bet was to go and write viruses for Windows. The irony that developers wouldn’t write viruses for Macs for the same reason that they wouldn’t write a lot of other software for Macs is not lost on me.
Malware is a wider net, and were it not for the specific mechanic of viruses (and the fact that people were talking about computer viruses decades before anyone coined the phrase “Malware”) then I’d be including viruses in that net. Most people do, and I agree that while that’s technically accurate in that a virus is a piece of software that runs on your computer and does Something Bad what we think of as Malware (or Adware, which is basically just a flavor of Malware) in this day and age tends to require human input. Generally speaking you have to perform an action to enable it; it’s the modern-day equivalent of having to invite the Vampire into your home before it can eat you.
Fortunately, Apple has done a lot to protect macOS. So much, in fact, that if we take a step out of the world of breathless hand-wringing and pause for a brief moment of sanity it becomes apparent that macOS malware is a fringe problem. A couple of weeks back the nice folks at Malwarebytes got a lot of press by pointing out that macOS Malware attacks are up disproportionately compared with Windows/Android attacks, and this is in fact broadly accurate. What a lot of people seem to have conveniently side-stepped is that you can shoot arrows at a brick wall all day long and not manage to do a lot of damage. Yes, macOS Malware attacks are up, but actual, real-world damage? Not a lot of significant difference there.
Why? My theory is that the point where macOS was insignificant enough to not merit attention and the point in which Apple introduced protections like GateKeeper (and now code notarization) was less a point and more an overlap. Further, it’s worth pointing out that with some elementary training and an ounce of common sense you can probably roll around in Malware all day long and come away smelling of roses. Let’s use the miracle of educational jpegs to illustrate this, shall we?

The fine folks at Kaspersky published this graphic back in January, showing that the Shlayer Trojan has an astonishing 29.28% share of attacks against macOS users. That’s clearly a bad thing and makes for great copy if you’re a company that makes anti-virus/anti-malware software, but the one thing that Shlayer has in common with every single other item on that list (and in fact every single other piece of malware for the Mac) is that it requires the following three things:
First, it requires you to download a piece of software from a suspicious website.
Second, it requires you to ignore the warnings that Apple gives you about installing unsigned software from an unknown source.
Third, it requires you to install that software by giving it your username and password – effectively authorizing the code to run on your computer.
That’s three break points that you’re required to sail through without considering your actions. It’s easy to point fingers at end-users and decide that that kind of negligence is inexcusable, but that’s childish behavior, lazy, reductive thinking and a quick and easy way to pass blame around; while finding who is to blame for something is always fun and enjoyable it’s ultimately not as important or useful as figuring out the explanation for the process of what went wrong.
So, let’s talk about process and education and best practices for not infecting your computer with Coronavirus, burning your house down and generally ruining your life. Those three break points are great places to start, and we’ll hit them with three actions; Evaluation, Execution and Consideration
Evaluation – Why do you need that piece of software? That browser extension? That utility that will make your Mac Run Faster And Better And Free Up Memory? What issue are you trying to correct? Recognizing that bad actors are perfectly willing to push solutions to problems that may (or may not) exist is a solid first step, and one that I encourage people to undertake.
I’ll go one further: pretty much every “Utility” “designed” to “make your Mac Faster” is either a con or outright lie. The vast bulk of them do nothing, and the few that actually do anything at all just run shell scripts to do the kind of periodic self-maintenance that your Mac does by itself without requiring stupid, shoddily-designed third party nonsense. A lot of these are malware, and the ones that aren’t are dumb and bad and designed to prey on the fears and concerns of people who don’t have the time or inclination to think about things like how your computer does periodic self-maintenance. You don’t need an app to free up memory or defrag your drive. Those are things that your computer does all by itself, or else there are sensible, grown-up reasons why it doesn’t do them at all. “Clearing Virtual Memory” sounds great, but when it means that your computer has to go and rebuild the caches it has in place and you’ve actually made your computer slower and less responsive then it doesn’t sound so great after all.
As a person who makes their living charging people for the privilege of having me help them with their macOS/iOS/network issues it may sound self-serving, but if you’re having an issue with your computer then call someone professional and ask their opinion. Or at least do a little research, and recognize that you’re not alone in figuring this stuff out. Not to be too pay-no-attention-to-the-man-behind-the-curtain about this, but malware authors don’t issue press releases and when a new piece of malware hits. We IT professionals are not notified in advance. We have groups and bulletin boards and mailing lists that we subscribe to where other professionals find weird things and report them and we figure stuff out. We ask questions and raise concerns and identify threats as a group. The second that some new, weird utility called “FixMyMacProFast” pops up you can bet someone’s looking at it with a long, critical eye, and if it’s problematic then word gets out fast. At the very least, google things before you download them and consider your sources.
So, call your IT person. There’s a decent chance that he/she/they won’t bill you for it, and they’ll be a lot happier about nipping something in the bud for free than dealing with a roiling nightmare and sleepless nights on the company dime.
Execution – This is your second break point. The moment that you’ve downloaded the new thing™ and you’re at the precipice of installing it. Before you go ahead, Gatekeeper will step in and your Mac will throw up a warning if the thing isn’t signed by a developer certificate, thus:
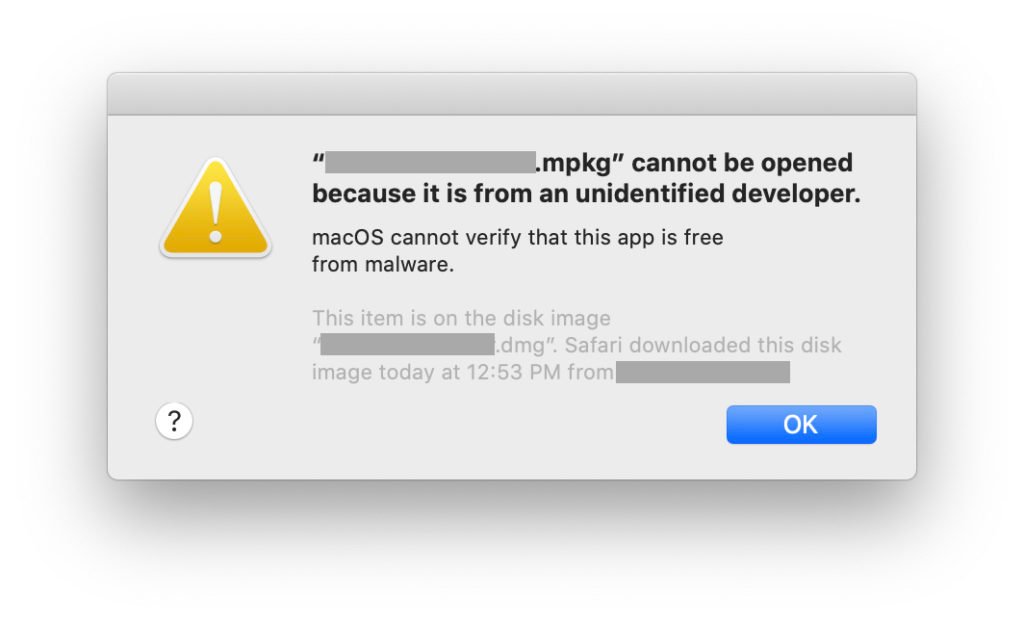
Your computer is literally telling you “Hey, I can’t guarantee that this isn’t going to do something really, really bad. Are you completely sure that you want to do this? I mean, really?”
At this point you can’t open the thing, except by hitting “OK” and then either adjusting your Gatekeeper preferences or by right clicking on the installer and explicitly telling your Mac to open it. Depending on how you look at it that’s either one or two break points at which you should be considering the provenance of what you’re about to put on your computer.
Consideration – This is your last chance. Before the executable runs it will probably want your username and password, so take a breath and think about what that means. This is a potentially unknown actor on your computer that Apple has specifically warned you isn’t necessarily legitimate, and that you’ve had to undertake extra steps to allow in, and now it wants your credentials – the same credentials used for, say, your Keychain. Where you probably keep a lot of encrypted data that you wouldn’t necessarily want accessed by anyone else. Passwords for email. Web pages. Encrypted notes. Banking information. Apple has included all kinds of security in the OS and in the hardware of the device itself, but that’s largely for naught if you’re going to hold the door open and freely hand out your private information. Consider this move very carefully.
The only thing that I really took away from my long-ago degree in Anthropology was the lesson that people – by and large – aren’t dumb. We may not understand why our fellow man believes something or acts in a certain way, but it’s a solid bet that they’re doing it for what they believe to be a damn good reason. Cargo cultists only look misguided and ill-informed from the outside; step in their shoes and look at their perspective and it’s very difficult to announce that their actions are illogical.
People tend to act in ways that make sense to them and seem the most logical and beneficial using the information on hand, and that’s the only vector that malware authors have to exploit. Further, anti-Malware/anti-Virus companies have a vested interest in building a little healthy hysteria up because they have targets and sales goals and costs, and if you’re a fire-extinguisher salesman then yelling “Fire” in a crowded theater makes good sense if you have a stall set up in the lobby. The middle line between actual and perceived threat is something that should be clearly identified and kept in perspective; if you want to protect yourself or your organization against attack then it’s vital to stay abreast of the dangers, enact reasonable protections and educate users on the threats that they’re going to face. There are great tools built into macOS, but tools are only as good as the hands that wield them…