Choose your weapon: VPN, Proxy or Tor

It probably says something about mildly disturbing about my character that I’m borderline obsessed with online security. That might sound like a setup for some kind of epic humble-brag (“I suppose my greatest weakness is that I’m too dedicated to doing this thing that is awesome” etc), but honestly, if you want to distract me from anything useful then start talking to me about IT security and I’ll break out the grey beard and pocket protector and suddenly turn from the dapper bon vivant my clients know and love into an utter, utter adenoidal bore.

Freudian theory would dictate that I’m clearly hiding some terrible, dark set of secrets that make me preternaturally concerned with discovery and deceit, but I’m frankly baffled as to what they could be. I mean, my greatest flaws are that I lie about going to the gym, play Dungeons and Dragons over Zoom with other nerds on Thursday nights and my secret addiction is about thirty-five dollars a week in espresso and not opioids or persons of negotiable value. It’s distressingly low-stakes stuff. My midlife crises are of the existential variety and not the acting-out type. I’m… well. I’m pretty dull.

And it’s probably that inherent, unrelenting dullness that makes me interested in security, simply because a lot of it so cerebral and complex, and scratches all the itches that speak to philately and not philandery. Still, there are nuances that are potentially interesting to people who don’t lick their chops when they hear about end-to-end encryption and start banging on about said subject while their loved ones roll their eyes at the dinner table and exchange just-let-him-get-it-out-of-his-system looks, and those nuances also happily seem to fall into the category of things-I’m-sometimes-asked-about, and so here we are in paragraph three and I’m about to talk about masking your IP address. I’ll try and make this painless.

Practicing safe browsing is common sense in this day and age. It’s not simply a case of hiding your location and details from the authorities out of (probably justifiable) paranoia about The Man nor is it about using anonymity to go and do illegal things on the internet. Okay, it’s partly about those things, but it’s more about the value of privacy in an age where the commoditization of the individual has become the chief form of currency. Advertisers track you, build profiles of you, push products and content at you, increasingly crafting narratives and information designed to feed their ideas of who you are economically and demographically. Andrew Lewis put it concisely into this quote: “If you are not paying for it, you’re not the customer; you’re the product being sold.” It’s an unfortunate condition of using the internet, and it’s kind of gross. But there are simple, easy, legitimate ways to take yourself off the market.

VPNs and Proxies are a simple and effective way to mask your location and presence on the internet, and Tor is a technology that essentially uses an alternate network altogether. There are pros and cons to each.

A VPN creates a Virtual Private Network – an encrypted channel between you and the endpoint you’re accessing on the internet.

Pro: When you connect to a VPN you’re essentially telling your computer that it has a special network interface, and that when data is sent out via that interface it is encrypted and protected and – as far as the world is concerned – you’re actually at the end point. A prime use for VPNs is connecting from a remote location – coffee shop, airport, home – to an office network. You host a VPN at the office and connect to it remotely, and as soon as you do so then your office network thinks that you’re on its local network and in your office and not using the Shake Shack™ guest Wifi network in Irvine, CA. The sketchy guy at the table near the door can’t eavesdrop on the traffic going into and out of your computer, and you can access all the resources you have in the office (servers, printers etc) just as if you were actually on the office network – because in a very real sense, you are on the office network.

Con: VPNs don’t always work. Oh, sure, they mostly work just fine, but it’s entirely possible for VPN traffic to be blocked or throttled by ISPs and local networks – particularly if you’re running your own VPN out of your office/remote location. If you don’t run or roll your own and prefer to use a commercial VPN solution (you know, the kind you pay ten bucks a month for) then you need to read some fine print and do some research. Sure, any data you send to and from those VPN providers is securely encrypted, but there’s nothing preventing them from logging what you access on the internet once you’re connected to them. Some VPN providers will swear blind that they don’t keep logs, but that’s not always factually correct.

Proxies are much like VPNs in that traffic you send or receive goes is handled on your behalf by a third party.

Pro: Proxies are reasonably fast, and proxies are flexible; where a VPN sends everything out of your computer as encrypted traffic to a remote location, a proxy can be set up for a particular service or program. Want to use one proxy for web traffic on Safari and another for gaming? Fiddly, but doable. Also, proxies are relatively simple to set up and inexpensive.

Con: Proxies are not as fast as VPNs. And they do a miserable job of securing your data. That guy at Shake Shack™ might as well be like that kid John Ellison when you were in eighth grade who you had pass a note to Hannah Davis during math class to ask if she’ll go out with you. Yes, he’s going to be able to read everything, and No, she was never going to date you with that haircut.

Tor is the one I get asked about least. I think that’s because Tor doesn’t really use the internet as we know it; instead it routes traffic through multiple volunteer networks.

Pro: Tor is secure. Like, really, really secure. It’s less a product and more a system of stripping your data of identifying information, adding layers of encryption and then funneling your data through multiple networks. To use Tor you’ll need the Tor browser (based on Firefox).

Con: The Tor browser is great and allows you to use the Tor network, but on the other hand it’s not infallible. You have to trust the operator of the exit node you’re connected to, who can potentially track your information and activity. Additionally, the Tor browser only protects data on that browser – anything else sent out on your computer is something that your ISP can track, and additionally your ISP can see that you’re using Tor.

So, what does this all get you? Well, it’s clear that there are pros and cons to proxies, Tor and VPNs. But can you mix and match to get the best of all worlds?

Sort of. You can combine a Tor and a proxy by connecting to Tor via a proxy – which isn’t a great idea because then the connection between you and the Tor network goes through an unencrypted proxy. The other way round is marginally better – if you connect to a proxy through Tor then your traffic would end up finally exiting through a proxy and thus the ISP would have no proof that you were using Tor. But it’d be slow. Like, slow.

No, the better move is to combine VPN and Tor. Using those two together isn’t what you’d call fast, either. But if you’re using a VPN to encrypt your traffic to the Tor network then you’re getting the best of all possible worlds; route obfuscation and end-to-end-encryption. Your data is encrypted when it enters the Tor network and your origin IP address is likewise protected…

Moving fast and breaking things with Yubikey and macOS

Right. Last time I wrote about how to configure your Mac to optionally use a Yubikey as a hardware authentication device – you plug the Yubikey in to a free USB port and you can then use the PIN for that key to log in to your user account – which is handy if you don’t want to have to mess around with your regular password. However, allowing it as an optional method of authentication isn’t the same thing as requiring it as a method of authentication. In other words, if you didn’t have your Yubikey handy then you could type in your password and still be able to use your computer, but maybe there are times and circumstances where you’d like to disable the ability to use a password entirely and substitute it with a Yubikey.

Yes. It really is this tiny.

This isn’t as crazy as it seems. Gather around the fire, friends, and let me recount a tale from the long, long ago; a fragment from a distant time, a ghostly antiquity from the Turn Of The Century.

A long time ago I worked at a design/branding agency where I had the unenviable duty of acting as a sort of media archivist as well as general IT factotum. This translated to being the guy who – if you needed to pull a work file from an archived job from three years ago – knew where to find the DVD with the data burned onto it. (This was almost twenty years ago. Storage space was expensive and DVDs were cheap. It was a different time, whippersnapper!) I didn’t particularly enjoy this condition of my employ, but it was fine. We used an obscure media-tracking application that had been put into effect some years beforehand and was full of an enormous amount of data that we were stuck with – we tried a lot of abortive attempts to shunt the massive, proprietarily-created weird database that the application used into some kind of form that we could slap on the office intranet with no real effect, so I was stuck doing it by hand; now and again I’d have someone show up and give me a time and a project name and I’d go dig through the archive and pull out the data, and everyone would be happy. To a degree. Okay, all parties would be equally frustrated, but would at least be good-natured and mutually apologetic about it.

Except for one guy, who was kind of a jerk. He thought that this was a ridiculous arrangement – and while I agreed with this in both theory and practice I at least understood that you can’t cram two hundred gigabytes of data into a one hundred gigabyte RAID and that being as this was the case it a necessary evil that it took a few minutes to go dig up old work. He didn’t. And he didn’t like waiting for me to go find the data for him, so because he wasn’t long on confrontation and trying to be proactive he thought the logical first move was that he should try and break into my computer and go find the data for himself.

I don’t think it’s controversial to run the following opinion up the flagpole: This was a dick move. But he was pretty sneaky about it – it took me a while to figure this out, but as the IT guy I’d usually be one of the first people in the office each morning and there were plenty of times that I’d find him there already, in a vile mood, loitering around my office. Sometimes my desk was in disarray (inasmuch as that was possible considering I’d spent years perfecting the platonic ideal of disarray). Once or twice I caught him sitting at my desk with my computer turned on and at the login screen. Just waiting for me to get there, he’d say.

And then, one day, I went to fix… I don’t remember. Probably something to do with QuarkXpress (because it was twenty years ago and QuarkXpress broke so badly and so often that whole careers were made out of fixing the thing), but that’s not important. I was at his desk and saw, stuck on a post-it note, my login password for my computer. He’d been watching me type on the keyboard when I logged in and I think he’d piecemealed it together over time.

This stuck in my craw because it was my computer. As in, not the-computer-that-work-issued-me because all the budget went into gear for the design teams and the computer they gave me had some serious hardware defects, but my computer as in the-one-that-I-bought-with-my-own-money-and-kept-at-my-office-desk. Still, things being as they were, there was little I could do about this except be creative about it, so I was creative about it. For one thing, I changed all my passwords. For another, I put my boot volume on a fast external drive and took it home with me every night. With no operating system there was nothing for him to snoop on. Effective, but drastic, and horribly insecure because if something terrible had happened to that drive (lost, stolen, destroyed) it would have significantly impacted my job performance. Everything was backed up, but it would have cost some time to restore things to their former glory.

Still, while he was a fairly senior person in the company there was a lot of information on that drive that for one reason or another couldn’t live on a server share and also was not for his eyes – after all, as well as finding DVDs and fixing QuarkXpress I also supported the CEO and had a couple of projects I was working on for her on there that the rest of the rank and file should absolutely not know anything about.

(Sidebar: On the slim chance that the offending party might ever read this – you know who you are and I’m still mad about it.)

If there’d been a way to secure login to that computer with a token that I could have kept on a keychain – say, a Yubikey – then this would have been a considerably simpler problem to navigate. That guy could have written passwords or PIN numbers down all day long, but without my hardware token plugged into the thing he’d have been pulling his hair out in frustration. And that would have been a thing of beauty.

It turns out that setting up macOS to only allow authentication via Yubikey/Smartcard isn’t terribly complicated. There are a few hoops to jump through, but the procedure itself isn’t vastly involved. However, there are a few caveats that I’d encourage you bear in mind before going forward.

Firstly, enable the root user (open /System/Library/CoreServices/Applications/Directory Utility and choose “enable root access). Having root enabled on your Mac is generally regarded as A Bad Thing for many excellent reasons, but we’re about to go mucking around at the bottom of the Marianas Trench of the operating system, so having God Mode on tap in case things go awry is a must. You can (and should) always turn it off again once we’re done.

Secondly, make sure you have a good backup before you start anything. If something unexpected happens (bizarre system crash, power cut, bad stick of RAM, freak Act of God) then you could incur significant loss of data – or more precisely, significant loss of access to your data.

Assuming you’ve taken both of these into account, we’ll need to change some things in /etc/pam.d – which I wrote about a few weeks back and took a run at an explanation of the mechanics of the thing that might be worth a read.

In case things go awry we’ll do some backing up in /etc/pam.d – I have my Yubikey set up and enabled for sudo and login, so to make a copy of the default, non-tinkered-with configurations for each you should enter the following two commands:

sudo cp /etc/pam.d/login /etc/pam.d/login_backup_`date "+%Y-%m-%d_%H:%M"`

sudo cp /etc/pam.d/sudo /etc/pam.d/sudo_backup_`date "+%Y-%m-%d_%H:%M"`

Note: It is important to back these up prior to changing anything. If you mis-type something and don’t have these files backed up then you’re in a world of hurt, but if you have these files backed up and root access enabled then you can log in as root at the loginwindow and copy these files back to their default names/locations.

Next, if you want to use your PIN instead of your password when executing sudo then replace the contents of /etc/pam.d/sudo with this text:

# sudo: auth account password session
auth        sufficient    pam_smartcard.so
auth        required      pam_opendirectory.so
auth        required      pam_deny.so
account     required      pam_permit.so
password    required      pam_deny.so
session     required      pam_permit.so

At this point you’ll now be required to use your Yubikey PIN instead of your password whenever you want to use sudo – it’s not for everyone, but my PIN is deep in my muscle memory and it’s a lot faster than typing in my password. If you want to change it back then I implore you to make sure that you open the backup you created and then sudo pico /etc/pam.d/sudo and manually make the changes you want rather than deleting the /etc/pam.d/sudo file, because it’s awfully hard to use your keys to unlock your front door when you’ve just chucked the things in the drain.

If you want to force the use of a PIN/Yubikey to log in to the computer then you’ll need to likewise change the contents of /etc/pam.d/login to this:

# login: auth account password session
auth        sufficient    pam_smartcard.so
auth        optional      pam_krb5.so use_kcminit
auth        optional      pam_ntlm.so try_first_pass
auth        optional      pam_mount.so try_first_pass
auth        required      pam_opendirectory.so try_first_pass
auth        required      pam_deny.so
account     required      pam_nologin.so
account     required      pam_opendirectory.so
password    required      pam_opendirectory.so
session     required      pam_launchd.so
session     required      pam_uwtmp.so
session     optional      pam_mount.so

Finally, create a new file on your Desktop by firing off touch ~/Desktop/smartcard.mobileconfig and then pico ~/Desktop/smartcard.mobileconfig and copy in this wall of text:

<?xml version="1.0" encoding="UTF-8"?>
<!DOCTYPE plist PUBLIC "-//Apple//DTD PLIST 1.0//EN" "http://www.apple.com/DTDs/PropertyList-1.0.dtd">
<plist version="1.0">
<dict>
<key>PayloadContent</key>
<array>
<dict>
<key>PayloadDescription</key>
<string>Configures smart card-only</string>
<key>PayloadDisplayName</key>
<string>Smart card-only</string>
<key>PayloadIdentifier</key>
<string>com.apple.configprofile.78.</string>
<key>PayloadOrganization</key>
<string>Apple</string>
<key>PayloadType</key>
<string>com.apple.security.smartcard</string>
<key>PayloadUUID</key>
<string>5A15247B-899C-474D-B1D7-DBD82BDE5678</string>
<key>PayloadVersion</key>
<integer>1</integer>
<key>UserPairing</key>
<false/>
<key>allowSmartCard</key>
<true/>
<key>checkCertificateTrust</key>
<false/>
<key>enforceSmartCard</key>
<true/>
</dict>
</array>
<key>PayloadDescription</key>
<string>Smartcard profile.</string>
<key>PayloadDisplayName</key>
<string>Smart card-only</string>
<key>PayloadIdentifier</key>
<string>com.apple.configprofile.77</string>
<key>PayloadOrganization</key>
<string></string>
<key>PayloadRemovalDisallowed</key>
<false/>
<key>PayloadType</key>
<string>Configuration</string>
<key>PayloadScope</key>
<string>system</string>
<key>PayloadUUID</key>
<string>7D34CC86-C707-44D2-9A9F-C5F6E347BD77</string>
<key>PayloadVersion</key>
<integer>1</integer>
</dict>
</plist>

Close out of the Terminal, find the smartcard.mobileconfig file you just created, double-click on it and install it.

All things being equal, you should now have your computer set up to require the Yubikey for logging in. If you pull the key out and try and log in you’ll get a password prompt, but neither your password nor your PIN will work until you plug the key in. Likewise, unlocking System Preference Panes or any other task that requires an admin password.

Securing your Mac with a Yubikey for Fun And Profit.

Last week I wrote a pretty dull treatise on some of the problems with using your phone as a solution for multi-factor authentication. Actually, just reading that last sentence aloud has a soporific effect, so I’m off to take a quick nap.

Right. That’s better. Using your phone as a security measure is fraught with problems because there’s a perennial tradeoff between convenience and security, and when push comes to shove most people like to talk a good game about the latter but end up opting (albeit with varying levels of guilt) for the former. Physical key setup has a reputation of being fiddly, so I thought I’d knock out a quick how-to on how to do it (relatively) painlessly.

Note: In order to secure your Mac with a Yubikey, you’re going to need… wait for it… a Yubikey. They have a nice wizard on their site that’ll help you choose the model for your optimal security needs, but the one I have is the Yubikey 5C Nano. You’ll also need admin access to your Mac, to be running macOS High Sierra or above, and to have downloaded (and installed) the Yubikey Manager software.

Your Yubikey will come out of the box with a PIN, PUK (PIN Unlock Key) and 3DES Management Key already programmed into it. While we’re on the subject of acronyms, the Yubikey uses the PIV (Personal Identity Verification) card interface to do its signing/decrypting. If that none of that makes a lot of difference to you then that’s fine; think of it as analogous to purchasing a combination padlock. Right out of the package it has a combination set up on the thing – you change that before you put it on your gate/locker/avant garde fashion statement/80’s punk jewelry chain, but nonetheless it comes with something set up on it from the factory.

The PUK and PIN for the 5C Nano is 123456, and the Management Key is an eye-watering 010203040506070801020304050607080102030405060708. You will, if you’re not an idiot, want to change all of those to something more in line with elementary common sense and reason, and this is done via the Yubikey Manager app.

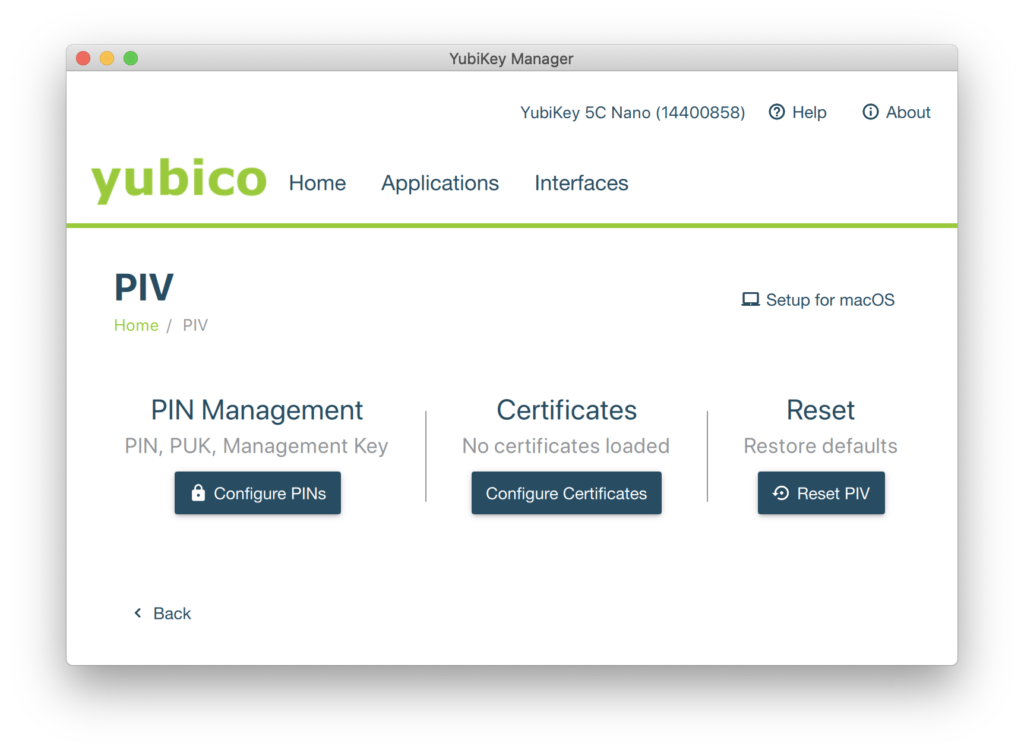
Firstly, choose “PIV” from the “Applications” menu:

Click “Configure PINs” then “Change PIN”, enter the old PIN (123456) and then the new PIN (a 6-8 digit number. Not 123456 or 12345678.)

Once you’ve clicked “Change PIN” you’ll be put back in the PIV screen, so hit “Change PUK” to… well, change the PUK. It’s the same drill; replace the old PUK (12345678) with another six-to-eight numbers, then hit “Change PUK” to head back to the PIV screen so you can change the Management Key.

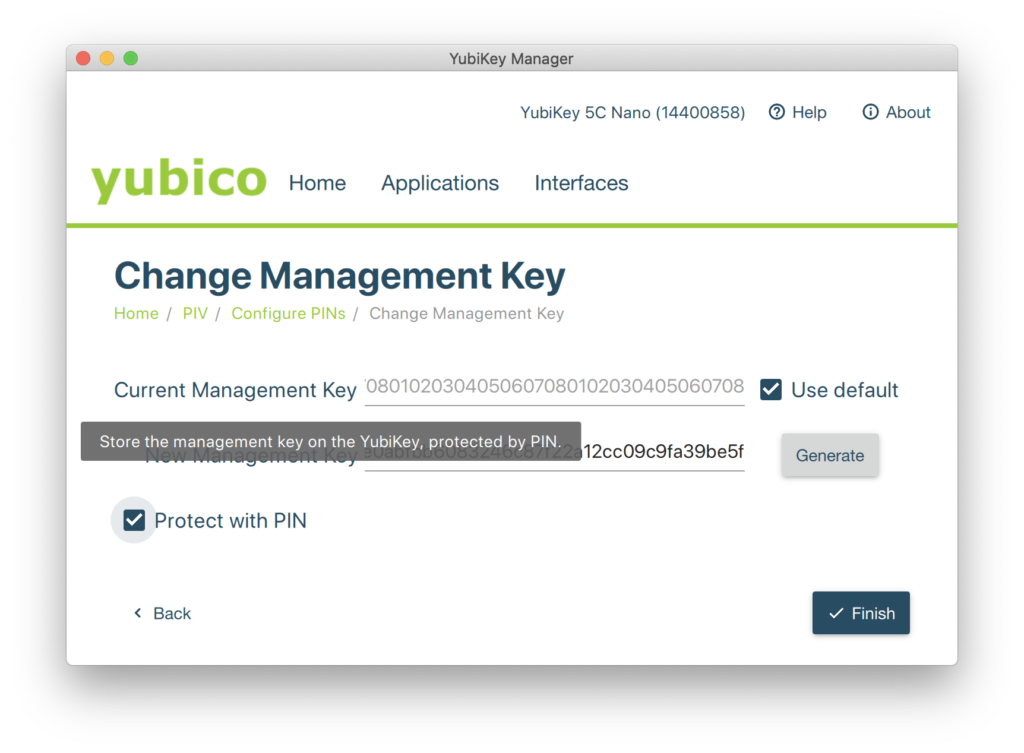
No, this isn’t my actual Management Key. I changed it because, well, Internet.

This bit is a little trickier and there are a couple more moving parts to consider. If you have a favorite, catchy, memorable 48 character password you like to use as a matter of course and feel it appropriate to spend thirty seconds typing the thing in here then by all means do so. On the other hand, it’s a lot easier to click “Generate” to create a randomized key, and that’s what I do. It’s also worth spending a moment with your mouse hovering over the “Protect with PIN” button, as checking that box will allow you to use the convenient six-to-eight digit number you made up a couple of steps ago and not have to bash away at the keyboard trying to remember if it was bc2b0366860a92dab92de4141dd87e3ed58d39c48a3c6442 or bc2b0366860a92dab92de4141dd873eed58d39c48a3c6442.

tl;dr: check the “Protect with PIN” box.

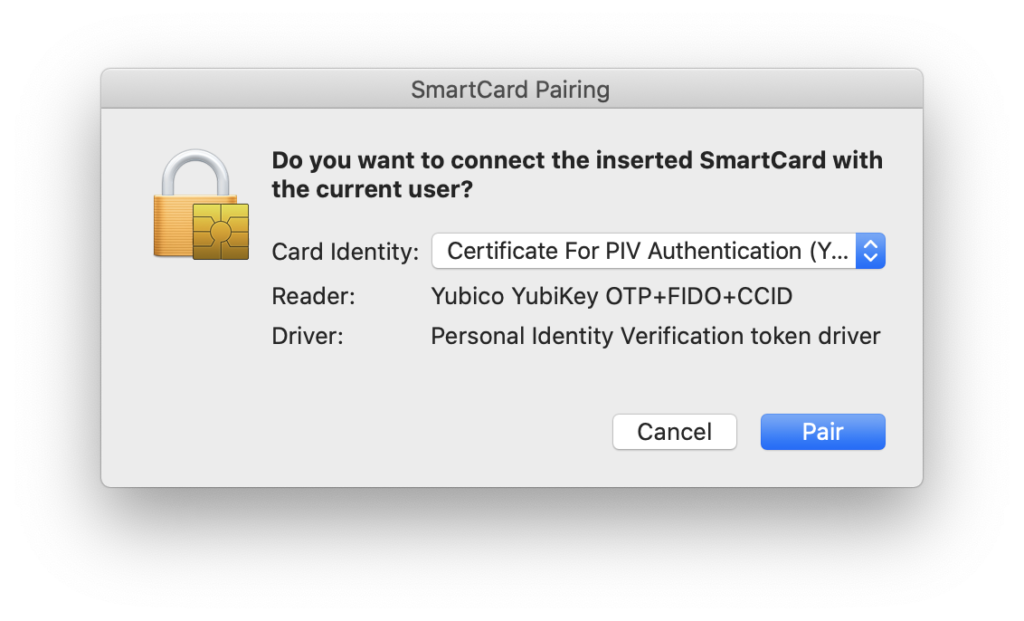
Back at the Applications->PIV window, click on “Setup for macOS”, because if you’re this far down then that’s probably the reason you’re here. Click “Setup for macOS” again and enter your PIN then click “OK”. You’ll be asked to remove the Yubikey from your Mac and then plug it in again, and all things being equal doing so will give you this notification:

Click “Pair”, and then wend your way down the garden path of approving things and Giving The Process What It Wants, like so:

Yes. Pair.
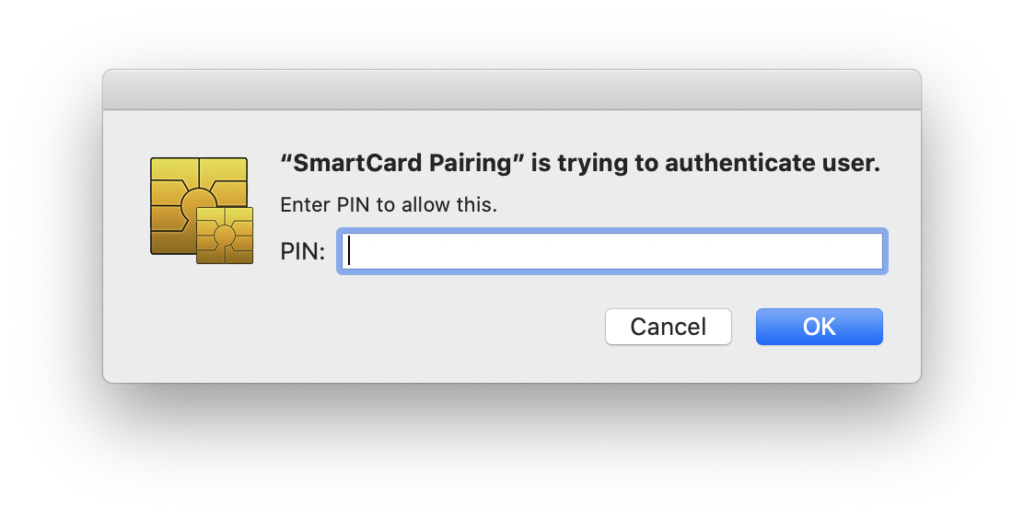
Enter your PIN, and then your login/keychain password

All things being equal, you should now be able to use that PIN to log in to your account while the Yubikey is connected to your Mac. Testing it out is pretty simple; just choose “Login Window…” from the Users menu at the top of the screen and check to see if you can use your PIN to log in.

Note: PIN being asked for in lieu of old, ugly password.

So, why do all of this? Well, for one thing it allows you to greatly up your local security game. Passwords are an Achilles heel for security – they’re theoretically decent enough, but the problem with passwords is that they have to be something that people can remember and use, which is why whenever someone sits me down in front of a computer that they don’t know the password to I generally try “password” and it works alarmingly often. The solution – the way to make passwords feasible – is to make them monstrously, inhumanly difficult to the point that people can’t remember them.

Or, better yet, make them something that people never know. Work with me here.

Imagine you have an office with ten computers in it and ten people using those ten computers. Normally, people would be assigned passwords that they’d have to remember and ostensibly keep secret, but anybody who’s ever worked in an office with a bunch of other people knows that passwords are soon widely known, or the schema is worked out. If I was hired at DaveCo on June 12th 2007 and my password is dave061207 then it’s pretty simple to work out what my boss Bob’s password is if I know he was hired on January 3rd 2008 (hint: it’s probably bob010308). If Bob is out of the office and has a spreadsheet with DaveCo secrets on it then I can go look at that and see things I’m not supposed to. Or maybe Bob writes his password on a post-it note and leaves it on his monitor (or – pro tip here – stuck to the underside of his keyboard), and so on and so forth. The takeaway here is that password security breaks down with remarkable ease.

So, let’s take away rational passwords. Let’s replace bob010308 with rjaycuyfhephudojpunmibelpehuokk, and replace dave061207 with dovopuewubsidopsykfyddaoravykwu, and then we’ll give Bob and Dave a token that they keep on their keychain and plug into their computer whenever they’re using it. And then let’s never tell Bob and Dave what their passwords are. Why? Well, they don’t need them anymore. If Bob and Dave need to unlock something or log in to their computers then all they have to do is plug their tokens into a USB port and enter their six-to-eight digit code. If one of them steps away from their computer to run out for lunch then all he has to do is unplug his keychain and have a hot corner set up to switch to the login window and that computer is suddenly very secure. The actual passwords are secured and kept by an office manager or IT person or someone similar should they be needed; that way it’s possible to log in using that horrible password if a token is lost or destroyed.

Of course, there’s another option here. Right now, the token is optional as a means to log in or access the computer; if you pull it out then you can still enter a password. But what if you wanted to take it a step further? What if you wanted to make using a token mandatory and disabled any other way of logging in? More on that next week…

Stick a PIN in IT.

Last week’s Twitter hack was an example of how good design and implementation isn’t a panacea for functional insecurity.

It’s easy to obfuscate or hide the shameful truth of how you’ve been compromised, but I have to give props to the Twitter security team for being frank and open about what happened. In short, parties-somewhat-unknown managed to take over a healthy fistful of ostensibly secured and verified high-profile accounts via social engineering and access to an internal Twitter slack channel upon which access credentials and tools had been left for all to see. This – and I don’t want to blow anyone’s mind by stating this – was a Bad Thing To Do on Twitter’s part – understandable, but nonetheless unwise.

Still, for a moment or two the prevailing theory was that some of those accounts had been compromised using the same method that prior Twitter hacks employed, and thus – for a brief moment – the narrative illustrated the Achilles heel of a lot of modern authentication exploits, chiefly that SMS hacks and SIM swaps are a remarkably efficient way of completely defeating text-based two-factor authentication.

In simple terms, a SIM swap is usually a socially-engineered hack whereby someone convinces your phone carrier to port your phone number over to a SIM card that isn’t yours and that they own. Sometimes this is done with the aid of an unscrupulous phone company employee, sometimes this is done with enough personal information and details about the victim that a legitimate employee might be fooled, but the net effect is the same: a person (who is not you) is in possession of a phone (with a number that latterly belonged to you) that they can use to receive SMS messages from companies and institutions that use SMS as a means of secondary authentication. Thus, they can seize control of anything that sends a one-time code to your phone to prove your identity, steal your social media accounts, raid your bank accounts and generally play havoc with your life.

While a host of companies (I’m looking at you Google) employ the use of authentication software that isn’t tied to SMS messages, Apple’s approach is fairly ingenious. Simply, if you’re trying to access your iCloud account on a new device then it’ll send a six-digit code to another device signed in with the same Apple ID, so that your prospective attacker would need to also have access to another device signed into your iCloud account in order to be able to get the code to access your iCloud account. Which, if you think about it for a second, is as silly as it is unlikely.

It’s a solid approach, but only really good for data inside their own little ecosystem, and for my money there are are better two-factor solutions out there. Apps like Google Authenticator give you an extra level of security in that the code required to access the relevant service is created on a device that you already own and that you’ve already configured to create the relevant code. Better yet, Google supports the use of physical authentication methods like Yubikey, which requires an actual USB or NFC device to be plugged into the computer or phone in order to allow access. The beauty of this is that if someone wants to steal your data then they’re not only going to have to steal your device but also swipe your physical keys, which rather ups the game on their end from “stupid, greedy and malicious” to “Thomas Crowne Affair-style shenanigans.”

Still, setting up physical keys and enabling the use of apps like Google Authenticator are – while strongly recommended for critical services – potentially a lot to manage for a lot of people. I love Google Authenticator, but I have about eight or nine different services set up on the app and have to scroll around the list to find the right one only to find that the key is about to time out, which is admittedly a pretty low-stakes complaint but apparently yes, I’m that petty and shallow. It’s an unfortunate truth that if you make a system too complex or difficult then people won’t use it, and third party authenticators sadly seem to fall into that category. It’s understandable; there are hoops to jump through and apps to install and codes to scan and the miscellany of the operation can be tiresome and easy to push off to tomorrow or ignore altogether.

There is, fortunately, a fantastically simple way of locking unauthorized people out of your phone accounts: put a PIN on the account. AT&T (for example) calls it a “wireless passcode”, and it’s simple to find if you log into your account via their customer portal; simply create a four-to-eight digit code and then that will be required whenever you (or someone pretending to be you) wants to do anything to your account either online or in a retail store. Verizon and T-Mobile offer something similar – it won’t protect you if someone at the phone company is willfully consorting with criminal elements to defraud you and compromise your identity, but it’ll stop anyone from walking into a phone store with a tale of woe and your personal details and walking out with a new phone and the keys to your life…

Incorporating BackBlaze B2 into your NAS infrastructure

Since macOS Server has been progressively waning as an affordable and effective counter-offering to the equivalent Windows and Linux alternatives I’ve been moving more and more clients to dedicated NAS hardware, which mostly means Synology DiskStations. I could write a whole other article about my experiences with Synology over the years, but nobody would want to read it because the vast bulk of it would be the equivalent of me doodling my first name and Synology’s last name in my binder during English Lit class, and probably drawing a lot of little hearts all over the place. tl;dr: Synology NAS hardware is excellent and only narrowly eclipsed by the software ecosystem they have in place.

It’s great. Not perfect (because perfection is entirely subjective), but really pretty great. The great thing about administering a macOS Server install was always that it had a solid toolset that was easy to navigate and configure for a wide range of tasks, and that if you had to go and do something peculiar with it then you could root around in the depths of that toolset and pretty much always come up with something workable. Working with Synology hits the same kind of reflexive impulse – you need to do a thing and you automatically go and reach for a way to do it, and there’s an answer. Synchronizing with another NAS at a remote location? Boom. Done. Set the thing up to auto-encode media? No problem. Backing up vast tracts of data? Easy.

Okay, not easy, but reasonable. Back when I first started working with Synology I found connecting to some cloud backups moderately torturous, but with a little patience and practice it’s possible to work it out without actually pulling your own hair out in frustration. I like to use BackBlaze B2 as a backup destination for Synology installs because it’s fast, secure, and crushingly, mind-bogglingly inexpensive. It’s like one of those here-are-three-things-you-can-choose-two situations where (against all expectation) you actually get to keep all three.

So, to work. Let’s set up a BackBlaze B2 bucket to work with a Synology NAS.

First, you’ll need a BackBlaze B2 account, available here. Go sign up. I can wait. You signed up? Great. Welcome back.

Next order of business is to log in to your Synology NAS and download the Cloud Sync Client from the Package Manager.

Now, the nitty gritty.

  • Log in to BackBlaze B2 and create a new bucket by choosing “Buckets” from the side bar and then clicking on “Create a Bucket.” It’s pretty straightforward.

  • Give your Bucket a pertinent name. If, for example, you were backing up your New Business Client folder then you’d call the bucket “New-Client-Files” (note the name can only contain alphanumeric characters or a “-“. No spaces.)

  • If this is your first time creating any kind of keys then you’ll want to choose App Keys from the sidebar and create a new Master Application Key. You’ll see that displayed once and once only, so make a note of that or take a screenshot. If you’ve made a Master Application Key before then you should skip this step.

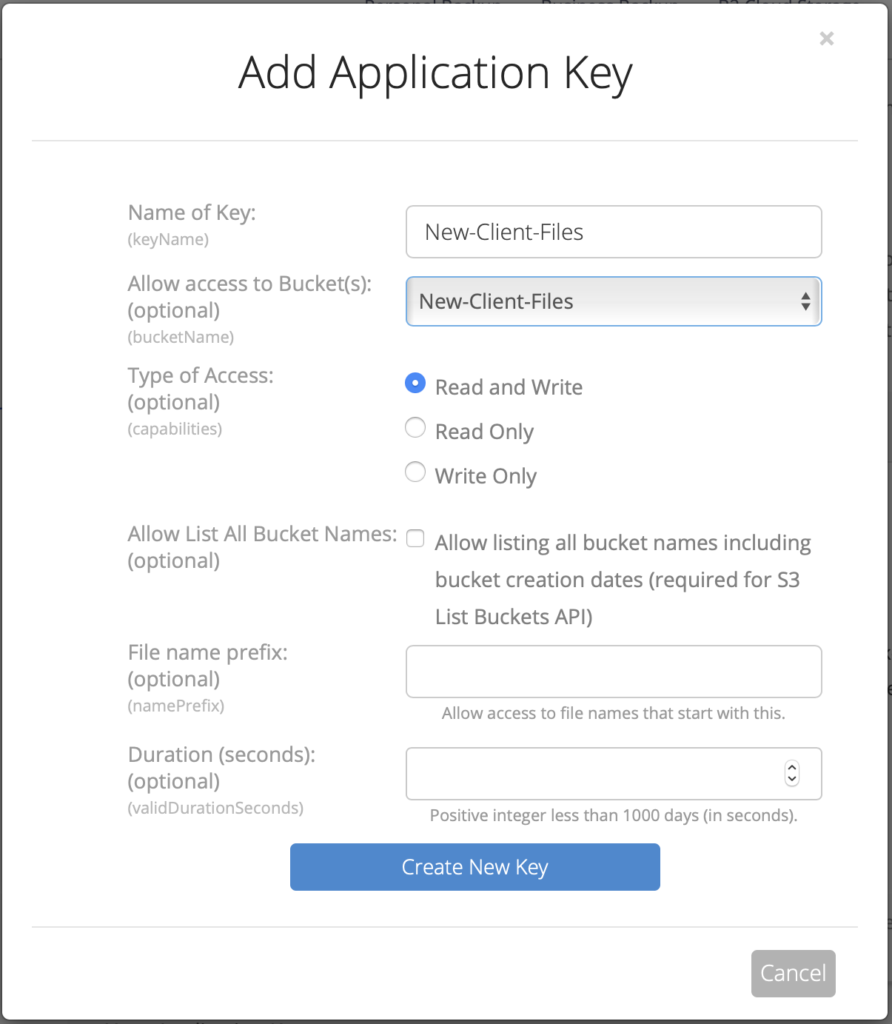
  • Still in App Keys you’ll want to make a new Application Key by choosing “Add a New Application Key”. (When this sort of thing is this self-explanatory then I feel a little silly writing it down, but better to err on the side of obsessive compulsion.)

  • You can name the Application Key whatever you like, but on a practical level it’s probably wise to make it something in line with the Bucket you created earlier, so “New-Client-Files” would be a decent choice.

  • Choose the Bucket you want that Application Key to be associated by from the drop-down menu, then the type of access you want. Note: You’ll almost certainly want to leave that as Read and Write and not mess with the other options before hitting “Create New Key”.
  • You’ll get a success message with keyID, keyName, S3 Endpoint and applicationKey info. Make a note of all those and – ideally – leave that window open in your browser. It should look something like this:
Actual useful key data deleted because I am not, in fact, an idiot.
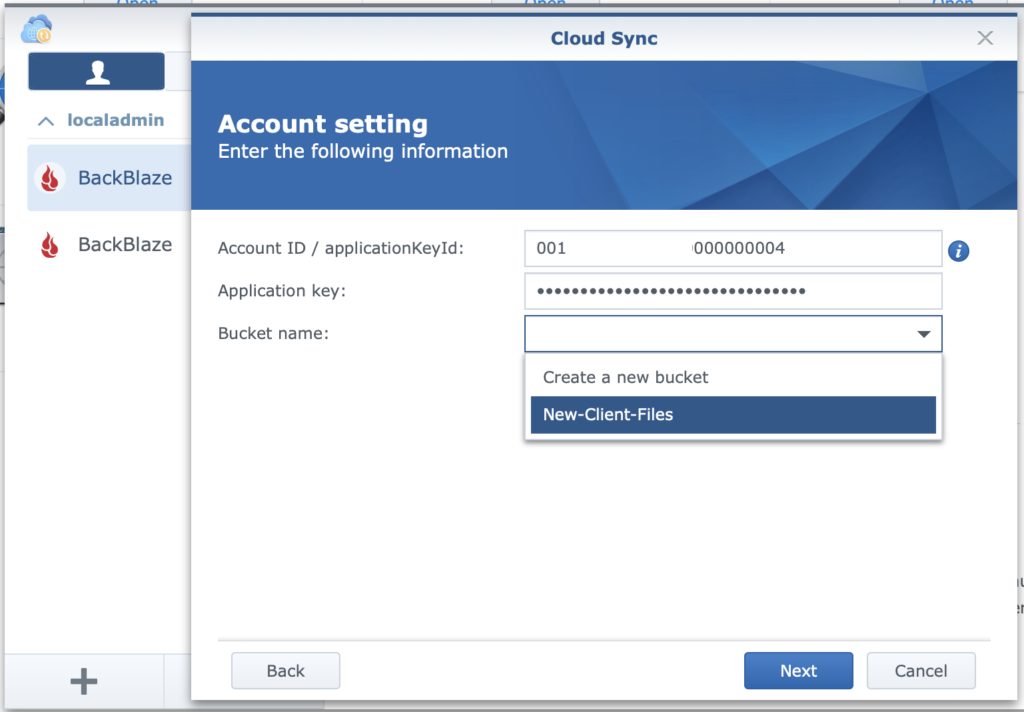
  • Navigate over to your Synology DiskStation and open up the Cloud Sync application, then hit the “+” icon to add a new Sync destination.
  • Add the “keyID” data you got from the Application Key in BackBlaze to the “Account ID/applicationKeyId” field, and the “applicationKey” data from BackBlaze to the “Application Key” field. Watch out for extra spaces if you’re copy/pasting, as they’ll throw up authentication errors.

  • From the “Bucket Name” drop-down menu you should be able to see the Bucket that you set up on BackBlaze. Most of the time this happens instantaneously, but if you have to wait a minute or two for it to show up then don’t be alarmed.
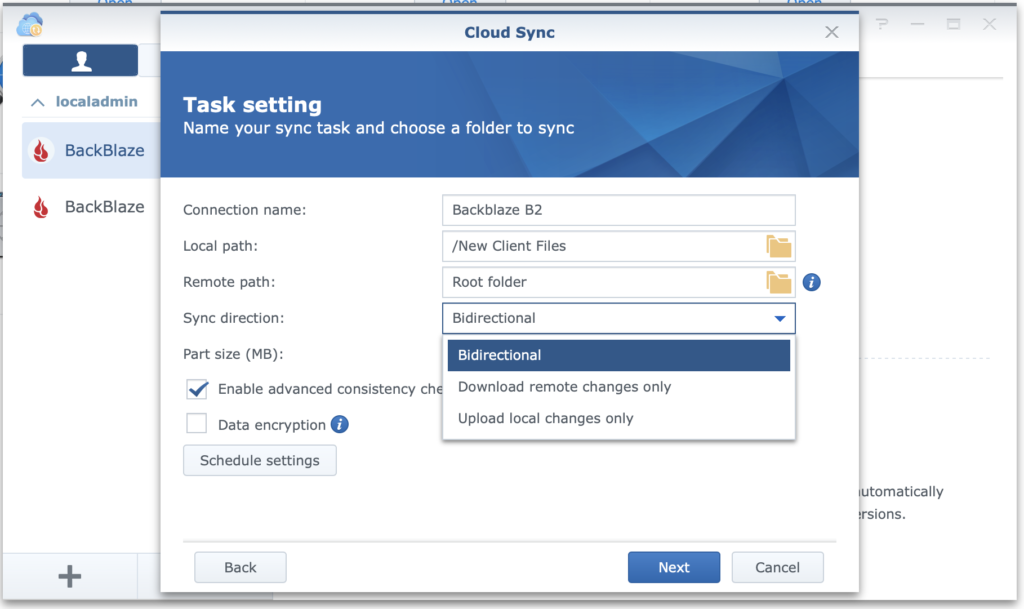
  • Next, select the local shared folder you want to backup from the “Local Path” drop-down, and choose the Sync Direction you need.

Note: If you’re interested in a straightforward backup then choose “Upload local changes only” and check the box next to “Don’t remove files in the destination folder when they are removed in the source folder.” If you neglect this step then any time you delete a directory on the NAS it will magically reappear, which might sound good on first blush but is actually really annoying. Case in point: renaming a large number of directories on a share only to find out that duplicate copies (with the old names) are pushed back down and you end up with multiple copies of everything and a lot of gnashing of teeth.

  • Click “Next”, “Confirm Settings” and “Apply”. And you’re done!

Searching macOS Logs

Way back in the good old days it was pretty straightforward to go and do some amateur spelunking in the depths of your Mac. Breaking important and vital things in the operating system was a – well, not trivial undertaking, but certainly a relatively simple one. Fortunately it was also very easy to go poking around in the Console.app to see what your Mac was up to so that you had at least a reasonable chance at deciding what you’d done wrong so that you could fix it.

And then, of course, Apple had to go and make it all better. Okay, the “better” there is a hair subjective, so I’ll clarify: Apple introduced a new, unified logging system whereby error logs were dynamically and intelligently supported as a matter of course, allowing you greater flexibility in being very granular in digging through logs as well as making the log files a lot smaller. Which was nice.

What wasn’t so nice is that it’s now terribly awkward to search through system logs. Sure, you can fire up the Console and watch error messages scroll by – and scroll back to look at them for the current session – but looking back through logs is a trifle more problematic, and requires a little command-fu.

Enter the log command, which allow you to (amongst other things) search through your log files to pull out user-defined strings, thus:

log show --predicate 'eventMessage contains "Previous shutdown cause"' --last 24h

OS X Patcher (or: There’s Life In The Old Dog Yet).

Way back at the beginning of the end of the world I walked into a store and dropped the astounding sum of five bucks on an iMac.

Behold. And while you’re beholding note the $4.99 scrawled in permanent marker on the top left corner. Grr.

(Note: the store in question is Alpha Thrift, which I unhesitatingly endorse because yes, it’s virtue-signally of my demographic to do that kind of thing but I actually think that they do an incredible job of supporting challenged and disadvantaged individuals and families, which is something we should all be getting behind right now.)

The Alpha Thrift I swing by now and again is next door to the health food store that has the weird special tea that my wife likes, so it’s an easy diversion to go and nip in there to look at stuff. Now and again they have computer bits that are worth picking up – the odd G4 iMac, a lot of keyboards and screens, but on that particular occasion I found a white Intel iMac, sans cords and keyboard/mouse, and figured “what the hell” and bought the thing.

It’s a late 2006 with a 2.16Ghz Core 2 Duo, a 250GB hard drive that I switched out for a spare SSD, and I also replaced the 2GB of memory with a couple of 2GB sticks I had left from my stack-of-dead-Mac-Mini project. I’m guessing from the neat lines of tape that were stuck to the screen that it was somebody’s home office machine and it was in remarkably good cosmetic condition for a computer that’s been around for fourteen years, with none of the fading/burning in that you get in screens of that vintage. I upgraded it to Mac OS X Lion 10.7.5, fooled around with it, then put it on a shelf in my garage because it turns out there’s very little you can practicably do with a computer of this vintage in this day and age. Getting Homebrew on there was an unruly and problematic hack, the only browser I could reliably get to run was Chrome (and even that protested), and it turns out I had no use for a five-dollar iMac and no time to find one.

Still, I couldn’t let go of the idea that – just maybe – there was something I could still do with the thing if I managed to workaround the limitation of 10.7.5 being the maximum supported version of the OS. The Mac Pro that was under my desk until very recently ran Catalina via the dosdude1 hack, but while there are ways of shoehorning macOS Sierra and up onto older machines my venerable iMac missed the cutoff for those by a generation or two. A few years back there existed some ingenious methods for getting OS X Yosemite 10.10 onto computers of this vintage, but the exact means and bits of software required to make that happen have sort of drifted away in the tidal sands of the internet and are no more.

Finally, I found RMC OS X Patcher, which seemed like the perfect solution except that I just couldn’t get it to work until I did some poking around and reinterpretation of the instructions, which I shall now present for your delectation and delight. So…

In order to make this work you’ll need the following:

• An existing Mac computer – ideally something current that works.

• An old, unsupported Mac that you want to install a modern operating system onto.

• A USB Thumbdrive large enough to hold a Mac OS X Installer (I used a 64GB one because I have a bunch of them in a drawer but you’d be okay with 32GB as well)

• A full installer for the operating system that you want to put onto the old computer. Current downloadable operating systems only give you a download of the installer application, not the full installer package. I used mas to download an installer for El Capitan for my ancient iMac.

• A few hours.

Note: Most of the below is liberally cribbed from the instructions page on RMC’s site, but I’ve made some changes to clarify some things that were not abundantly clear and caused a certain amount of confusion. I am not pretending to be any kind of authority on how this dark magic works; I’m just a pronunciation guide for the trickier bits.

  • You’ll need to download the latest version of the OS X Patcher software from here after you’ve looked at the Supported Macs list found here. If your old Mac isn’t on this list then don’t go any further. Yes, this is all about installing modern operating systems on old computers, but there’s still such a thing as too old. Sorry.
  • Plug your USB Thumbdrive into your current, modern Mac and erase it in Disk Utility as Mac OS Extended Journaled. Give it a simple name like “Installer”.
  • Find the OS X Patcher software you downloaded and double-click it to unzip it. Open the Terminal up, type in chmod +x and then drag the OS X Patcher.sh script into the Terminal window and hit return.
  • Still in the Terminal, type sudo and then drag the script into the Terminal window again and hit return.
  • The script will run and give you a choice to hit “1” for Patch Installer and “2” for Patch Update. Type “1” and hit return. It will then ask you for the installer for the modern operating system you want to use to make into a hacked installer to use on your old Mac, so you should locate the full installer for that operating system and drag it into the Terminal window and hit return again.
  • Next, it’ll ask you what volume you’d like to use and you should type in the name of the USB thumb drive that you’re going to be turning into an installer for your modern operating system (e.g., “Installer”). Hit return again and then wait as it copies/builds the installer onto the thumb drive. And wait.
  • Once the script has finished running you can quit out of Terminal, eject the thumb drive, plug it into your old Mac, then power it on while holding down the Option key on the keyboard until you see the boot picker menu. Choose the Installer disk you created on your thumb drive, then hit return to boot from that drive.
  • It should open up into the installer for the OS, but before you start installing things there are some things to do first. For one, while you can technically install onto an existing drive it’s going to be a lot simpler and less problematic if you’re installing onto a clean, erased drive, so if you haven’t done so already and want to make sure that any data on the drive in your old computer is backed up then this would be an excellent time to reboot from the internal drive in your old computer and back that data up.
  • Still, if you’re happy erasing the drive then this is the time to do it. From the Utilities menu at the top of the screen choose Disk Utility, then erase the internal drive and reformat it as Mac OS Extended Journaled, and once that’s done quit out of Disk Utility.
  • We’re not ready to install yet, though. The next thing you’ll probably need to do (particularly if you’re using an older Mac OS X Installer like I was) is fool the computer into thinking that it’s still valid and signed, and that means lying to your computer about the date. I wrote something about that here, but in case you don’t want to wade through that then you’ll need to find out the date that the operating system was released on (El Capitan was September 30th, 2015), then turn off wifi from the wifi menu at the top right corner of the screen on the old computer/unplug any network connections. With that done, you’ll need to open the Terminal from the Utilities menu at the top of the screen and use the date command to fool the computer into thinking that it’s just a few days after the OS was released. The command I used for El Capitan was date 1001000015 (for midnight on October 1st, 2015).
  • Finally, you can then go ahead and run the installer. Once it’s finished, reboot but hold the option key down again to boot from your thumb drive.
  • Open the Terminal from the Utilities menu and type in patch and choose the default Machine ID that the script decides your old Mac conforms to (mine was iMac 5,1) Hit return, then type in the name of your internal drive (e.g., “Macintosh HD”) and hit return again. The script will run machine-specific patches, and once that’s done you can just reboot and use your updated Mac.

Some notes: this iMac is old. Very old. Old enough to the point that it comes with an astonishing 128mb of video memory, and because this old hardware isn’t supported by the drivers that come with the OS some things like, well, any kind of graphics acceleration are not supported at all. So, forget gaming or video or anything graphic-intensive (or graphic-involving, for that matter). Still, that aside, it’s clear that if you’re willing to invest a little time (and five bucks) then you can actually get something that’s… well, decently usable and surprisingly responsive, or maybe just be able to keep an old computer that you have in the back of the closet ticking for a little while longer…

Sudo and Touch ID

So, I really like my 16″ MacBook Pro. I spent years using smaller laptops on the grounds that they’re light and easy to lug around all day, but having this enormous screen and astounding performance has proven invaluable in a world in which I’m not often in my office because, well, The Apocalypse™.

Still – and I don’t want to be all 2017 about this – the Touch Bar and Touch ID bother me. I think it’s because I’m a dinosaur and have legitimate old-school-Mac-user-get-off-my-lawn cred that I’m eager to use. My first laptop was a PowerBook 160, for goodness sakes. The idea that there isn’t a physical button for everything is still strange and alien and makes me feel oddly, incalculably lonely. The world has changed so much, and now they’ve taken buttons away from us? Is there no end to the madness?

Not mine. My Powerbook 160 is in a box, slowly crumbling from age.

You get the idea. Happily, there are some things I do enjoy about the new way of doing things, and while you’ll never convince me that I’ll relish using a button that might not be where I expect it to be because button placement is now contextual I am quite digging Touch ID. It’s great, and it has really solid integration in Apple’s ecosystem, and with a little tweaking you can use it for more than what it says on the side of the box.

For example; using it in the Terminal. I’ve reached the point now that I have to stop and think for a moment to recall what my login password is because I type it so seldom, which is annoying when I’m trying to sudo a command and then have to ham-fistedly bang said password into the Terminal, except now there’s a way of telling Touch ID to do that for you.

We do it using the miracle of PAM (Pluggable Authentication Modules). It’s not a new idea or technology, and it’s been widely used in UNIX/Linux/*nix flavors of many kinds going back for a long time; in it’s simplest terms it’s a little mechanism that sits between you (the user) and the service on your system that you want to use. The service we’re really interested in is sudo, but if you want to see the other default services then you can go take a look in /etc/pam.d

macOS doesn’t keep its PAM modules in etc/pam.d but instead stashes them in /usr/lib/pam. I mention this not because there’s a lot to be gained from poking around in there but because I had a devil of a time finding them, and this way I have some record of where to look so future-me doesn’t have to go reinvent the wheel and spend half an hour spelunking in the Terminal issuing salty oaths. You’re welcome, future me. Jerk.

There are modules for all kinds of functionality; smart card support, Kerberos authentication, Open Directory as well as simple deny/approve functions. For now we’re only interested in the pam_tid.so module (where tid = Touch ID) and making that work with the sudo service, but it’s clear that this is a tool that a discerning admin could use to do some pretty impressive tweaking of the fundamentals of how the OS handles users and services.

The first move is to go into /etc/pam.d and edit the sudo config file, like so:

sudo pico /etc/pam.d/sudo

Which will give you this:

We’re going to tie in the pam_tid.so module for authentication and make it useable for executing the sudo service by adding

auth sufficient pam_tid.so

…to the first line of the configuration file, leaving it looking like this:

Once you’ve saved that file then you should be able to use Touch ID to authenticate any command that requires sudo. You can test it out with something innocuous, such as sudo cd ~/ which will then put up a prompt like this on your screen to tell you to put your finger on the Touch ID button:

And that’s about it! All first-world-problem jokes about the exhausting chore of having to type a password into a Terminal screen aside, this is a really nifty way of leveraging something that’s been built into macOS to use the powerful biometric security in your computer in place of a normal password, which can be attacked or stolen or, let’s face it, forgotten.

WWDC Non-Predictions

So, WWDC 2020 is coming up in three days, and a lot of people in my neck of the tech industry are interested to see what exotic treats, unusual surprises/rare unguents it will bring. Rather than throw my two cents into the ring on the thrilling stuff that will bring (i.e., ARM transition etc) I thought I’d instead jot down the things that I think should make an appearance (but that absolutely will not do so).

• Face ID for Macs would be nice, and I think it’s absolutely doable, but probably not with current Mac hardware. I mean, it seems like a logical move – we already have Touch ID and the T2 chip to handle the grunt work of authorization, but when the current, brand spankin’ new portables line is rocking pretty lousy front-facing cameras and no sensors for doing the kind of mapping required to make Face ID work then it’s hard to make an argument for this coming any time soon.

• Xcode for iOS is also something that I’d love to see but that I’d be fabulously surprised would make the cut. Yes, we have Playgrounds (which is very decent and really nice for people like me who enjoy a healthy refresher on the very basic blocks of programming), but that’s not the same as the full IDE. And that’s a shame, because the iPad Pro is a very capable machine power-wise and also has a huge market footprint – being able to write iOS applications on an iOS device would be great for a lot of people but I don’t see it coming soon. Plus, there’s a pleasing symmetry in the idea that where you currently need a Mac to write iOS applications, you might be able to use an iOS device to write Mac applications.

• While we’re on the subject, I’d like an actual, Apple-approved or Apple-branded Terminal application for iOS. It’d be a niche product, sure, but for the folks who’d use that functionality it would be extraordinary to suddenly have a raft of tools available that they wouldn’t otherwise keep to hand. Still, that raises the idea of being able to execute code on the iPad that isn’t Apple-approved, and it’d have to be rigidly sandboxed as an environment for them to even consider the idea. I’m sure that there’s some internal math where the balance between the cost benefit of dealing with licensing open source tools for iOS would be weighed against the actual number of losers, and my gut says that even with nobody putting their thumb on the scale it won’t be worth pursuing. And this makes me sad because that would be pretty incredible.

• USB 4/Thunderbolt 4 introduction on the Mac/iOS. It seems clear that those two technologies are destined to converge, but it’s too early in the game for Apple to widely start supporting and implementing them. This time next year, maybe.

• Wildly experimental new hardware products/technologies. Apple tends not to intro new hardware at WWDC, preferring to go with special events for those because they like to keep their focus and message tight on product introductions. And that’s very smart. I don’t think there’ll be any introductions of significant hardware products for any of their platforms. There’s a lot of talk about Apple AR glasses being a thing, and that’s an interesting idea, but my hunch is that Apple probably has a bunch of things going at any one time and a lot of them never see the light of day. Remember the kerfuffle about how Apple Is Doing A Car? And yet no cars have appeared, and I suspect none are likely to do so.

Now, it’s worth noting that my batting average on predictions is… well, it’s pretty dreadful. I guess we’ll find out How Wrong I Am on Monday the 22nd…

Secret Fonts in Catalina

This is really cool.

Font management in macOS has radically improved over time; there are people who’ll throw a lot of shade at macOS Catalina, but for every niggle and complaint there are a bunch of neat, clever little fixes and features that don’t necessarily get the exposure and appreciation they deserve.

Licensing additional fonts that can be delivered through Font Book is both smart and creative. It’s also something that could be extensible – while font licensing isn’t what the vast bulk of people would automatically think of as a killer feature in an OS there are plenty of folks in the creative/design world who would richly appreciate, say, some kind of macOS Font Store. As someone who works primarily with those kinds of users, I’d be more than happy to see specific cuts of fonts that could be automatically purchased or licensed and that would just plain work with the OS. I mean, if you’ve ever spent an hour or two digging through the font folders on macOS doing forensic font-management then you’d appreciate, well, never having to do that again.