Burning Down The House (or: What To Do When All Your Stuff Is On Fire.)

This is, admittedly, sort of close to home in a very literal sense; a few weeks ago I walked out of my back door, took a bracing lungful of clear morning, air, coughed, and then noticed that the large expanse of legally-contested Mesa behind my yard was, in fact, on fire. Thus:

Admittedly less dramatic than half an hour earlier, but in my defense I’d been too busy not being on fire to spend time composing artful studies on the savage beauty of the open flame. Also, it was very smoky.

Now, I don’t know about you, but this kind of thing is something I typically find… perturbing. You know what? I’m not ashamed to say it. I was perturbed. You could even make an argument for my being alarmed. There’s an initial instinct to be very British about it (which – being British – comes easily to me) and look at the encroaching flames and say things like “Right,” and “Ah,” and “I see,” and then go back indoors and spend a couple of minutes unpacking the emotional load that comes with oncoming disaster in order that those emotions can be best suppressed or – better yet – filed away, never to be spoken of (because, again, British). Once that initial instinct is out of the way, I’m glad to report that I behaved in an adult and responsible fashion and immediately called the local authorities that deal with these sorts of things, let them know who I was and where I was and what the issue was, and then hung up and watched the roiling inferno as it bore down upon my person, my loved ones, the collection of creatures that I think of as pets and that they think of as roommates and, oh yes, all my possessions.

I had a nice, long wait until fire trucks turned up. I’m not complaining; mine is an out-of-the-way sort of place that’s hard to get to. We don’t often see any kind of law enforcement-type activity back here, which is fine because we’re not exactly a hotbed of crime and public disorder (save for the party house on the next street and the occasional, terrified middle-class teenagers doing low-level drug deals in the most highly conspicuous, terrified middle-class teenager way underneath the sole streetlight at the end of the road). I spent some of that time messing around with hoses and calling neighbors, and the rest of the time running through the mental checklist of What I’d Do If My House Burned Down.

Other than protecting all my stuff and the welfare of my loved ones, it turned out to be a fairly short list. I have a go-bag with a laptop that’s signed into iCloud so that I can get to iCloud Keychain, a portable hard drive with a lot of copies of insurance information on, a key to a safe deposit box and a bunch of chargers and cables and batteries. The idea would be that if I had a few seconds I could grab that thing, throw it into whatever vehicle is nearest, and then leave the family manse to the flames, secure in the knowledge that as long as I can get to some kind of internet access I’ll be able to start piecing everything else together. Further, everyone in the household backs up to BackBlaze, so provided nothing wildly unexpected happens most (if not all) of everyone’s data should be available in some form.

So, well done me. Roll out the red carpet, do mischief to the fatted calf and so forth. The whole nine yards. But now that self-congratulatory claptrap is out of the way it’s probably worth establishing some basic guidelines so that you, gentle reader, can figure out what to do when sheets of flame come roaring and hissing down the hill behind your house while your neighbors talk to the local TV reporter and don’t pull their weight vis-a-vis the oncoming inferno. Yes, you can imagine the petty, annoyed tone in that last sentence. Oh please, it’s not like they read this, anyway.

Firstly, have a backup strategy that includes a cloud component. Or two; after all, while belt and suspenders are solid, belt and suspenders and another pair of suspenders are better. And optionally another belt. When I talk to clients about backup strategies I like to present three separate scenarios, ranging from mundane to ridiculous, that hopefully spell out the value in mixing different backup techniques. They are:

You lose a file or accidentally erase something. This one’s easy; use some kind of directly attached storage on your computer or (if you’re accessing files on a server) have some kind of directly attached storage hooked up to the server. This mostly works out to be some kind of big hard drive, and the product I chiefly recommend to clients to actually run the backups is Apple’s Time Machine. No, it’s not perfect, and yes, once in a blue moon it’ll just stop working, but it’s built in to the OS, its extremely easy to use, and it’s… well, it’s reliable enough

Your office/home burns to the ground. A little more alarming, but still possible. In that case I like to recommend a combined strategy of offline physical and (optionally) online cloud backups – a set of hard drives that are rotated out on a regular schedule and then the inactive drives stored at a separate physical location. If disaster strikes then you can retrieve the offsite backup, plug it into a replacement computer (or server), and within an hour or two you’re back in business.

The entire State of California sinks into the unforgiving blackness of the Pacific Ocean, or else is enveloped in relentless white-hot fire that pulls the air from your lungs even as if blackens the sky, bringing utter destruction and the irretrievable loss of not only your business premises but every other place where you might have a backup stored. Funny thing, this one. There was once a time when I’d trot this out and there’d be a certain amount of good-natured eye-rolling and general amusement. Of late this has started to tip over the edge from “kind of thing that people laugh about” to “kind of thing that people laugh nervously about.” It’s California. Sun. Surf. Gorgeous scenery. The Golden Coast. The American Riviera.

Except during fire season, when it unaccountably has a tendency to turn into bloody Mordor at the drop of a bloody hat. Having your data backed up to the cloud is a solid hedge against this kind of disaster. Cloud backups are massively slower than direct backups because, well, internet, but services like BackBlaze will send you a hard drive containing all of your data if you give them about a hundred bucks, which seems like an astonishingly efficient way of recovering huge amounts of data without having to muck around with hotel wifi.

Actual daytime photo of Santa Barbara. See that blue sky on the right? The part that isn’t swamped by oxidized trees? Just don’t go outside, and if you do, don’t breathe.

Secondly, have some kind of secure repository of information that you might need in case of disaster.

Now, that sounds completely subjective, as it doesn’t make a lot of distinctions about what either “secure,” “repository,” or “information” actually consist of. I’ll try and break this down in reverse order because, hey, that’s a little more fun.

Information. What information? That kind of depends on what you’re currently doing with your data and what you need to be able to do. For example: if you use two-factor authentication through an app like Google Authenticator the you should have a bunch of backup codes for each of the services you use so that (once your house has burned down with your phone in it) you’ll be able to set up a new device to get new two factor codes. Or this might mean something physical – paper copies of insurance documentation, deeds, birth certificates – stuff that’s not necessarily irreplaceable but certainly not something that can be re-sourced at the drop of a hat.

Repository. This can be digital, but it doesn’t have to be. That’s important to note; I think it’s widely assumed that having everything on a thumb drive or on The Cloud™ is better than traditional media, but that’s not always the case. When you’re talking about the aforementioned birth certificates, deeds etc then that’s kind of a moot point – there are some things that are only valid in dead tree format – but having vital information on paper can be a huge time saver. Of course, there are a slew of issues with having physical copies of things, so it’s worth mentioning…

Secure. Having that data – no matter what its form – secure is vital. Critical data in rest is always a target of some sort, or at least vulnerable to opportunism. In the simplest sense; having a notebook labelled “Passwords and Bank Account Info” lying around in case you need to grab it on the way out the door is only great in that one, narrow moment. Until then it’s just a book with everything required to remake or ruin your life, just lying around the house. Don’t do that. A Safe Deposit box with your local bank runs to a couple of hundred bucks a year. Put it in a vault, get a spare key, and put the spare key somewhere safe. If we’re not talking about physical security then think about data and encryption. Really consider things like the keys you’re using to encrypt your data, and where records of those keys might be kept.

Finally – and this is something that I don’t see mentioned a lot, but that I personally think is vital – have spare hardware. Nobody stands in the smoking ruins of their home, brushes themselves off, and says “Oh good. Now I can go stand around at the Apple Store for an hour spending upwards of a couple of grand on a new laptop. At last, the excuse that I’ve been looking for. Oh happy day! This was all worth while.”

Okay, maybe there are few really odd people out there, but I’m willing to bet they’re the exception rather than the rule. I go the other route – the laptop I have shoved in my IT go-bag is a 2013 MacBook Pro running macOS Mojave. It’s not some speed demon, and it’s not running anything except the basic, stock applications. I power the thing on a couple of times a year, kick the tires, make sure that everything seems in working order, then shut it off and put it away again. It’s not a thing for tinkering with; it’s the thing that I’m going to know is working properly when I absolutely need it to. You don’t need a laptop, though; an iPad does the job just fine for most things, and even an old iPhone or iPod touch will be serviceable in a pinch – provided that whatever you use can is recognized by iCloud or your cloud-solution of preference.

I’m reliably informed that – this being the internet and all – many people reading this are not in Southern California, but I think these simple guidelines work no matter where you are and no matter the disasters you’d like to mitigate. Fire, flood, violent political unrest – at the end of the day you end up coming back to something that I bang on about endlessly both in the written word and in person whenever I’m called on to speak to a room full of people who are checking Facebook while ostensibly paying attention at conferences: Helen Keller was right. Security is mostly superstition. It doesn’t exist in nature. The sun may rise and set from one day to the next for months, years, decades – but it’s an unwise person who believes that we’re playing anything other than a numbers game. One day, the axe will fall. Possibly when you least expect it – you’ll stroll out of your back door with coffee cup in hand, behold the fire as it races forward, borne by the cool morning breeze, and in a moment your world will shift minutely but significantly.

Thankfully, my house didn’t burn down (which was a great relief to all parties concerned), but yours might. Or your office, or in extreme cases, the city where you live. It may sound doom-and-gloom, but there’s no getting away from that; you can’t escape the risk, and you can’t prevent it. But, with a few careful decisions and an ounce or two of forethought, you can mitigate those risks and prepare for the worst.

After all, this is 2020. Preparing for the worst has practically become a national sport at this point… 🙂

Big Sur (or: It’s the little things that count).

I wrote last time about how updates to Operating Systems never fail to arouse the deepest passions in the bosoms of their users. Tears of joy vs gnashing of teeth, wearing of sackcloth and so forth. Any time you take something fundamental that people build their workflow off and make any kind of change you’re always going to court disaster and heartbreak, but very, very occasionally there’s a change that people are pretty much universally going to applaud.

Sometimes those things are the result of careful design or listening to the needs of the clamoring public. Sometimes those things are happy mistakes. Sometimes those are things that are just in the spirit of trying something new. And sometimes – just once in a while – they’re the result of looking at a prior change and then rolling that back. Big Sur (as of it’s current Public Beta 10) has a bunch of all of those – both large and small – but the one that I’m most excited-slash-relieved about is probably the most trivial: they fixed Show Original.

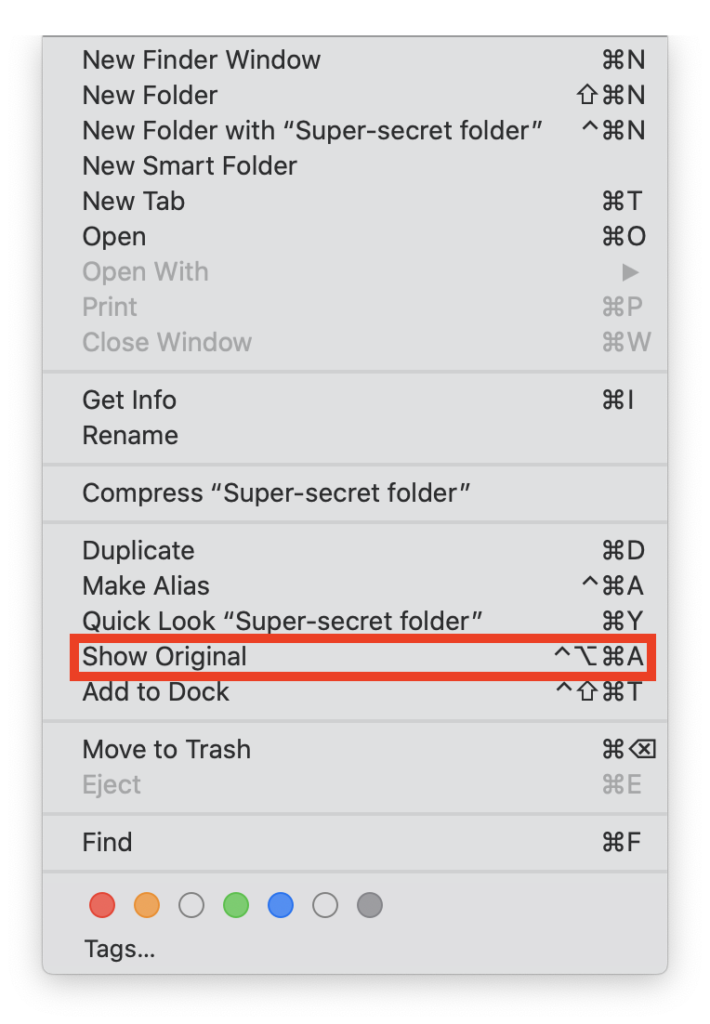
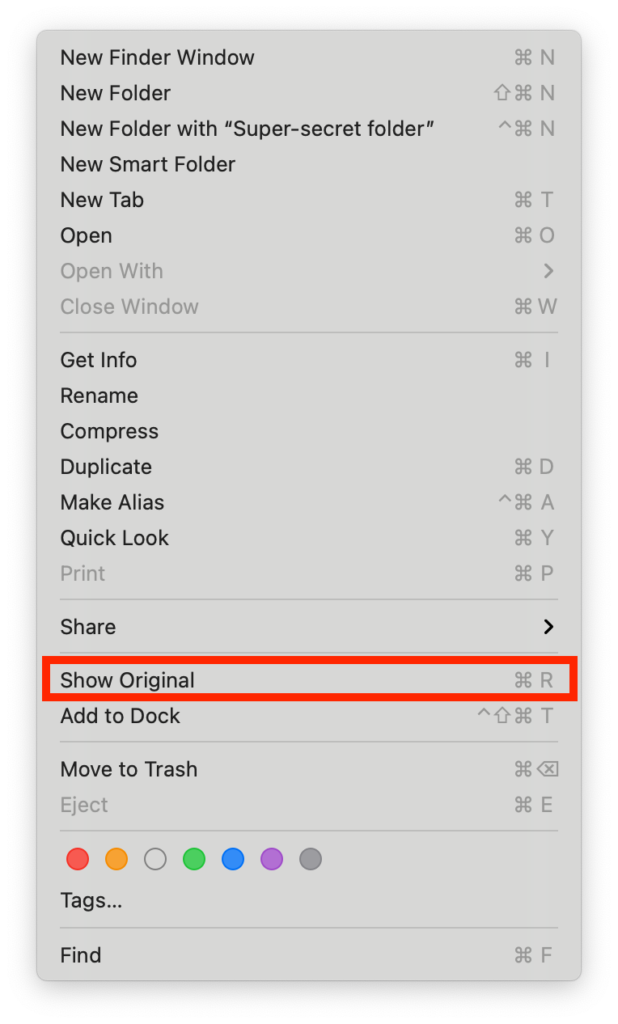
For anyone who doesn’t use file aliases (and yes, I’m including directories as being files because we could get into a useless syntactic discussion about that but this is my blog, dammit) an alias is a link to a file that lives at an alternate location. Maybe – like me – you have a bunch of folders that you regularly use but that you don’t want to have actually live on your Desktop. Or on your computer at all, for that matter. Maybe they live on an external drive, or a file server, or a NAS. There are lots of reasons for going that route, after all; shared access, retention, backup strategies – but it’s also just a lot more convenient to have the things you want to access close at hand. Now and again, though, you might want to know where the original file is or navigate to it, and in macOS Catalina that meant either scouring Finder menus or memorizing a bunch of keystrokes designed to break your own left hand. Here, this is what I mean:

I mean, look at that key combination. It’s… well, I don’t really have the words. “Bonkers” seems like a decent shot, though. I think what I’m aiming for is something more puzzling than rage-inducing; after all, decisions on this kind of thing aren’t made by accident because they are, after all, decisions. At some point, some bright, eager software engineer scratched his or her chin and said “You know what? There are too many people who are inadvertently attempting to find aliases of their files, and yes, Bob, I know that we’re talking about a fringe number of cases where someone has to select the alias in the Finder and then hit a keystroke or two to reveal the location of the individual file, but it’s still a risk that’s not worth taking, dammit. After all, nobody in their right mind wants to live in the kind of world where you can puncture the fragile illusion of how the file system works. Something must be done, so I think we should immediately implement a series of keystrokes that are difficult if not torturous to perform so that this eventuality never comes to fruition and so that we can sleep at night secure in the knowledge that we’ve demonstrably done something with our time. Sushi, anyone?”

(At least, I’m guessing that’s more or less how it went based on the small amount of time I’ve spent working for huge corporations and the much, much smaller amount of time I’ve spent at Infinite Loop eating Sushi at Caffe Macs.)

Just to make really, really sure that this was as unpleasant as possible, they then decided to use all the modifier keys on the keyboard that I – David Ball – have a hell of a time remembering.

Now, I might be alone in this one, and if that’s the case then – if you’ll pardon awkward metaphors – I’ll hold my hand up and take it on the chin. I’ve been working with Apple and macOS in a professional capacity for the better part of a quarter of a century, and while I’m comfortable with what the Command key looks like (), the other two – Option () and Control () are things that I have to sneak a peek at the keyboard for (which in the case of Control is particularly inexcusable because I’m always in the Terminal and am constantly hitting that key on a daily – if not hourly – basis). And so, this is me; and if I – someone who ostensibly knows his way around the macOS – am reduced to making confused, whining noises when trying to find the original of an alias then it’s a decent bet that other people are, too.

Of course, adding insult to injury is that the non-modifier key involved is the “A” key, which is smack dab in the middle of the three modifiers and up two rows, so no matter whether you hit the modifiers with whichever combination of fingers you’d care to go with you either end up twisting a finger around or doing some kind of wrist contortion to hit all four keys at once. It’s hard to take this as anything other than some kind of deliberate assault (albeit, a low-stakes one).

It didn’t use to be this way. Prior to macOS Catalina you could hit Command-R in the Finder while selecting an alias, which was simple and easy to mnemonically accommodate (“Command-R means… find ‘riginal?), and thankfully this is something that they’ve re-implemented in Big Sur, thus:

So, all is right with the world. We can all go back to our daily lives secure in the knowledge that this travesty has been resolved, that this great iniquity has been cast aside, and that once again we are free as a people to stand in the light of the sun and eat breakfast under newer, better skies. Okay, there might be the slightest hint of an over-reach in that sentiment; after all, many other things are still in assorted states of brokenness, but the point has enough legs to stand on (albeit in a highly qualified fashion).

The lesson here is not that you need to make a lot of changes to the way that you think about how operating systems work; it’s that there’s value in doing something right the first time, then having the clarity to appreciate and acknowledge that value. I’m not mad because Apple changed a keystroke combination that, let’s face it, most people would go to the appropriate pull-down menu to access anyway. I mean, that’s a fairly small hill to die on. No, the thing that concerns and annoys me is that while most good designers make decisions based on forethought and conceptual understanding, there’s always the pitfall of thinking that you’re going to do something better, and that the work that has been done before lacks value and needs to be remedied.

And it’s not something unique to Apple. I’ve seen that tendency in code that I’ve written and revisited, and I imagine that a lot of people in my shoes have had the same experience. Sometimes you’re so eager to improve something that you fall into the trap of thinking that everything you touch needs to be changed, and you end up throwing up roadblocks to productivity that didn’t need to be put there. You can measure twice and cut once as often as you like, but if the thing doesn’t need to be cut at all? Well. The next best thing you can do is to have the humility to undo your mistakes.

Everything Old is New And Broken

Today I shall be writing about macOS Big Sur, which is even as we speak wending its way through both the Public and Developer Beta programs while the good folks at Apple either glue bits on or hack them off with what we hope is some kind of grand design in mind.

New Operating Systems are polarizing things, and that’s the kind of attitude and behavior that I enjoy, nay, encourage. I like the seasonal nature of disgruntlement; the perennial moaning and scowling and disapprobation that people inevitably kick into high gear whenever what is – on a fundamental level – the single most important thing they use on their computer is improved. Or reimagined. Or… well, changed. There’s some kind of metaphor in there for the nature of man; we all come into the world fresh-faced and brimming with optimism, and then get stuck in our ways and end up grey-haired and angry at progress and prone to using words like “whelp” and “whippersnapper” in cold blood.

It’s freeing to realize this, because it’s a realization that sets you free. You’re not going to like change, and you’re not going to welcome it because you’re older and wiser than you used to be – and that’s okay. The measure of character is not how well we accommodate change, but how well we tolerate it. The test of your maturity lies in rolling with those punches and – instead of trying to change the world – realizing that you’re not infallible, and that maybe you should consider working on changing yourself.

Huh. That got real profound real fast. And I was only here to bitch about the menu bar clock. Let’s get back to that, shall we? Yes? Good.

The menu bar clock in macOS Big Sur is irrevocably stupid. Oh, it’s fine if you want to know what day of the week it is and what the time is, thus:

…but it’s not useful if you, say, want to know what the date is. Or (and this is admittedly rather less likely) know what the month is, just in case you’ve really overslept or have sustained some traumatic and untreated cranial injury.

In the good old days – before whippersnappers like you whelps were running around with your iPhone 12s and your Billie Eilish records and whatnot – you could happily go and jump into the Date and Time System Prefpane and change the way the menu bar clock reported the date and time, specify whether you preferred 24 or 12 hour time, whether you wanted such bizarre indulgences as flashing time separators or the ability to observe seconds as they ticked by. You were probably also able to go and buy shoes for a nickel, but these days that Prefpane shows you this instead:

This will never do. Now, I’m happy to let a lot slide in the name of progress, but I’ll go to the mat for the Date. I’m forty-seven, which is a fact that never ceases to surprise me and induce mild existential horror when I’m confronted by it. I’m forty-seven and my left knee is in a constant state of betrayal of the rest of my body and I wear glasses and I forget what the date is about thirty-thousand times a minute. My options extend to either getting the date tattooed on myself afresh each day or finding a way to get the date back into the menu bar. And I hate needles.

Fortunately, this turns out to be doable because while Apple doesn’t have a convenient button in there to allow you to specify clock options, the fundamental wiring for said clock options is still extent in the OS. To get to what they’ve done we’ll use the defaults command to read what’s going on with the menubar extra, thus:

Behold.

So, if “Fri 15:43” equates to “EEE HH:mm” then it’s a pretty solid bet that EEE = day of the week, HH = hour, and mm = minute. With that in mind, we can use defaults to write back some other options for the OS to look at. If you turn everything on and then look at the defaults read for the same plist under macOS Catalina then you’ll get this:

Right. So, it doesn’t take much to come to the conclusion that MMM = Month, ss = seconds, and (be still my beating, arthritic heart) d = date.

With that in mind, we’ll write all the above back into Big Sur, thus:

defaults write com.apple.menuextra.clock DateFormat -string "EEE d MMM HH:mm:ss"

…which magically turns into:

Ah. That’s much better. Change is a wonderful thing; particularly when it happens to other people.

Securing your Synology with QuickConnect

This is another one of those posts where I wear my heart on my sleeve about how great Synology is. A lot of that has to do from spending many, many years in an abusive relationship with OS X/macOS Server, which was good during the good times, but when it was bad it was very, very bad. In this time of global apocalypse it’s increasingly important to be able to get remote access to vital data resources, and Synology’s DSM has a really convenient way of doing that in their QuickConnect product, which simply gives you a convenient portal to access your DiskStation from anywhere in the world and administer it through a browser. Sounds good?

No. No, that isn’t good. I mean, I get it; it’s an intelligent and functional way of remote access and administration, but it isn’t ideal. Convenient? Sure. But problematic.

Come on in. Sure, you can steal all my data!

The thing with QuickConnect is that the nature of the thing requires remote access, and the thing about remote access over the internet is that, well, it’s remote access over the internet. And the internet isn’t exactly famed and noted for it’s utter infallibility and ironclad invulnerability.

Tangible example (don’t try this at home and I’m certainly not going to get into specifics because this is ethically problematic territory): it took me about five minutes and some well-crafted Google searches to find, build and install the tools and methods to pull a list of every single subdomain on the internet in the quickconnect.to domain. It’s a big list, and I’m willing to bet that most of those Synology QuickConnect setups are legitimately and intelligently setup with clever usernames and passwords and lots of security. But, statistically, there’s a likelihood – a decent one – that a lot of those have “admin” as the username and “admin” as the password. Or “Password”. Or, I don’t know, “12345678”.

Were I interested in larceny and mischief then I could script the means to run down that list and try the most common usernames and passwords against each of those entries. And I’m pretty sure that I’d end up with, well, a healthy handful of hits. That translates to complete, unfettered access to the files and data of the respective companies and institutions, along with usernames and emails and passwords, VPN access credentials and so on.

Fortunately, there are some pretty basic things you can do to somewhat lock down QuickConnect and the DSM in general. And when I say “somewhat” that’s because hey, this is the internet and no, there’s no such thing as secure, but yes, there is such a thing as making breaking into your stuff difficult and expensive and time-consuming, and yes, that’s your best shot at what we’re euphemistically calling cybersecurity these days.

The best tool in the arsenal is to enable two-step verification to the DSM, so that when you connect via QuickConnect you’ll also have to have access to an authenticator app on your phone in order to retrieve a six-digit code. It is, thankfully, a pretty simple operation.

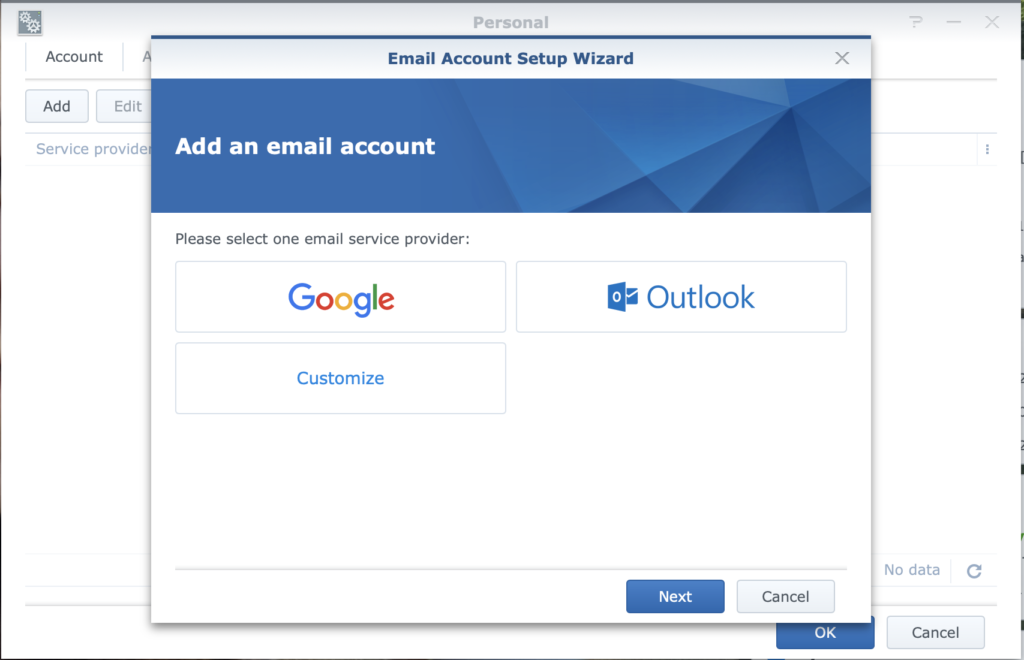
Sign into your Synology DSM as per usual, then navigate to the person-shaped icon at the upper-right corner of the window and choose Personal, and then choose Account. You’ll see a helpful box marked “Enable 2-Step Verification” that will mostly likely be greyed out if you haven’t set up your Synology with an email account that it can use for notifications. If that’s the case then click on the “Email Account” tab and hit “Add”. You’ll be prompted to add either an Outlook, GSuite, or other email account thus:

Choose the appropriate option, hit Next, then follow the prompts to connect your email Account with the Synology Personal Notification service. If you’re using GSuite (like I do) then it’s as simple as clicking “Allow” at the next window. Seriously.

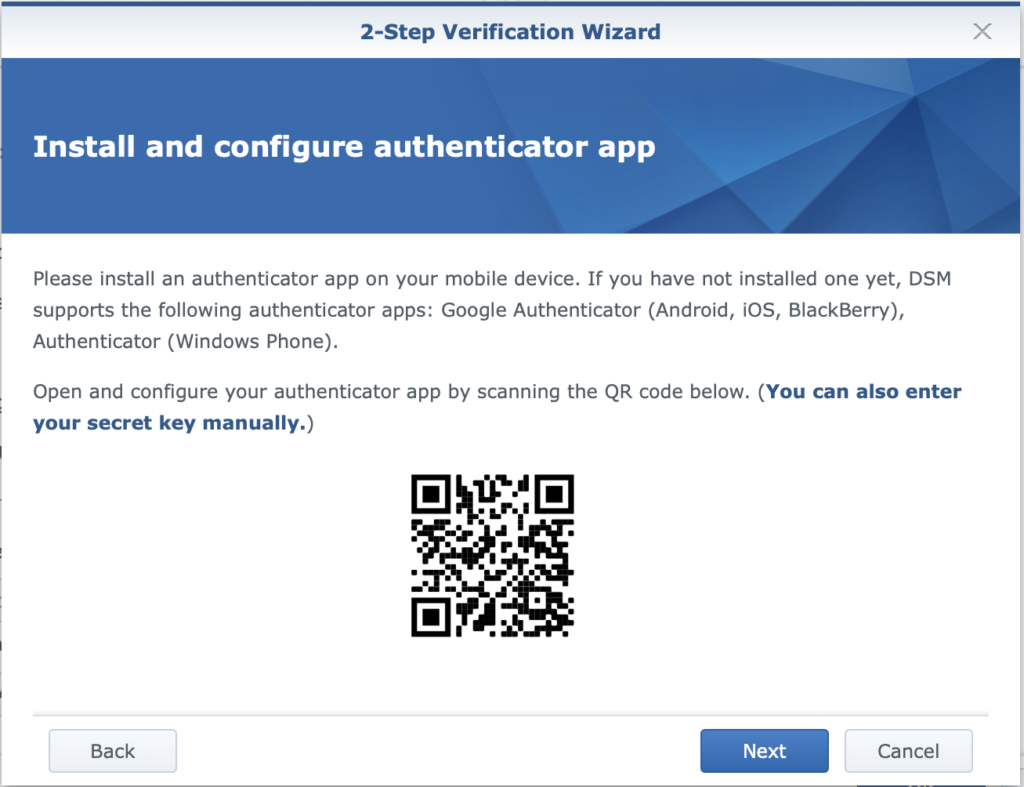
Once that’s out of the way you can go back to the “Enable 2-Step Verification” box and check it, then walk through the Wizard, which will ask you for an email address to use as an emergency backup. It’s probably best to use a different email address than the one associated with the Notifications setup in the last step. After that you’ll be given a QR code to scan into the authenticator app of your choice (I use Google Authenticator).

What? You think I’d put a legitimate DSM QR code in a screenshot on the internet? Go on. Scan it. I dare you.

Log out of the DSM, and when you log in again you’ll be required to enter the six-digit verification code found in your authenticator app, and can then breathe a little easier. It’s no VPN, but it’s a lot better than just leaving everything open and hoping that you remembered to change the default user name and password…

Securing your Synology with VPN

I’ve not been shy about wearing my love of Synology Diskstations on my sleeve. As an IT Consultant it’s fairly common to establish a set of tools or recommendations that are go-to options you regularly put in front of clients, but the true test of whether or not those tools and recommendations are worth considering is to turn to your IT person and ask them if they use those in their own businesses. Some things don’t make that cut because they don’t necessarily apply (for example, I have no need of an Okta setup) and others are either cost-prohibitive or simply recommended due to a paucity of options. The NAS space falls into all of those prohibitions, but it says something that a lot of consultants I regularly work with eat their own dog food when it comes to Synology. I know I do. I’ve bought two of the things, after all, and they were both purchases that not only fail to fill me with regret, but that make me quietly relieved. They’re the kind of thing that you put in place, configure, and then leave alone knowing with absolute certainty that they’re doing their job, and that you don’t have to worry about them.

It’s the configuring part that’s kind of interesting, though. There are options in that area that you can go with out of the box that hit the essentials of whatever you’d like to do, security-wise; either keep the thing off the internet entirely, use Synology QuickConnect, or use a VPN.

QuickConnect is fine, but it’s not exactly bullet-proof. Any time you’re opening up a device to the internet at large you’re painting a target on its back, and yes, QuickConnect offers some reasonable protections but it’s fundamentally a way for remote users to connect to specific services, and as such requires exposure of those services. There are times when it’s the only option (when, say, your NAS is hosted at your office behind a captive portal), and there are a lot of things you can do to beef up security to compensate (locking down ports and services, setting up a reverse proxy, using your own domain name, extensive 2FA usage and so on).

Fortunately, setting up a VPN on your Synology box is easy to the point of trivial (provided your DiskStation has a routable connection to the internet that you have some kind of control over. You’ll need to be able to open the appropriate ports for VPN.)

Synology VPN Server is freely accessible from the Package Center of your DSM – once downloaded, open the VPN Server package and click on OpenVPN to configure it. Doing that is terribly simple; just check the “Enable OpenVPN Server” box, choose the maximum number of connections you want to enable.

Note the port that’s opened (1194), and if you want to allow users to connect to other devices and services on the target network then you’ll need to check the box marked “Allow clients to access server’s LAN”.

Synology can do a lot of the heavy lifting for you if you’re lucky enough to have a router that its router configuration (Control Panel -> Router Configuration) can talk to. If you’re in that group then the wizard can walk you through configuring port forwarding; if you’re not then you’ll have to go get access to your router and manually set up port forwarding for port 1194. Going into that is somewhat out of the scope of this article. I mean I can’t see your router model, or write directions for every single one. I’d be here all day.

“But,” I hear you ask, “doesn’t this only apply if you have a static IP address? How will the internet know where my Synology is? My internet provider is terrible and only gives me static addresses if I sign up for their exorbitant business account that’s vastly slower than a residential account despite the fact that it’s on the same exact line and using the same exact modem!”

This is a good point (although oddly specific). Happily, Synology DSM makes it extremely simple to set up DDNS. In the Control Panel, choose “External Access” and then click the DDNS tab. If you have an existing DDNS setup (mine is hosted with dyndns) then you can enter your credentials here, or else opt to use Synology’s included DDNS solution (synology.me). The DDNS client on the Synology DSM runs out and talks to Synology’s DDNS server and updates its current address.

After that, it’s simply a matter of configuring your VPN Client to connect to your newly-created VPN. Handily, you can do a lot of the work by clicking on the “Export Configuration” button at the bottom of the OpenVPN configuration window. This will download a text file and a certificate that you’ll need to install onto your computer to work with your OpenVPN client – Synology includes a helpful read me file that details exactly how this process works and recommends an OpenVPN client for each major platform.

So, there you have it; a simple way to connect to your own network when traveling or working remotely, safe in the knowledge that you’re protected from man-in-the-middle attacks and able to access your critical data in a secure and safe manner.

There’s Life In The Old Dog Yet (or: More Adventures In Keeping Old Things Alive).

This, ladies and gentlemen, is what Apple thinks is an iMac Pro:

Behold. (Please ignore the horrible rug.)

Now, for those of you who don’t pay a lot of attention to Apple’s product line (and who probably have better things to do) it should be made clear at this point that this is not, in fact, an iMac Pro. Or any kind of iMac for that matter. iMacs have the computer and screen built into one slim, stylish, power unit, whereas this is a massive, forty-pound hunk of scratched and scarred Aluminum hewn into something resembling a giant cheese grater, and then covered in faux-wood because its owner had a bunch of faux-wood wrap kicking around and was sick of looking at a lot of scratches. More precisely, this is a 2009 Mac Pro, and even more precisely, it is my 2009 Mac Pro.

I love this machine because it is, not to put too fine a point on it, completely bonkers. While there’s every reason for it to exist, there is no reason whatsoever to be using an eleven year-old computer in a world where the massive leaps in processor and design technology make this akin to an abacus. A computer from 2009 is slow, has terrible graphical abilities, and lacks the modern conveniences that we take for granted in terms of interfaces and technologies. Using one is to obey the same impulse for anachronism that makes young men grow ironic beards, smoke pipes, and ride penny-farthings.

Except, actually, this is none of these things. Because while old computers are slow, a lot of them are also expandable, and a lot of those expandable bits are not slow and terrible, but are fast and decent. I bought this thing for about two hundred dollars and augmented it with bits of dead computers and assorted projects I’ve accumulated over the years, and now it’s chock full of fast storage, has oodles of memory, and two six-core Xeons. That’s twelve Xeon cores. Twenty-four threads! I feel that I’m not sufficiently making this accessible to people who don’t know or care about Xeons or cores, but think of it this way; imagine if you woke up one morning, had got dressed, had breakfast, bid farewell to your nearest and dearest, got in your car to go to work, turned the key in the ignition and instead of hearing the modest, pedestrian burble of an inline six you were presented with the sound of a Furious Titan Roaring A Battle Cry Unto The Gods And Breaking His Fists Against The Firmament?

Yeah, so, it’s basically that.

So, this thing isn’t slow and awful and ugly and stupid. Okay, yes, it’s ugly, but none of the rest is true. The video card in it is equivalent to the one that comes in the new Mac Pro. It has a lot of slots to put cards and upgrades in, has the wireless bits from a newer, dead MacBook Pro so that it can do all the wireless things that modern computers can do, and you can even plug your fancy USB-C peripherals into an expansion card in the back.

What you can’t do is use it with macOS Catalina or macOS Big Sur.

Now, I kind of get that; if you’re Apple then there are some very solid reasons not to support a machine of this vintage. While those Xeons are mighty they’re prone to some security flaws that make this machine a bad fit for some very specific niches and industries, and Apple’s not in the habit of issuing software updates that are going to open up customer data to any kind of intrusion. Still, a lot of people (like me) aren’t going to be using their computers in any kind of situation that might make that threat remotely likely, and would really like to continue using their big, ugly computers.

Happily, this is technically possible with only a modicum of headache because those Xeons I keep rattling on about are also the types of processors that run in Apple’s current iMac Pro and Mac Pro computers. Admittedly the processors in my stylish, mock-oak Mac Pro are somewhat slower and older in vintage, but they’re basically the same creature, so technically they should work, Right?

Right. And, it turns out, the process is fiddly but not as horrible as you might expect.

(Note: If you have a Mac Pro 5,1 (or a 4,1 upgraded to 5,1) then the following will probably work for you as written. If you have neither of these machines but your computer is of an older vintage and you want to try and run a newer operating system than you technically should, then you can read along and take in the general points and input, but I’m in no way guaranteeing that any of this will work. Also, back up before trying any of this, and if you’re even remotely concerned about this just back away now. This is the kind of thing that would violate your warranty if there was the remotest possibility that anyone of sound mind would warranty an eleven year old computer, but still, beware. Your Mileage May Vary. Caveat Emptor. Cave Canem. Don’t Walk On The Grass.)

First, some provisional considerations. You’ll need a metal-capable graphics card and to upgrade your Mac Pro to macOS Mojave in order to upgrade the BootROM to 144.0.0.0.0 (which will also allow you to use NVME drives) and once that’s done boot into Internet Recovery and disable SIP by typing csrutil disable in the Terminal.

Secondly, you should look at this thread on macrumors.com. It’s enormous and where I got a lot of this information from, but be warned; there’s a lot to trawl through there – which is why I’ve put this more concise walkthrough together.

Next, you’ll need to download the latest version of OpenCore from this GitHub repository. Once downloaded, open the OpenCore folder, where you’ll see something like this:

Next, copy this and paste it into a new non-rich text document. Warning: this is very long:

<?xml version="1.0" encoding="UTF-8"?>
<!DOCTYPE plist PUBLIC "-//Apple//DTD PLIST 1.0//EN" "http://www.apple.com/DTDs/PropertyList-1.0.dtd">
<plist version="1.0">
<dict>
	<key>ACPI</key>
	<dict>
		<key>Add</key>
		<array>
			<dict>
				<key>Comment</key>
				<string>TBOLT3</string>
				<key>Enabled</key>
				<false/>
				<key>Path</key>
				<string>SSDT-TBOLT3.aml</string>
			</dict>
		</array>
		<key>Delete</key>
		<array/>
		<key>Patch</key>
		<array/>
		<key>Quirks</key>
		<dict>
			<key>FadtEnableReset</key>
			<false/>
			<key>NormalizeHeaders</key>
			<false/>
			<key>RebaseRegions</key>
			<false/>
			<key>ResetHwSig</key>
			<false/>
			<key>ResetLogoStatus</key>
			<false/>
		</dict>
	</dict>
	<key>Booter</key>
	<dict>
		<key>MmioWhitelist</key>
		<array/>
		<key>Quirks</key>
		<dict>
			<key>AvoidRuntimeDefrag</key>
			<false/>
			<key>DevirtualiseMmio</key>
			<false/>
			<key>DisableSingleUser</key>
			<false/>
			<key>DisableVariableWrite</key>
			<false/>
			<key>DiscardHibernateMap</key>
			<false/>
			<key>EnableSafeModeSlide</key>
			<false/>
			<key>EnableWriteUnprotector</key>
			<false/>
			<key>ForceExitBootServices</key>
			<false/>
			<key>ProtectMemoryRegions</key>
			<false/>
			<key>ProtectSecureBoot</key>
			<true/>
			<key>ProtectUefiServices</key>
			<false/>
			<key>ProvideCustomSlide</key>
			<false/>
			<key>ProvideMaxSlide</key>
			<integer>0</integer>
			<key>RebuildAppleMemoryMap</key>
			<false/>
			<key>SetupVirtualMap</key>
			<false/>
			<key>SignalAppleOS</key>
			<false/>
			<key>SyncRuntimePermissions</key>
			<false/>
		</dict>
	</dict>
	<key>DeviceProperties</key>
	<dict>
		<key>Add</key>
		<dict/>
		<key>Delete</key>
		<dict/>
	</dict>
	<key>Kernel</key>
	<dict>
		<key>Add</key>
		<array>
			<dict>
				<key>BundlePath</key>
				<string>Lilu.kext</string>
				<key>Comment</key>
				<string></string>
				<key>Enabled</key>
				<true/>
				<key>ExecutablePath</key>
				<string>Contents/MacOS/Lilu</string>
				<key>MaxKernel</key>
				<string></string>
				<key>MinKernel</key>
				<string>16.0.0</string>
				<key>PlistPath</key>
				<string>Contents/Info.plist</string>
			</dict>
			<dict>
				<key>BundlePath</key>
				<string>WhateverGreen.kext</string>
				<key>Comment</key>
				<string>Video card</string>
				<key>Enabled</key>
				<true/>
				<key>ExecutablePath</key>
				<string>Contents/MacOS/WhateverGreen</string>
				<key>MaxKernel</key>
				<string></string>
				<key>MinKernel</key>
				<string>16.0.0</string>
				<key>PlistPath</key>
				<string>Contents/Info.plist</string>
			</dict>
			<dict>
				<key>BundlePath</key>
				<string>AppleMCEReporterDisabler.kext</string>
				<key>Comment</key>
				<string>DisableAppleIntelMCEReporter</string>
				<key>Enabled</key>
				<true/>
				<key>ExecutablePath</key>
				<string></string>
				<key>MaxKernel</key>
				<string></string>
				<key>MinKernel</key>
				<string>19.0.0</string>
				<key>PlistPath</key>
				<string>Contents/Info.plist</string>
			</dict>
		</array>
		<key>Block</key>
		<array/>
		<key>Emulate</key>
		<dict>
			<key>Cpuid1Data</key>
			<data>AAAAAAAAAAAAAACAAAAAAA==</data>
			<key>Cpuid1Mask</key>
			<data>AAAAAAAAAAAAAACAAAAAAA==</data>
		</dict>
		<key>Patch</key>
		<array>
			<dict>
				<key>Base</key>
				<string></string>
				<key>Comment</key>
				<string>IONVMeFamily Patch#External</string>
				<key>Count</key>
				<integer>0</integer>
				<key>Enabled</key>
				<true/>
				<key>Find</key>
				<data>RXh0ZXJuYWw=</data>
				<key>Identifier</key>
				<string>com.apple.iokit.IONVMeFamily</string>
				<key>Limit</key>
				<integer>0</integer>
				<key>Mask</key>
				<data></data>
				<key>MaxKernel</key>
				<string></string>
				<key>MinKernel</key>
				<string>17.0.0</string>
				<key>Replace</key>
				<data>SW50ZXJuYWw=</data>
				<key>ReplaceMask</key>
				<data></data>
				<key>Skip</key>
				<integer>0</integer>
			</dict>
		</array>
		<key>Quirks</key>
		<dict>
			<key>AppleCpuPmCfgLock</key>
			<false/>
			<key>AppleXcpmCfgLock</key>
			<false/>
			<key>AppleXcpmExtraMsrs</key>
			<false/>
			<key>AppleXcpmForceBoost</key>
			<false/>
			<key>CustomSMBIOSGuid</key>
			<false/>
			<key>DisableIoMapper</key>
			<false/>
			<key>DisableRtcChecksum</key>
			<false/>
			<key>DummyPowerManagement</key>
			<false/>
			<key>ExternalDiskIcons</key>
			<true/>
			<key>IncreasePciBarSize</key>
			<false/>
			<key>LapicKernelPanic</key>
			<false/>
			<key>PanicNoKextDump</key>
			<false/>
			<key>PowerTimeoutKernelPanic</key>
			<false/>
			<key>ThirdPartyDrives</key>
			<true/>
			<key>XhciPortLimit</key>
			<false/>
		</dict>
	</dict>
	<key>Misc</key>
	<dict>
		<key>BlessOverride</key>
		<array/>
		<key>Boot</key>
		<dict>
			<key>HibernateMode</key>
			<string>None</string>
			<key>HideAuxiliary</key>
			<false/>
			<key>ConsoleAttributes</key>
			<integer>0</integer>
			<key>PickerAttributes</key>
			<integer>0</integer>
			<key>PickerAudioAssist</key>
			<false/>
			<key>PickerMode</key>
			<string>External</string>
			<key>PollAppleHotKeys</key>
			<false/>
			<key>ShowPicker</key>
			<true/>
			<key>TakeoffDelay</key>
			<integer>0</integer>
			<key>Timeout</key>
			<integer>10</integer>
		</dict>
		<key>Debug</key>
		<dict>
			<key>AppleDebug</key>
			<false/>
			<key>ApplePanic</key>
			<false/>
			<key>DisableWatchDog</key>
			<false/>
			<key>DisplayDelay</key>
			<integer>0</integer>
			<key>DisplayLevel</key>
			<integer>2151678018</integer>
			<key>SerialInit</key>
			<false/>
			<key>Target</key>
			<integer>0</integer>
		</dict>
		<key>Entries</key>
		<array/>
		<key>Security</key>
		<dict>
			<key>AllowNvramReset</key>
			<false/>
			<key>AllowSetDefault</key>
			<true/>
			<key>AuthRestart</key>
			<false/>
			<key>BootProtect</key>
			<string>None</string>
			<key>ExposeSensitiveData</key>
			<integer>15</integer>
			<key>HaltLevel</key>
			<integer>2147483648</integer>
			<key>ScanPolicy</key>
			<integer>0</integer>
			<key>Vault</key>
			<string>Optional</string>
		</dict>
		<key>Tools</key>
		<array/>
	</dict>
	<key>NVRAM</key>
	<dict>
		<key>Add</key>
		<dict>
			<key>4D1EDE05-38C7-4A6A-9CC6-4BCCA8B38C14</key>
			<dict>
				<key>UIScale</key>
				<data>AQ==</data>
				<key>DefaultBackgroundColor</key>
				<data>AAAAAA==</data>
			</dict>
			<key>7C436110-AB2A-4BBB-A880-FE41995C9F82</key>
			<dict>
				<key>boot-args</key>
				<string>agdpmod=pikera shikigva=80 mbasd=1 -wegtree -no_compat_check no32exec=0</string>
				<key>run-efi-updater</key>
				<string>No</string>
			</dict>
		</dict>
		<key>Delete</key>
		<dict>
			<key>4D1EDE05-38C7-4A6A-9CC6-4BCCA8B38C14</key>
			<array>
				<string>UIScale</string>
				<string>DefaultBackgroundColor</string>
			</array>
			<key>7C436110-AB2A-4BBB-A880-FE41995C9F82</key>
			<array>
				<string>boot-args</string>
			</array>
		</dict>
		<key>LegacyEnable</key>
		<false/>
		<key>LegacyOverwrite</key>
		<false/>
		<key>LegacySchema</key>
		<dict/>
		<key>WriteFlash</key>
		<false/>
	</dict>
	<key>PlatformInfo</key>
    <dict>
        <key>Automatic</key>
        <true/>
        <key>Generic</key>
        <dict>
        <key>MLB</key>
        <string>C02706700J9JG36JA</string>
        <key>ROM</key>
        <data>ESIzAAAA</data>
        <key>SpoofVendor</key>
        <true/>
        <key>SystemProductName</key>
        <string>iMacPro1,1</string>
        <key>SystemSerialNumber</key>
        <string>C02T75Y5HX87</string>
        <key>SystemUUID</key>
        <string>EF81678C-50D7-4A13-9D1A-B423E7F7BE5B</string>
        </dict>
        <key>UpdateDataHub</key>
        <true/>
        <key>UpdateNVRAM</key>
        <true/>
        <key>UpdateSMBIOS</key>
        <true/>
        <key>UpdateSMBIOSMode</key>
        <string>Create</string>
    </dict>
	<key>UEFI</key>
	<dict>
		<key>APFS</key>
		<dict>
			<key>EnableJumpstart</key>
			<false/>
			<key>GlobalConnect</key>
			<false/>
			<key>HideVerbose</key>
			<false/>
			<key>JumpstartHotPlug</key>
			<false/>
			<key>MinDate</key>
			<integer>0</integer>
			<key>MinVersion</key>
			<integer>0</integer>
		</dict>
		<key>Audio</key>
		<dict>
			<key>AudioCodec</key>
			<integer>0</integer>
			<key>AudioDevice</key>
			<string></string>
			<key>AudioOut</key>
			<integer>0</integer>
			<key>AudioSupport</key>
			<false/>
			<key>MinimumVolume</key>
			<integer>0</integer>
			<key>PlayChime</key>
			<false/>
			<key>VolumeAmplifier</key>
			<integer>0</integer>
		</dict>
		<key>ConnectDrivers</key>
		<true/>
		<key>Drivers</key>
		<array>
			<string>OpenRuntime.efi</string>
			<string>OpenCanopy.efi</string>
			<string>CrScreenshotDxe.efi</string>
		</array>
		<key>Input</key>
		<dict>
			<key>KeyFiltering</key>
			<false/>
			<key>KeyForgetThreshold</key>
			<integer>0</integer>
			<key>KeyMergeThreshold</key>
			<integer>0</integer>
			<key>KeySupport</key>
			<false/>
			<key>KeySupportMode</key>
			<string></string>
			<key>KeySwap</key>
			<false/>
			<key>PointerSupport</key>
			<false/>
			<key>PointerSupportMode</key>
			<string></string>
			<key>TimerResolution</key>
			<integer>0</integer>
		</dict>
		<key>Output</key>
		<dict>
			<key>ConsoleMode</key>
			<string></string>
			<key>Resolution</key>
			<string>Max</string>
			<key>ClearScreenOnModeSwitch</key>
			<false/>
			<key>IgnoreTextInGraphics</key>
			<false/>
			<key>ProvideConsoleGop</key>
			<true/>
			<key>DirectGopRendering</key>
			<true/>
			<key>ReconnectOnResChange</key>
			<false/>
			<key>ReplaceTabWithSpace</key>
			<false/>
			<key>SanitiseClearScreen</key>
			<false/>
			<key>TextRenderer</key>
			<string>BuiltinGraphics</string>
			<key>UgaPassThrough</key>
			<false/>
		</dict>
		<key>ProtocolOverrides</key>
		<dict>
			<key>AppleAudio</key>
			<false/>
			<key>AppleBootPolicy</key>
			<true/>
			<key>AppleDebugLog</key>
			<false/>
			<key>AppleEvent</key>
			<false/>
			<key>AppleFramebufferInfo</key>
			<false/>
			<key>AppleImageConversion</key>
			<false/>
			<key>AppleKeyMap</key>
			<false/>
			<key>AppleRtcRam</key>
			<false/>
			<key>AppleSmcIo</key>
			<false/>
			<key>AppleUserInterfaceTheme</key>
			<true/>
			<key>DataHub</key>
			<false/>
			<key>DeviceProperties</key>
			<false/>
			<key>FirmwareVolume</key>
			<false/>
			<key>HashServices</key>
			<false/>
			<key>OSInfo</key>
			<false/>
			<key>UnicodeCollation</key>
			<false/>
		</dict>
		<key>Quirks</key>
		<dict>
			<key>DeduplicateBootOrder</key>
			<false/>
			<key>ExitBootServicesDelay</key>
			<integer>0</integer>
			<key>IgnoreInvalidFlexRatio</key>
			<false/>
			<key>ReleaseUsbOwnership</key>
			<false/>
			<key>RequestBootVarRouting</key>
			<true/>
			<key>TscSyncTimeout</key>
			<integer>0</integer>
			<key>UnblockFsConnect</key>
			<false/>
		</dict>
		<key>ReservedMemory</key>
		<array/>
	</dict>
</dict>
</plist>

Take this new document and save it as “config.plist” (check again that it’s plain text and not rich text) and then drop it into the /EFI/OC directory, thus:

This file is a copy of the config file I’ve been playing with and using, and is set up to allow OpenCore to identify itself as an iMac Pro and allow it to get actual Apple updates. Again, this works fine for me, but I make no warranty that it’ll work for you.

Next, it’s time to engage in some command-line trickery pertaining to EFI – the Extensible Firmware Interface. EFI is a partition on a disk that the computer looks at when powering up to get an idea of what hardware is running on the computer, and once it has that information the computer uses that information to boot the operating system. In editing that config.plist file we’re telling the Mac Pro at the very lowest and most fundamental level that it is something that it isn’t, and also supplying some additional bits of code to allow it to function accordingly.

In order to do any of that we have to get at the existing EFI partition so we can tinker around with it, so fire up Terminal and enter the command diskutil list – you’ll end up looking at something like this:

Yes, my Terminal is set up to look like MS-DOS. I’m easily amused.

What you see here is a list of every disk and volume on the computer, but we’re only interested in the EFI volume at disk0s1. In order to get your hands on that, enter this command to mount the volume in the Finder:

sudo diskutil mount /dev/disk0s1

Once that’s mounted, take your new and improved EFI folder that you got from OpenCore and put it into the top level of your disk’s EFI volume, thus:

Finally, cross your fingers and reboot your Mac Pro.

All things being equal you’ll be able to use your computer as per normal (with the exception that if you’re using a non-Apple video card you’ll now have a boot picker that you didn’t have before). I’ve actually tried this file on two Mac Pros – one of them worked perfectly the first time and the other failed to see the startup disk, but I was able to boot into Internet Recovery and choose the existing startup disk, and then reboot into that disk without further incident.

You should also be able to install macOS Catalina or (as of this writing) the latest beta release of macOS Big Sur. As an amusing side benefit, you might also be given a notification thanking you for the purchase of your iMac Pro and offering you a guided tour of the computer that you don’t actually have…

Connecting to WiFi Captive Portals (or: How To Put A Synology In Your Office When You Only Have Stupid, Dumb WiFi).

I don’t think I wrote anything last week, which is something I feel low-grade anxiety about. One of the things I’ve been trying to do as some sort of Psychic-Goat-Sacrifice-To-The-Apocalypse-Gods is to knock out a few words of wisdom now and again so that I can tell anyone who cares that I’m trying to put some positive energy out in the world or somesuch. It’s a lie, of course; I’m just writing things down because I have more free time to bang my head against problems these days, and if I don’t record that stuff then I’ll just forget.

I’m good at forgetting things. Not maybe-I-should-seek-professional-help good, but definitely in pro-am territory. Happily, technology has solutions for people like me, and those solutions tend to be the common-sense, regular solutions that I’ll cheerfully recommend to anybody who’ll pay me to have an opinion; keep your data safe and accessible, and back it up. A lot. Equally handily, there’s a relatively simple thing for doing that – a NAS. Specifically (in this case) a Synology DiskStation 220+, nestled discreetly in a bookshelf:

Brad – I still have your Negroponte book. Sorry.

I love Synology DiskStations. They’re an excellent piece of kit, striking the line between full-featured and accessible, allowing you to do pretty much anything you want with data without making the process utterly incomprehensible. They’re the perfect $300-if-you-have-your-own-drives solution for the enterprising young IT consultant on the go, and while the latter part of that sentence seems unduly optimistic, the three hundred bucks part rather does the heavy lifting, value-wise.

The problem with having one of these in my office is that they don’t support WiFi, and the only internet I have in the office is WiFi, and there’s literally nothing that I can plug anything into to get internet via the customary physical route, i.e., a cable.

So, a problem. What I really needed was to find a way to bridge the wireless connection in the office (via Cox Wifi and their Captive Portal) to the Synology box, and at first blush this seemed pretty simple.

When you first sign a new device onto the Cox Hotsports Captive Portal (which I’m going to call “WiFi portal” from now on to save a lot of typing) it prompts you for your credentials, and once you’ve entered those you’re able to stay logged in to the network for as long as you might possibly want, because what the WiFi portal does is capture your MAC address, checks to see if it’s authorized to use the network, and then if not gives you a prompt for your username and password. If you have a web browser installed on your computer (which you do because otherwise I’d be intrigued to know how the hell you’re reading this) then most of this is done for you. But the Synology DiskStation has no web browser, and even if it had one it has no WiFi hardware that would allow it to connect to the WiFi network in the first place.

Oh dear.

So, I have no ability to use the Synology with WiFi, but I do have a number of large boxes filled with cables and assorted bits of networking gear of assorted vintages. Trawling through those boxes yielded one part of the answer in the form of an Apple Airport Express.

These are little puck-sized wireless boxes that were mostly designed to extend existing Apple Airport networks, but also did decent duty as simple routers that you could use to create wireless networks. One of the great things about them is that the built-in Airport Utility software in macOS gives you the option to Join A Wireless Network, which effectively turns the Airport Express into a little wireless bridge. In English: you select this option, choose a WiFi network to connect to, WiFi goes into the box, and internet comes out via a cable. Perfect. Except that there’s no web browser installed on the Airport Express so you can’t sign it into the WiFi portal, which was the same problem we had when we started.

Except no, it really isn’t. What’s happening when you use your web browser to sign into the WiFi portal is that – as I mentioned before – the first thing that happens in the process is that the portal looks at your MAC address and decides whether or not you’ve connected before. If you can tell the portal that the MAC address its looking at is one that it’s seen before then the portal will simply allow the device that bears that MAC address to connect to the network, no questions asked.

So, let’s start lying to the WiFi portal about who we really are. To do this we’re going to temporarily change the MAC address of your computer so that you can use it to connect to the WiFi portal, and then once that’s done whatever device that actually owns that MAC address will be able to connect. This is done via the command line with the following command: sudo ifconfig en0 ether 00:11:22:33:44:55 (where 00:11:22:33:44:55 equals an actual MAC address and not a lazy placeholder). You’re going to do this more than once, so if you’re like me and enjoy tinkering with your whole Terminal environment then you can add it as an alias to your .zprofile, thus:

alias mac='sudo ifconfig en0 ether'

The first step is to make sure that the Airport Express is able to join the WiFi network. To do that we’ll have to find the MAC address of the Airport Express, which is easy if you have the original box that the thing came with but not so easy if you dug the infernal gadget out of a large, dusty cardboard box of junk and knotted cables that resides in your haunted garage. Happily, there’s an undocumented way of finding the MAC address of an Airport router; simply hold down the Option key on the keyboard while clicking on the icon for the router in the Airport Utility, and instead of the default view (this):

Note the clever Airport-themed name. I’m quite proud.

…you get this:

Mmmm. MAC addresses. Delicious, delicious MAC addresses.

The next step is to take the MAC address of the Wi-Fi interface on the Airport Express and then clone that onto your computer. I chose the 5GHz MAC address, but you may have to do either the 2.4GHz or the 5GHz or both depending on the WiFi portal you’re connecting to. The first thing to do is to connect to the WiFi portal normally, then open up the Terminal and either use the handy alias from earlier on or go ahead and type in sudo ifconfig en0 ether followed by the MAC address of the appropriate wireless interface that you got from the Airport Utility. After a moment you’ll be prompted to sign into the WiFi portal again, and once you’ve done so then that MAC address will then be accepted and useable. Reboot your computer to reset the MAC address to it’s original state. No, I don’t like rebooting either. Yes, you should probably do it.

Once you’re back up and running, turn off WiFi and connect an ethernet cable to the network port on the back of the Airport Express. All things being equal you’ll now be able to connect to the internet. If not then go back a step or two and try the MAC address for the other interface on the Airport Express (2.4GHz or 5Ghz).

Next, you’ll need to go snag the MAC address of your Synology NAS. This is a lot easier; simply open the Control Panel on your DiskStation, click on Info Center, and then the Network tab, thus:

Again, do the same trick: connect your computer to the WiFi portal, fire up Terminal and enter sudo ifconfig en0 ether followed by the MAC address of the DiskStation. Reboot your computer, then shut down the DiskStation, connect it to the network port of your Airport Express, then fire it up again.

This has, I must say, worked flawlessly, but there are caveats. For one thing, there’s no guarantee that you’ll retain the same IP address if there’s, say, a power outage, so if you’re planning on connecting to the Synology remotely then you’d better enable the QuickConnect feature and/or sign the thing into some kind of DDNS (I like dyndns.org, but the Synology supports a lot of options in that space). Finally, I’d encourage the use of Synology Drive to keep data synced between your Synology and your computer, as having the thing safely store and serve important things to your computer is rather the whole point of the exercise, and this makes that considerably easier…

Apple Configurator 2 and VPN Shared Secrets (or “Higher Numbers Are Not Always Better.”)

Apple’s Configurator application (now Apple Configurator 2 because it’s an irrefutable rule that adding more numbers to things makes them intrinsically better) is an essential tool in the enterprising Mac IT persons’ toolbox. Initially it was designed as the way to build profiles that you’d put onto iPads, but it’s increasingly become a sort of multitool that you can use to build configuration profiles on an ad hoc basis, and even to resuscitate dead T2-enabled Macs.

It’s great, except that (as is the way of things) updates not only introduce fixes but occasionally add new and interesting problems. More specifically (and the reason I’m writing all of this nonsense) is that I spent a frustrating hour or two this week trying to work out why in the name of all that’s good and true Apple would see fit to remove the Shared Secret field from the VPN configuration portion of the Configurator. I’d been building config profiles to post on an intranet for a client, so imagine my surprise when instead of seeing a field where I could pop in the Shared Secret I saw… well. Nothing. Nothing at all. And that was a problem.

Do you see a field for the Shared Secret? No. You do not. Neither do I.

So, a problem. But every problem is a solution waiting to be discovered, and happily enough this one is the most enjoyable kind of head-scratcher; the kind that can be solved with a modicum of common sense and only minor trickery. Happier yet, the .config files generated by Apple Configurator are basically just Property List files that can be opened by a text editor and tweaked. It’s just a case of knowing what tweaks to make.

First, figuring out what to add to the .config file. The mysterious removal of the Shared Secret field showed up with the most recent version of Apple Configurator (2.12.1), but prior versions allowed you to set that configuration, so digging out an older .config file and opening it allows you to see what’s different, thus:

One of these is not like the other.

The older .config file (on the right), includes this text:

<key>IPSec</key>
<dict>
<key>AuthenticationMethod</key>
<string>SharedSecret</string>
<key>PromptForVPNPIN</key>
<false/>
<key>OnDemandEnabled</key>
<integer>0</integer>
<key>SharedSecret</key>
<data> encoded-shared-secret </data>
</dict>

So, copying that into the new, non-shared-secreted .config file should theoretically add the shared secret into the configuration. Great! There’s just one more piece of the puzzle – encoding the shared secret itself. There are websites out there that will allow you plug in text and covert it to Base64, but it’s simple enough to do it via the Terminal. Let’s say your shared secret is… well, let’s just call it sharedsecretpassword:

echo -n 'sharedsecretpassword' | base64

Which will translate sharedsecretpassword to c2hhcmVkc2VjcmV0cGFzc3dvcmQ=

Edit the .config file thus:

<key>IPSec</key>
<dict>
<key>AuthenticationMethod</key>
<string>SharedSecret</string>
<key>PromptForVPNPIN</key>
<false/>
<key>OnDemandEnabled</key>
<integer>0</integer>
<key>SharedSecret</key>
<data> c2hhcmVkc2VjcmV0cGFzc3dvcmQ= </data>
</dict>

…hit “Save”, et voila. You’ll now have a functional VPN config file that can be deployed with the shared secret (even though Apple Configurator doesn’t seem to want you to).

Making Nice with .DS_Store

One thing that’s become abundantly apparent during this long, disease-vectored sequester we all seem to be on is that this time represents a wonderful opportunity to get the kind of frank, honest feedback about ourselves that only our nearest and dearest can bestow. And when I mean “bestow” I mean “crush all illusions about how you are perceived by the people who are around you the most.”

Two things that I’m being educated on of late are that I am not as amusing as I think and I am I’m also fussy about things in ways that are frequently incompatible with other people. Not in big, interesting ways (I mean, I’m not a monster), but in small, frustrating ways. I like my coffee very specifically made from one very specific coffee shop that my coffee friends look down on as being The Bad Coffee Shop, and will ruthlessly subvert and hijack plans so that said Bad Coffee Shop ends up being our ultimate destination. Being masked and gloved and PPE’d and socially distanced hasn’t changed that – it’s just made it more apparent and troublesome.

It’s nothing personal. It’s just that I know that the Bad Coffee Shop is secretly the Best Coffee Shop. I’m capable of sustaining the position that my way is really the only correct way, even while cheerfully acknowledging that said position is, in fact, tangibly incorrect. I call it the “Grand Irrefutable Theory of Self Deception™” because it’s my flaw and the very least I should be able to do is name the wretched thing.

Take Finder views, for example. I like them when they look like this:

This is the way you should be.

…because the Column view is clearly superior, and everyone should look at their files that way. It’s so much better! You can zip up and down directory hierarchies quickly and simply! I’m right!

Not everyone feels that way – mostly because of the afore-mentioned “Grand Irrefutable Theory of” etc. Some people (philistines and malcontents in the main) prefer the old fashioned icon view, thus:

Why?

It’s unfortunate that some of us have to work with these poor, misguided folks, but there’s no reason why you should have to put up with their ham-fisted insanity when there’s a better way.

Your Mac knows how you like your files positioned and your preferred view and retains that information in tiny, invisible files that it creates in each directory you access. These files are .DS_Store files, where “DS” stands for “Desktop Services”. They’re difficult to open and inspect, but once you crack one open and took a look it’s clear that they contain information about the window’s position on screen, the window view, icon size, relative position inside the window, the status and visibility of the window bar icons, the sidebar, backgrounds, snap-to-grid, stacks and so on and so forth. Whenever you change view or move something around those changes are update in the .DS_Store file so that next time you open that window it appears exactly the way you left it.

Which is great if it’s your computer, but not so great if it’s a share on a server that is also accessed by nincompoops and dunderheaded ne’er-do-wells who prefer icon view for some insane, incalculable reason, because the moment they open that window they see your (superb, intelligent, morally-superior) layout and not their stupid mess. And then they change it to reflect the way they like to do things and then when you open it again it’s all awful and you have to step away and go lie down in a dark, cool room for a while.

Happily, there’s a way to tell your computer to not make those .DS_Store files, which locks in as default the nonsensical, asinine way that your idiot colleagues and co-workers like to use their stuff – simply fire up the Terminal and enter the following:

defaults write com.apple.desktopservices DSDontWriteNetworkStores true

Once you’ve done that then your colleagues will be able to set up the way they view those files according to whatever the inchoate voices in their heads tell them to, and you won’t have to put up with that. Instead, the next time that you access that folder you’ll be able to set the view appropriately. Like the misunderstood genius that you are. Right? Right.

Staying Cool with kernel_task

Here’s fun. Back in the Halcyon Days of 1982 one Richard McClintock made an interesting discovery – the origins of Lorem Ipsum (you know, the filler text you occasionally find padding out web pages and anywhere requiring placeholder material), thus:

Lorem ipsum dolor sit amet, consectetur adipiscing elit, sed do eiusmod tempor incididunt ut labore et dolore magna aliqua. Ut enim ad minim veniam, quis nostrud exercitation ullamco laboris nisi ut aliquip ex ea commodo consequat. Duis aute irure dolor in reprehenderit in voluptate velit esse cillum dolore eu fugiat nulla pariatur. Excepteur sint occaecat cupidatat non proident, sunt in culpa qui officia deserunt mollit anim id est laborum.

Mr McClintock – in a letter to Before & After magazine in 1994 – pointed out that the full passage was originally an excerpt from Cicero’s ethical treatise “The Extremes of Good And Evil” which was the number one hot bestseller of 45 B.C (probably). At some point in the sixteenth century – so the theory goes – an annoyed typesetter threw Cicero’s text into his press along with some filler, nonsense words in order to pad out enough text to mockup different types and fonts for a book, and then due to tradition and institutional laziness it stuck around for the next five hundred years and is still popping up today whenever You Just Need To Put Something There.

The thing is that it turns out there’s enormous value in having something on tap that you can use as a quick, reliable placeholder. It makes your life easier, you don’t have to constantly reinvent the wheel and go find new material to put into place, and it’s widely recognized for what it is; not actual content, but something to fill empty space until actual content can be substituted and you can go back to work.

But this isn’t my typeset blog; this is my macOS IT blog. And I’m not here to talk about placeholder text; I’m here to talk about placeholder processes. Hmm? What’s that? Well, I’m glad you asked. Meet kernel_task – the Lorem Ipsum of the macOS world.

When your Mac is running something particularly demanding then the chances are that whatever the “something” is will be using a lot of the CPU. You can see this in the Activity Monitor.app – sorting by % CPU will show you which apps or services are using the most system resources. The more CPU a process or program uses the more power it consumes, and the more heat it generates. And that’s fine; well-engineered computers and devices are built with heat tolerance and dissipation in mind (well, most are. I had a colleague who blew through three – yes, three – cheap PC laptops that all melted while my slightly more expensive PowerBook kept on ticking in support of the Sam Vimes Theory of Boots). Still, there are times and circumstances where it pays to have a way to throttle the activity of your computer to allow it to cool down – and this is that kernel_task does.

Simply put, it’s a process that the computer fires up whenever it decides that it’s running too hot, specifically to block other processes and applications from using the processor. Google Chrome wants to use a hundred percent of your CPU? Sorry; it’ll have to wait. kernel_task is using that right now, except all it’s doing is twiddling its thumbs, waiting for the computer to cool down while the fans run. Once things are back to an acceptable operating temperature then kernel_task frees up more and more resources until finally it all but disappears…