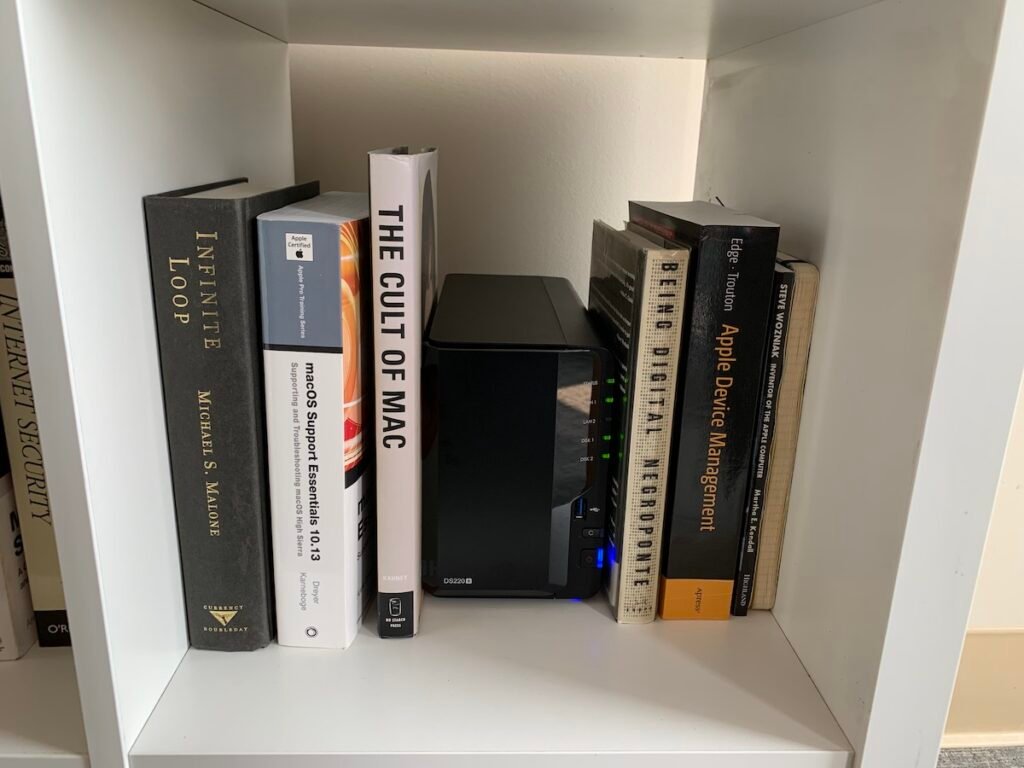
This, ladies and gentlemen, is what Apple thinks is an iMac Pro:

Now, for those of you who don’t pay a lot of attention to Apple’s product line (and who probably have better things to do) it should be made clear at this point that this is not, in fact, an iMac Pro. Or any kind of iMac for that matter. iMacs have the computer and screen built into one slim, stylish, power unit, whereas this is a massive, forty-pound hunk of scratched and scarred Aluminum hewn into something resembling a giant cheese grater, and then covered in faux-wood because its owner had a bunch of faux-wood wrap kicking around and was sick of looking at a lot of scratches. More precisely, this is a 2009 Mac Pro, and even more precisely, it is my 2009 Mac Pro.
I love this machine because it is, not to put too fine a point on it, completely bonkers. While there’s every reason for it to exist, there is no reason whatsoever to be using an eleven year-old computer in a world where the massive leaps in processor and design technology make this akin to an abacus. A computer from 2009 is slow, has terrible graphical abilities, and lacks the modern conveniences that we take for granted in terms of interfaces and technologies. Using one is to obey the same impulse for anachronism that makes young men grow ironic beards, smoke pipes, and ride penny-farthings.
Except, actually, this is none of these things. Because while old computers are slow, a lot of them are also expandable, and a lot of those expandable bits are not slow and terrible, but are fast and decent. I bought this thing for about two hundred dollars and augmented it with bits of dead computers and assorted projects I’ve accumulated over the years, and now it’s chock full of fast storage, has oodles of memory, and two six-core Xeons. That’s twelve Xeon cores. Twenty-four threads! I feel that I’m not sufficiently making this accessible to people who don’t know or care about Xeons or cores, but think of it this way; imagine if you woke up one morning, had got dressed, had breakfast, bid farewell to your nearest and dearest, got in your car to go to work, turned the key in the ignition and instead of hearing the modest, pedestrian burble of an inline six you were presented with the sound of a Furious Titan Roaring A Battle Cry Unto The Gods And Breaking His Fists Against The Firmament?
Yeah, so, it’s basically that.
So, this thing isn’t slow and awful and ugly and stupid. Okay, yes, it’s ugly, but none of the rest is true. The video card in it is equivalent to the one that comes in the new Mac Pro. It has a lot of slots to put cards and upgrades in, has the wireless bits from a newer, dead MacBook Pro so that it can do all the wireless things that modern computers can do, and you can even plug your fancy USB-C peripherals into an expansion card in the back.
What you can’t do is use it with macOS Catalina or macOS Big Sur.
Now, I kind of get that; if you’re Apple then there are some very solid reasons not to support a machine of this vintage. While those Xeons are mighty they’re prone to some security flaws that make this machine a bad fit for some very specific niches and industries, and Apple’s not in the habit of issuing software updates that are going to open up customer data to any kind of intrusion. Still, a lot of people (like me) aren’t going to be using their computers in any kind of situation that might make that threat remotely likely, and would really like to continue using their big, ugly computers.
Happily, this is technically possible with only a modicum of headache because those Xeons I keep rattling on about are also the types of processors that run in Apple’s current iMac Pro and Mac Pro computers. Admittedly the processors in my stylish, mock-oak Mac Pro are somewhat slower and older in vintage, but they’re basically the same creature, so technically they should work, Right?
Right. And, it turns out, the process is fiddly but not as horrible as you might expect.
(Note: If you have a Mac Pro 5,1 (or a 4,1 upgraded to 5,1) then the following will probably work for you as written. If you have neither of these machines but your computer is of an older vintage and you want to try and run a newer operating system than you technically should, then you can read along and take in the general points and input, but I’m in no way guaranteeing that any of this will work. Also, back up before trying any of this, and if you’re even remotely concerned about this just back away now. This is the kind of thing that would violate your warranty if there was the remotest possibility that anyone of sound mind would warranty an eleven year old computer, but still, beware. Your Mileage May Vary. Caveat Emptor. Cave Canem. Don’t Walk On The Grass.)
First, some provisional considerations. You’ll need a metal-capable graphics card and to upgrade your Mac Pro to macOS Mojave in order to upgrade the BootROM to 144.0.0.0.0 (which will also allow you to use NVME drives) and once that’s done boot into Internet Recovery and disable SIP by typing csrutil disable in the Terminal.
Secondly, you should look at this thread on macrumors.com. It’s enormous and where I got a lot of this information from, but be warned; there’s a lot to trawl through there – which is why I’ve put this more concise walkthrough together.
Next, you’ll need to download the latest version of OpenCore from this GitHub repository. Once downloaded, open the OpenCore folder, where you’ll see something like this:

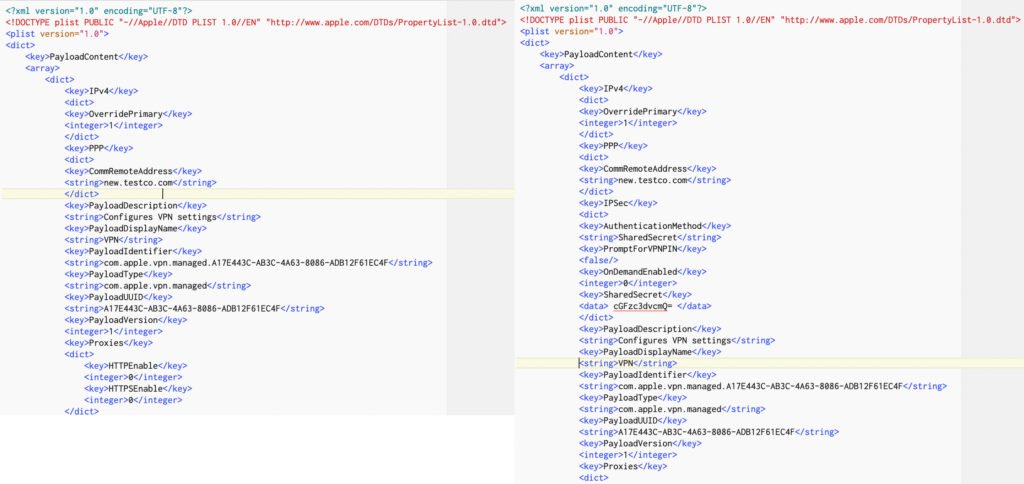
Next, copy this and paste it into a new non-rich text document. Warning: this is very long:
<?xml version="1.0" encoding="UTF-8"?>
<!DOCTYPE plist PUBLIC "-//Apple//DTD PLIST 1.0//EN" "http://www.apple.com/DTDs/PropertyList-1.0.dtd">
<plist version="1.0">
<dict>
<key>ACPI</key>
<dict>
<key>Add</key>
<array>
<dict>
<key>Comment</key>
<string>TBOLT3</string>
<key>Enabled</key>
<false/>
<key>Path</key>
<string>SSDT-TBOLT3.aml</string>
</dict>
</array>
<key>Delete</key>
<array/>
<key>Patch</key>
<array/>
<key>Quirks</key>
<dict>
<key>FadtEnableReset</key>
<false/>
<key>NormalizeHeaders</key>
<false/>
<key>RebaseRegions</key>
<false/>
<key>ResetHwSig</key>
<false/>
<key>ResetLogoStatus</key>
<false/>
</dict>
</dict>
<key>Booter</key>
<dict>
<key>MmioWhitelist</key>
<array/>
<key>Quirks</key>
<dict>
<key>AvoidRuntimeDefrag</key>
<false/>
<key>DevirtualiseMmio</key>
<false/>
<key>DisableSingleUser</key>
<false/>
<key>DisableVariableWrite</key>
<false/>
<key>DiscardHibernateMap</key>
<false/>
<key>EnableSafeModeSlide</key>
<false/>
<key>EnableWriteUnprotector</key>
<false/>
<key>ForceExitBootServices</key>
<false/>
<key>ProtectMemoryRegions</key>
<false/>
<key>ProtectSecureBoot</key>
<true/>
<key>ProtectUefiServices</key>
<false/>
<key>ProvideCustomSlide</key>
<false/>
<key>ProvideMaxSlide</key>
<integer>0</integer>
<key>RebuildAppleMemoryMap</key>
<false/>
<key>SetupVirtualMap</key>
<false/>
<key>SignalAppleOS</key>
<false/>
<key>SyncRuntimePermissions</key>
<false/>
</dict>
</dict>
<key>DeviceProperties</key>
<dict>
<key>Add</key>
<dict/>
<key>Delete</key>
<dict/>
</dict>
<key>Kernel</key>
<dict>
<key>Add</key>
<array>
<dict>
<key>BundlePath</key>
<string>Lilu.kext</string>
<key>Comment</key>
<string></string>
<key>Enabled</key>
<true/>
<key>ExecutablePath</key>
<string>Contents/MacOS/Lilu</string>
<key>MaxKernel</key>
<string></string>
<key>MinKernel</key>
<string>16.0.0</string>
<key>PlistPath</key>
<string>Contents/Info.plist</string>
</dict>
<dict>
<key>BundlePath</key>
<string>WhateverGreen.kext</string>
<key>Comment</key>
<string>Video card</string>
<key>Enabled</key>
<true/>
<key>ExecutablePath</key>
<string>Contents/MacOS/WhateverGreen</string>
<key>MaxKernel</key>
<string></string>
<key>MinKernel</key>
<string>16.0.0</string>
<key>PlistPath</key>
<string>Contents/Info.plist</string>
</dict>
<dict>
<key>BundlePath</key>
<string>AppleMCEReporterDisabler.kext</string>
<key>Comment</key>
<string>DisableAppleIntelMCEReporter</string>
<key>Enabled</key>
<true/>
<key>ExecutablePath</key>
<string></string>
<key>MaxKernel</key>
<string></string>
<key>MinKernel</key>
<string>19.0.0</string>
<key>PlistPath</key>
<string>Contents/Info.plist</string>
</dict>
</array>
<key>Block</key>
<array/>
<key>Emulate</key>
<dict>
<key>Cpuid1Data</key>
<data>AAAAAAAAAAAAAACAAAAAAA==</data>
<key>Cpuid1Mask</key>
<data>AAAAAAAAAAAAAACAAAAAAA==</data>
</dict>
<key>Patch</key>
<array>
<dict>
<key>Base</key>
<string></string>
<key>Comment</key>
<string>IONVMeFamily Patch#External</string>
<key>Count</key>
<integer>0</integer>
<key>Enabled</key>
<true/>
<key>Find</key>
<data>RXh0ZXJuYWw=</data>
<key>Identifier</key>
<string>com.apple.iokit.IONVMeFamily</string>
<key>Limit</key>
<integer>0</integer>
<key>Mask</key>
<data></data>
<key>MaxKernel</key>
<string></string>
<key>MinKernel</key>
<string>17.0.0</string>
<key>Replace</key>
<data>SW50ZXJuYWw=</data>
<key>ReplaceMask</key>
<data></data>
<key>Skip</key>
<integer>0</integer>
</dict>
</array>
<key>Quirks</key>
<dict>
<key>AppleCpuPmCfgLock</key>
<false/>
<key>AppleXcpmCfgLock</key>
<false/>
<key>AppleXcpmExtraMsrs</key>
<false/>
<key>AppleXcpmForceBoost</key>
<false/>
<key>CustomSMBIOSGuid</key>
<false/>
<key>DisableIoMapper</key>
<false/>
<key>DisableRtcChecksum</key>
<false/>
<key>DummyPowerManagement</key>
<false/>
<key>ExternalDiskIcons</key>
<true/>
<key>IncreasePciBarSize</key>
<false/>
<key>LapicKernelPanic</key>
<false/>
<key>PanicNoKextDump</key>
<false/>
<key>PowerTimeoutKernelPanic</key>
<false/>
<key>ThirdPartyDrives</key>
<true/>
<key>XhciPortLimit</key>
<false/>
</dict>
</dict>
<key>Misc</key>
<dict>
<key>BlessOverride</key>
<array/>
<key>Boot</key>
<dict>
<key>HibernateMode</key>
<string>None</string>
<key>HideAuxiliary</key>
<false/>
<key>ConsoleAttributes</key>
<integer>0</integer>
<key>PickerAttributes</key>
<integer>0</integer>
<key>PickerAudioAssist</key>
<false/>
<key>PickerMode</key>
<string>External</string>
<key>PollAppleHotKeys</key>
<false/>
<key>ShowPicker</key>
<true/>
<key>TakeoffDelay</key>
<integer>0</integer>
<key>Timeout</key>
<integer>10</integer>
</dict>
<key>Debug</key>
<dict>
<key>AppleDebug</key>
<false/>
<key>ApplePanic</key>
<false/>
<key>DisableWatchDog</key>
<false/>
<key>DisplayDelay</key>
<integer>0</integer>
<key>DisplayLevel</key>
<integer>2151678018</integer>
<key>SerialInit</key>
<false/>
<key>Target</key>
<integer>0</integer>
</dict>
<key>Entries</key>
<array/>
<key>Security</key>
<dict>
<key>AllowNvramReset</key>
<false/>
<key>AllowSetDefault</key>
<true/>
<key>AuthRestart</key>
<false/>
<key>BootProtect</key>
<string>None</string>
<key>ExposeSensitiveData</key>
<integer>15</integer>
<key>HaltLevel</key>
<integer>2147483648</integer>
<key>ScanPolicy</key>
<integer>0</integer>
<key>Vault</key>
<string>Optional</string>
</dict>
<key>Tools</key>
<array/>
</dict>
<key>NVRAM</key>
<dict>
<key>Add</key>
<dict>
<key>4D1EDE05-38C7-4A6A-9CC6-4BCCA8B38C14</key>
<dict>
<key>UIScale</key>
<data>AQ==</data>
<key>DefaultBackgroundColor</key>
<data>AAAAAA==</data>
</dict>
<key>7C436110-AB2A-4BBB-A880-FE41995C9F82</key>
<dict>
<key>boot-args</key>
<string>agdpmod=pikera shikigva=80 mbasd=1 -wegtree -no_compat_check no32exec=0</string>
<key>run-efi-updater</key>
<string>No</string>
</dict>
</dict>
<key>Delete</key>
<dict>
<key>4D1EDE05-38C7-4A6A-9CC6-4BCCA8B38C14</key>
<array>
<string>UIScale</string>
<string>DefaultBackgroundColor</string>
</array>
<key>7C436110-AB2A-4BBB-A880-FE41995C9F82</key>
<array>
<string>boot-args</string>
</array>
</dict>
<key>LegacyEnable</key>
<false/>
<key>LegacyOverwrite</key>
<false/>
<key>LegacySchema</key>
<dict/>
<key>WriteFlash</key>
<false/>
</dict>
<key>PlatformInfo</key>
<dict>
<key>Automatic</key>
<true/>
<key>Generic</key>
<dict>
<key>MLB</key>
<string>C02706700J9JG36JA</string>
<key>ROM</key>
<data>ESIzAAAA</data>
<key>SpoofVendor</key>
<true/>
<key>SystemProductName</key>
<string>iMacPro1,1</string>
<key>SystemSerialNumber</key>
<string>C02T75Y5HX87</string>
<key>SystemUUID</key>
<string>EF81678C-50D7-4A13-9D1A-B423E7F7BE5B</string>
</dict>
<key>UpdateDataHub</key>
<true/>
<key>UpdateNVRAM</key>
<true/>
<key>UpdateSMBIOS</key>
<true/>
<key>UpdateSMBIOSMode</key>
<string>Create</string>
</dict>
<key>UEFI</key>
<dict>
<key>APFS</key>
<dict>
<key>EnableJumpstart</key>
<false/>
<key>GlobalConnect</key>
<false/>
<key>HideVerbose</key>
<false/>
<key>JumpstartHotPlug</key>
<false/>
<key>MinDate</key>
<integer>0</integer>
<key>MinVersion</key>
<integer>0</integer>
</dict>
<key>Audio</key>
<dict>
<key>AudioCodec</key>
<integer>0</integer>
<key>AudioDevice</key>
<string></string>
<key>AudioOut</key>
<integer>0</integer>
<key>AudioSupport</key>
<false/>
<key>MinimumVolume</key>
<integer>0</integer>
<key>PlayChime</key>
<false/>
<key>VolumeAmplifier</key>
<integer>0</integer>
</dict>
<key>ConnectDrivers</key>
<true/>
<key>Drivers</key>
<array>
<string>OpenRuntime.efi</string>
<string>OpenCanopy.efi</string>
<string>CrScreenshotDxe.efi</string>
</array>
<key>Input</key>
<dict>
<key>KeyFiltering</key>
<false/>
<key>KeyForgetThreshold</key>
<integer>0</integer>
<key>KeyMergeThreshold</key>
<integer>0</integer>
<key>KeySupport</key>
<false/>
<key>KeySupportMode</key>
<string></string>
<key>KeySwap</key>
<false/>
<key>PointerSupport</key>
<false/>
<key>PointerSupportMode</key>
<string></string>
<key>TimerResolution</key>
<integer>0</integer>
</dict>
<key>Output</key>
<dict>
<key>ConsoleMode</key>
<string></string>
<key>Resolution</key>
<string>Max</string>
<key>ClearScreenOnModeSwitch</key>
<false/>
<key>IgnoreTextInGraphics</key>
<false/>
<key>ProvideConsoleGop</key>
<true/>
<key>DirectGopRendering</key>
<true/>
<key>ReconnectOnResChange</key>
<false/>
<key>ReplaceTabWithSpace</key>
<false/>
<key>SanitiseClearScreen</key>
<false/>
<key>TextRenderer</key>
<string>BuiltinGraphics</string>
<key>UgaPassThrough</key>
<false/>
</dict>
<key>ProtocolOverrides</key>
<dict>
<key>AppleAudio</key>
<false/>
<key>AppleBootPolicy</key>
<true/>
<key>AppleDebugLog</key>
<false/>
<key>AppleEvent</key>
<false/>
<key>AppleFramebufferInfo</key>
<false/>
<key>AppleImageConversion</key>
<false/>
<key>AppleKeyMap</key>
<false/>
<key>AppleRtcRam</key>
<false/>
<key>AppleSmcIo</key>
<false/>
<key>AppleUserInterfaceTheme</key>
<true/>
<key>DataHub</key>
<false/>
<key>DeviceProperties</key>
<false/>
<key>FirmwareVolume</key>
<false/>
<key>HashServices</key>
<false/>
<key>OSInfo</key>
<false/>
<key>UnicodeCollation</key>
<false/>
</dict>
<key>Quirks</key>
<dict>
<key>DeduplicateBootOrder</key>
<false/>
<key>ExitBootServicesDelay</key>
<integer>0</integer>
<key>IgnoreInvalidFlexRatio</key>
<false/>
<key>ReleaseUsbOwnership</key>
<false/>
<key>RequestBootVarRouting</key>
<true/>
<key>TscSyncTimeout</key>
<integer>0</integer>
<key>UnblockFsConnect</key>
<false/>
</dict>
<key>ReservedMemory</key>
<array/>
</dict>
</dict>
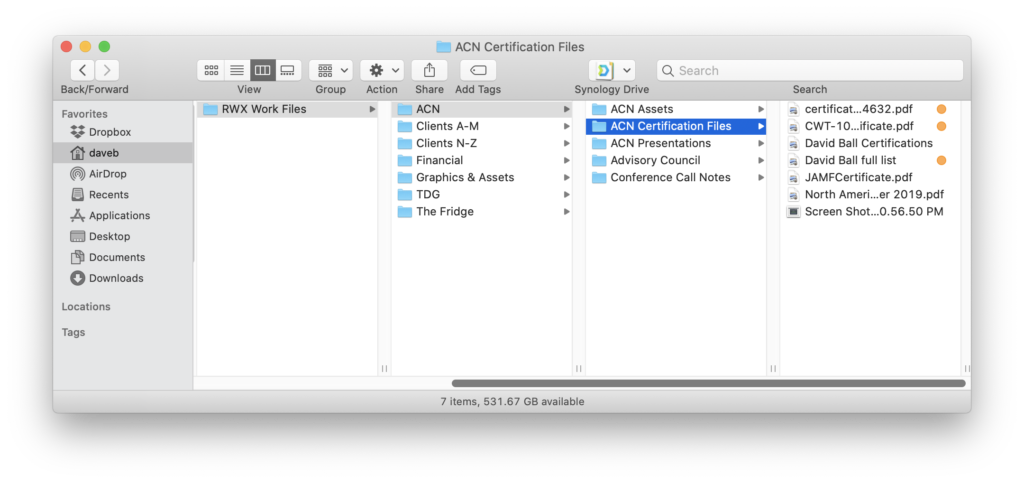
</plist>Take this new document and save it as “config.plist” (check again that it’s plain text and not rich text) and then drop it into the /EFI/OC directory, thus:

This file is a copy of the config file I’ve been playing with and using, and is set up to allow OpenCore to identify itself as an iMac Pro and allow it to get actual Apple updates. Again, this works fine for me, but I make no warranty that it’ll work for you.
Next, it’s time to engage in some command-line trickery pertaining to EFI – the Extensible Firmware Interface. EFI is a partition on a disk that the computer looks at when powering up to get an idea of what hardware is running on the computer, and once it has that information the computer uses that information to boot the operating system. In editing that config.plist file we’re telling the Mac Pro at the very lowest and most fundamental level that it is something that it isn’t, and also supplying some additional bits of code to allow it to function accordingly.
In order to do any of that we have to get at the existing EFI partition so we can tinker around with it, so fire up Terminal and enter the command diskutil list – you’ll end up looking at something like this:

What you see here is a list of every disk and volume on the computer, but we’re only interested in the EFI volume at disk0s1. In order to get your hands on that, enter this command to mount the volume in the Finder:
sudo diskutil mount /dev/disk0s1
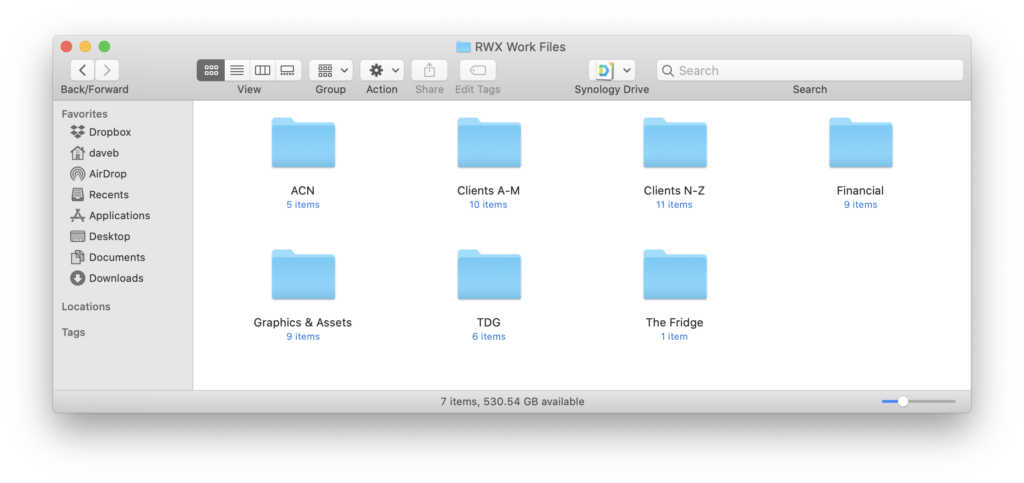
Once that’s mounted, take your new and improved EFI folder that you got from OpenCore and put it into the top level of your disk’s EFI volume, thus:

Finally, cross your fingers and reboot your Mac Pro.
All things being equal you’ll be able to use your computer as per normal (with the exception that if you’re using a non-Apple video card you’ll now have a boot picker that you didn’t have before). I’ve actually tried this file on two Mac Pros – one of them worked perfectly the first time and the other failed to see the startup disk, but I was able to boot into Internet Recovery and choose the existing startup disk, and then reboot into that disk without further incident.
You should also be able to install macOS Catalina or (as of this writing) the latest beta release of macOS Big Sur. As an amusing side benefit, you might also be given a notification thanking you for the purchase of your iMac Pro and offering you a guided tour of the computer that you don’t actually have…